Brought to you by 1AAuto.com, your source for quality replacement parts and the best service on the Internet.
Hi, I'm Mike from 1A Auto. I hope this how-to video helps you out, and next time you need parts for your vehicle, think of 1AAuto.com. Thanks.
In this video, we're going to show you how to replace the EGR valve in this Dodge Ram. This one's a 2008, but the procedure's pretty much the same for 2006-2008. You'll need a new EGR valve from 1AAuto.com, a flat blade screwdriver, 8 to 10mm sockets with a ratchet and extension, and some penetrating oil.
While it may not be necessary to remove the upper intake components on your motor in order to do this install, it only takes a moment to remove these parts. Gives you a lot more room to work and see what you're doing.
Open the air box by releasing the metal clips on the side and the rear. Pop it out of its holders, release this hose from the front and using a flat blade screwdriver, loosen the clamp on the rear of the inlet pipe. With that loosened up, work the pipe off of the box, and remove this assembly. The bottom half of your air box simply lifts off its retainers and comes right out of the truck. Remove the two ten millimeter bolts, one behind the alternator and one behind the oil cap, with a ten millimeter socket, ratchet, and extension. Lift up on the air box so you can access the intake air temp sensor at the front. Push down on the connector, and remove it from the IAT. Remove the air box from the vehicle.
The EGR valve is located on the front of the cylinder head on the passenger side just below the alternator. Pull out the red safety tab on the connector, push down on the connector tab, and disconnect it from the EGR valve. Tuck it off to the side while you're working.
Using an 8mm socket and ratchet, remove the two bolts connecting the EGR tube to the EGR valve. You may want to use penetrating oil on the bolts that connect the EGR tube to the valve because they are very prone to breaking. Remove the EGR tube from the valve and allow it to rest off to the side.
Remove the two 10mm bolts on the front of the EGR valve. Remove the EGR valve from the front of the motor.
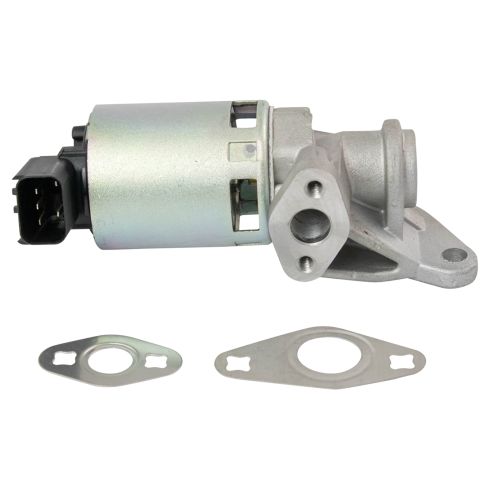
Here we have our old EGR valve we removed from the truck and our new EGR valve from 1AAuto. As you can see, we have the same 5 pin connector up top and the same valve chamber here. We have a new flange, and it’s got the same mounting holes and the same size inlet to our cylinder head.
Our EGR valve even comes with a new valve-to-head gasket, as well as a new valve-to-tube gasket. We're going to pre-assemble this part of the EGR valve before reinstalling it onto the motor. Going to lay the EGR gasket onto the valve and thread the bolts in. Just a few threads there to hold our gasket in place and help us line everything up without worrying about holding everything together.
Reinstall the EGR valve. As you can see, the fact that we pre-threaded the bolts into the gasket keeps everything lined up nicely and makes it a lot easier to see what we're doing while we line it all up here. Using a 10mm socket and ratchet, tighten the bolts down. Torque the bolts to 20 foot-pounds.
Reinstall the bolts into the EGR valve, tighten the bolts down with an 8mm socket and ratchet. Torque the bolts on the EGR tube to 20 foot-pounds. Reinstall the electrical connector. Snap the red safety tab back into place.
Reinstall the end of the air box with the silicone gasket over the end of your throttle body. Tighten up the bolt behind the oil fill cap and behind the alternator with the ten millimeter socket and ratchet and an extension. Reconnect the intake air temp sensor. Drop the lower air filter housing back onto its mounting locations. Be sure the air filter is fully seated into the housing. Reinstall the intake tube onto the air box and the PCV breather hose. Lock the lid of the air box back onto its hinge. Close it. Lock it back down. Tighten the intake tube clamp with a flat blade screwdriver.
Thanks for tuning in. We hope this video helped you out. Next time you need parts for your car, please visit 1AAuto.com. Also check out our other helpful how-to and diagnosis videos.