Replaces
This part doesn’t fit a . Select from parts that fit.
Frequently bought together
Part Details
Product Features
Item Condition:
New
Attention California Customers:
 WARNING: This product can expose you to chemicals including Lead and Lead Compounds, which are known to the State of California to cause cancer, and birth defects or other reproductive harm. For more information, go to www.P65Warnings.ca.gov.
Lifetime Warranty
This item is backed by our limited lifetime warranty. In the event that this item should fail due to manufacturing defects during intended use, we will replace the part free of charge. This warranty covers the cost of the part only.
Returns: Parts with electrical components cannot be returned once installed.
FREE Shipping is standard on Orders shipped to the lower 48 States (Contiguous United States). Standard shipping charges apply to Hawaii, Alaska and US Territories. Shipping is not available to Canada.
Expedited is available on checkout to the United States, excluding Alaska, Hawaii and US Territories as well as P.O. Boxes and APO/FPO/DPO addresses. Final shipping costs are available at checkout.
Created on:
Tools used
Hi, I'm Mike from 1A Auto. We've been selling auto parts for over 30 years. We're dedicated to delivering quality auto parts, expert customer service, fast and free shipping, all backed by our 100% satisfaction guarantee. Visit us at 1AAuto.com, your trusted source for quality auto parts.
In this video we're going to be working with our 2006 Chrysler 300 3.5 liter V6. We're going to show you how to remove and replace the engine's ignition coil cylinders two and four, here at the driver's side front of the engine, do not need the intake manifold removed in order to replace them. However, the remaining four cylinders will need to and we'll show you how to do that. If you like this video please click subscribe. We have a ton more information on this car as well as many other makes and models and if you need this part for your vehicle, you can follow the link down in the description over to 1AAuto.com. Here are the items you'll need for this repair.
Open the hood latch on your vehicle. Open it fully. The cylinder two and four ignition coils and spark plugs can be done without removing your intake manifold. To do this, we'll disconnect the connector on either one. We'll remove the 10 millimeter bolt at the top with a socket and ratchet. Remove the bolt. You may have to wiggle and pull up a little bit to remove your ignition coil.
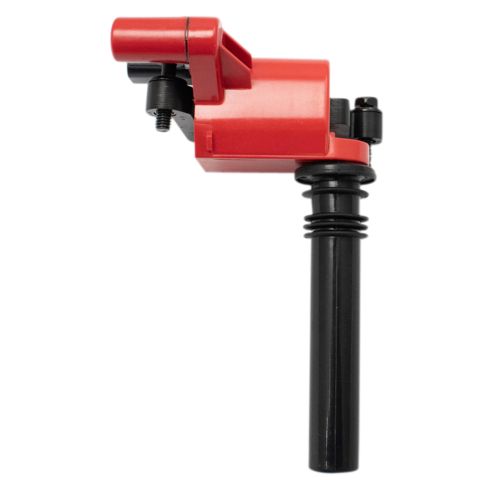
Here we have our old ignition coil that we removed from our vehicle and our new part from 1AAuto.com. As you can see, these parts are exactly the same. We have the same length, same boot, the same actual coil on the top with the same single bolt mounting location size and shape, and the same three-pin connector on the back. Now what your ignition coil does, is it has a power and ground going to it from the battery and it has a switched power which is what tells it when to fire, which is what sets your spark plugs off. This is all controlled electronically via the computer n the same way that the rotation of a distributor used to be what determines your firing order on older vehicles. A bad ignition coil can cause the vehicle to not have enough spark or maybe no spark at all which can cause a rich misfire which will harm emissions and potentially the engine as well as creating a check engine light either solid for a lesser misfire or a more serious one will cause the check engine light to flash at which point you should shut the vehicle down immediately. If you need a new ignition coil, this part from 1A Auto it's going to go in direct fit just like your original equipment and fix you up right.
Reinstall your ignition coil. Reconnect the electrical connector. Go ahead and put your 10-millimeter bolt back in and tighten it down with a socket and ratchet. Now this is just securing it in there. I'm just going to get it down as tight as I can by hand here spinning the extension and we'll give it just turn from the top of the ratchet with the wrist just to secure it into place.
To remove your intake manifold we'll loosen the clamp at the throttle body with a flat blade screwdriver. You may want to disconnect this sensor. Looks like ours has been glued on because the clip is broken. You can also simply pop it out of the boot. Disconnect these two hoses from the back of the intake located just behind the throttle body. These just pop off by hand. There's one more at the back of the manifold.
Pull back on the red safety tab, push down and disconnect the sensor from the top of the intake, as well as the two electrical connectors at the front. Disconnect the connector from the throttle body. Again, we have one of those little red safety tabs we have to push down. Then we'll push down the tab and remove the connector.
We'll remove the two 10 millimeter nuts from the throttle body, the seven 10 millimeter bolts from the center of the intake manifold here, as well as the two 10 millimeter nuts over on the passenger side of the intake manifold. We'll do this using a 10 millimeter socket and ratchet where we can and a 10 millimeter wrench where it's a little too tight. Remove the two 15 millimeter bolts at the bottom of the throttle body bracket.
We're doing this with a 15 millimeter socket and ratchet. Remove the bracket from the throttle body. There's a 15 millimeter bolt at the bottom of the bracket on the passenger side of the intake manifold, both front and rear. We'll loosen those up with a 15 millimeter wrench until we can slide them off of the studs. Once you've loosened the brackets go ahead and slide them off the studs. Now we'll lift up on the intake manifold, slide it forward to release it from the EGR tube at the back. Once you're off that tube, lift up being careful for that transmission dipstick and remove the manifold from the vehicle.
While the top of the intake manifold is exposed we're going to wad some paper towels in there, just to keep any dirt and debris from getting in there while we're working.
With the upper intake manifold off we can now access the rest of our ignition coils to replace them.
Reinstall all six of your coil packs. Tighten them down with a 10-millimeter socket and ratchet.
Remove the paper towels from the intake. Clean down this mating surface with some solvent and paper towels or a clean rag. Once again I'm using a brake cleaner here, but there's a variety of solvents you can use to get all that old debris and oil off.
Install your PCV breather tube on the back of the valve cover. You've got a nice little marking on it that says PCV with an arrow so you know which end goes where, and the other end should fall just about over here, where the back of the intake will be.
Remove the old gasket from your intake manifold using a small straight pick here, just to get in there and start popping it out. You should be able to remove the rest by hand. Start your new gasket. Line up. Press that in. Our old EGR seal is damaged so remove that. Install our new one. Make sure it sits all the way back past its edge.
Reinstall your intake manifold, being sure to set the opening for the automatic transmission dipstick into its proper place on the manifold. We'll also want to be careful for the bolts. We'll have to line up our EGR tube as well. Just be mindful of all of these things while we set it into place. Once the EGR tube is set and the intake is laid down onto the lower manifold, clip your automatic transmission dipstick back into place and start all of the 10 millimeter bolts by hand, just a couple of threads, to make sure they're all lined up before we tighten them down.
Tighten up the seven 10 millimeter bolts at the center of the intake. We're not going to tighten these down all the way yet. You just want them a little bit and then we'll have to torque them. Torque these bolts to nine foot-pounds. The manufacturer specification is 150 inch-pounds. However, it's a lot easier to do with this wrench and that number rounds up to about nine foot-pounds. We want to start these in the center and work our way out in a cross pattern.
Reconnect the map sensor. Push the safety into place. Reconnect the two intake tuner valve control. Reinstall the support brackets at the front and rear on the passenger side of the intake. We'll start those 10 millimeters on, just a couple of threads to keep it in place. Using a 15 millimeter socket and ratchet to tighten up those two bolts all the way at the bottom of those support brackets. Once the bottom of the support brackets are tighten down you can use the 10 millimeter socket and ratchet to finish tightening up the top two bolts.
Reconnect the PCV hose and this fitting closest to the EGR tube. We have a small hose here, and a large hose next to that. Reconnect the electrical connector onto the throttle body. Lock the safety tab back into place. You can now set the support bracket back over the throttle body bolts. Make sure it doesn't get caught up in any of the wiring down below. We'll spin our two 10 millimeter nuts on at the top by hand, just to keep that in place. Reinstall the two 15 millimeter bolts at the bottom of the bracket by hand. Tighten up the two 15 millimeter bolts at the bottom of the bracket with your socket and ratchet. Tighten up the two 10 millimeter nuts at the top.
Install the other end of the intake boot onto the throttle body. Tighten it up with your flat blade screwdriver. Reinstall the coolant tank line bracket on the side of the intake tube. Reinstall the map sensor into the intake tube. Earlier when we removed our intake, we wanted to wait until we had the intake tube reinstalled to make sure this all lined up properly. Now that we've got it where it needs to be we'll go ahead and tighten that down.
Thanks for watching. Visit us at 1AAuto.com for quality auto parts, fast and free shipping, and the best customer service in the industry.
Tools used
Hi, I'm Mike from 1A Auto. We've been selling auto parts for over 30 years. We're dedicated to delivering quality auto parts, expert customer service, fast and free shipping, all backed by our 100% satisfaction guarantee. Visit us at 1AAuto.com, your trusted source for quality auto parts.
In this video we're going to be working with our 2006 Chrysler 300 3.5 liter V6. We're going to show you how to remove and replace the engine's ignition coil cylinders two and four, here at the driver's side front of the engine, do not need the intake manifold removed in order to replace them. However, the remaining four cylinders will need to and we'll show you how to do that. If you like this video please click subscribe. We have a ton more information on this car as well as many other makes and models and if you need this part for your vehicle, you can follow the link down in the description over to 1AAuto.com. Here are the items you'll need for this repair.
Open the hood latch on your vehicle. Open it fully. The cylinder two and four ignition coils and spark plugs can be done without removing your intake manifold. To do this, we'll disconnect the connector on either one. We'll remove the 10 millimeter bolt at the top with a socket and ratchet. Remove the bolt. You may have to wiggle and pull up a little bit to remove your ignition coil.
Here we have our old ignition coil that we removed from our vehicle and our new part from 1AAuto.com. As you can see, these parts are exactly the same. We have the same length, same boot, the same actual coil on the top with the same single bolt mounting location size and shape, and the same three-pin connector on the back. Now what your ignition coil does, is it has a power and ground going to it from the battery and it has a switched power which is what tells it when to fire, which is what sets your spark plugs off. This is all controlled electronically via the computer n the same way that the rotation of a distributor used to be what determines your firing order on older vehicles. A bad ignition coil can cause the vehicle to not have enough spark or maybe no spark at all which can cause a rich misfire which will harm emissions and potentially the engine as well as creating a check engine light either solid for a lesser misfire or a more serious one will cause the check engine light to flash at which point you should shut the vehicle down immediately. If you need a new ignition coil, this part from 1A Auto it's going to go in direct fit just like your original equipment and fix you up right.
Reinstall your ignition coil. Reconnect the electrical connector. Go ahead and put your 10-millimeter bolt back in and tighten it down with a socket and ratchet. Now this is just securing it in there. I'm just going to get it down as tight as I can by hand here spinning the extension and we'll give it just turn from the top of the ratchet with the wrist just to secure it into place.
To remove your intake manifold we'll loosen the clamp at the throttle body with a flat blade screwdriver. You may want to disconnect this sensor. Looks like ours has been glued on because the clip is broken. You can also simply pop it out of the boot. Disconnect these two hoses from the back of the intake located just behind the throttle body. These just pop off by hand. There's one more at the back of the manifold.
Pull back on the red safety tab, push down and disconnect the sensor from the top of the intake, as well as the two electrical connectors at the front. Disconnect the connector from the throttle body. Again, we have one of those little red safety tabs we have to push down. Then we'll push down the tab and remove the connector.
We'll remove the two 10 millimeter nuts from the throttle body, the seven 10 millimeter bolts from the center of the intake manifold here, as well as the two 10 millimeter nuts over on the passenger side of the intake manifold. We'll do this using a 10 millimeter socket and ratchet where we can and a 10 millimeter wrench where it's a little too tight. Remove the two 15 millimeter bolts at the bottom of the throttle body bracket.
We're doing this with a 15 millimeter socket and ratchet. Remove the bracket from the throttle body. There's a 15 millimeter bolt at the bottom of the bracket on the passenger side of the intake manifold, both front and rear. We'll loosen those up with a 15 millimeter wrench until we can slide them off of the studs. Once you've loosened the brackets go ahead and slide them off the studs. Now we'll lift up on the intake manifold, slide it forward to release it from the EGR tube at the back. Once you're off that tube, lift up being careful for that transmission dipstick and remove the manifold from the vehicle.
While the top of the intake manifold is exposed we're going to wad some paper towels in there, just to keep any dirt and debris from getting in there while we're working.
With the upper intake manifold off we can now access the rest of our ignition coils to replace them.
Reinstall all six of your coil packs. Tighten them down with a 10-millimeter socket and ratchet.
Remove the paper towels from the intake. Clean down this mating surface with some solvent and paper towels or a clean rag. Once again I'm using a brake cleaner here, but there's a variety of solvents you can use to get all that old debris and oil off.
Install your PCV breather tube on the back of the valve cover. You've got a nice little marking on it that says PCV with an arrow so you know which end goes where, and the other end should fall just about over here, where the back of the intake will be.
Remove the old gasket from your intake manifold using a small straight pick here, just to get in there and start popping it out. You should be able to remove the rest by hand. Start your new gasket. Line up. Press that in. Our old EGR seal is damaged so remove that. Install our new one. Make sure it sits all the way back past its edge.
Reinstall your intake manifold, being sure to set the opening for the automatic transmission dipstick into its proper place on the manifold. We'll also want to be careful for the bolts. We'll have to line up our EGR tube as well. Just be mindful of all of these things while we set it into place. Once the EGR tube is set and the intake is laid down onto the lower manifold, clip your automatic transmission dipstick back into place and start all of the 10 millimeter bolts by hand, just a couple of threads, to make sure they're all lined up before we tighten them down.
Tighten up the seven 10 millimeter bolts at the center of the intake. We're not going to tighten these down all the way yet. You just want them a little bit and then we'll have to torque them. Torque these bolts to nine foot-pounds. The manufacturer specification is 150 inch-pounds. However, it's a lot easier to do with this wrench and that number rounds up to about nine foot-pounds. We want to start these in the center and work our way out in a cross pattern.
Reconnect the map sensor. Push the safety into place. Reconnect the two intake tuner valve control. Reinstall the support brackets at the front and rear on the passenger side of the intake. We'll start those 10 millimeters on, just a couple of threads to keep it in place. Using a 15 millimeter socket and ratchet to tighten up those two bolts all the way at the bottom of those support brackets. Once the bottom of the support brackets are tighten down you can use the 10 millimeter socket and ratchet to finish tightening up the top two bolts.
Reconnect the PCV hose and this fitting closest to the EGR tube. We have a small hose here, and a large hose next to that. Reconnect the electrical connector onto the throttle body. Lock the safety tab back into place. You can now set the support bracket back over the throttle body bolts. Make sure it doesn't get caught up in any of the wiring down below. We'll spin our two 10 millimeter nuts on at the top by hand, just to keep that in place. Reinstall the two 15 millimeter bolts at the bottom of the bracket by hand. Tighten up the two 15 millimeter bolts at the bottom of the bracket with your socket and ratchet. Tighten up the two 10 millimeter nuts at the top.
Install the other end of the intake boot onto the throttle body. Tighten it up with your flat blade screwdriver. Reinstall the coolant tank line bracket on the side of the intake tube. Reinstall the map sensor into the intake tube. Earlier when we removed our intake, we wanted to wait until we had the intake tube reinstalled to make sure this all lined up properly. Now that we've got it where it needs to be we'll go ahead and tighten that down.
Thanks for watching. Visit us at 1AAuto.com for quality auto parts, fast and free shipping, and the best customer service in the industry.
Tools used
Brought to you by 1AAuto.com, your source for quality replacement parts and the best service on the Internet.
Hi, I'm Mike from 1A Auto. I hope this how-to video helps you out, and next time you need parts for your vehicle, think of 1AAuto.com. Thanks!
In this video, we're going to show you ignition coil replacement. This 2008 Dodge Ram has the hemi 5.78 engine in it and the procedure to do it is the same for pretty much any truck, although if you have a Hemi engine in some of the other platforms such as the Dodge Durango or the Dodge Challenger, the procedure could be different. You actually go up through the wheel well for some of the cylinders.
Items you need include new ignition coils from 1AAuto.com. 10 millimeter socket - actually you'll need various rackets and extensions to get into different places on different coils -, flat blade screwdriver, and dielectric or silicon grease.
Open up your hood, on each side of the engine there are four coils. You can see the front one here, and then they go back, and it's all the same procedure for each one. Those ones you just need to use a short socket and a wrench. To disconnect, there's a little tab on the backside.
Push them towards the coil a little bit, push the tab to disconnect. Then a 10 millimeter socket and ratchet will remove the bolts that hold the coils. The bolts actually have little retainers on them so they don't come all the way out. Once you get it loose, just move it around a little bit and pull them up and out.
To access the coils on the passenger side, we're just going to remove the intake hose and the top of the air box. There's four clips, just unclip them. Loosen this clamp here, flat blade screwdriver, and pull this hose off, pull this hose off, and then bring your intake box up and off. It gives you access. On this side you may want to have extensions to do this second one here. Again, push the connector towards the coil some and push the tab and release.
Here's the original coil from the vehicle, and the new coil from 1A Auto. You can see it's exactly the same. It's going to install just like the original.
If you want to use some dielectric or silicon based grease and just put a little bit right inside the tube that fits over the spark plug. Put the coil back in, you'll want to push down firmly and then start the bolts probably with your hand. Once it's tight, reconnect the lead, put your air box lid back in, connect this hose, push it over. Get it locked in right. Flip the tabs up and on. Then tighten up this clamp.
Thanks for tuning in. We hope this video helped you out. Next time you need parts for your car, please visit 1AAuto.com. Also check out our other helpful how-to and diagnosis videos.