WARNING: This product can expose you to chemicals including Cadmium and Cadmium Compounds, which is known to the State of California to cause cancer and birth defects or other reproductive harm. For more information, go to www.P65Warnings.ca.gov.
Lifetime Warranty
This item is backed by our limited lifetime warranty. In the event this item should fail due to manufacturing defects during intended use, we will replace the part free of charge. This warranty covers the cost of the part only.
FREE Shipping is standard on Orders shipped to the lower 48 States (Contiguous United States). Standard shipping charges apply to Hawaii, Alaska and US Territories. Shipping is not available to Canada.
Expedited is available on checkout to the United States, excluding Alaska, Hawaii and US Territories as well as P.O. Boxes and APO/FPO/DPO addresses. Final shipping costs are available at checkout.
How to Replace Ignition Lock Cylinder 1998-2004 Dodge Intrepid
How to Replace Ignition Lock Cylinder 2001-05 Chrysler PT Cruiser
Created on:
Tools used
15mm Wrench
T15 Torx Driver
T30 Driver
1. Disconnecting the Battery
Disconnect your negative battery cable, which is located on the passenger side at the top of the shock tower
Use your 15mm wrench
2. Removing Ignition Cylinder
Use your torx drivers, remove the T30 screw
Remove the two T15 screws underneath
Pull up on the steering column cover to pop it off
Unclip the ignition cylinder bezel
Turn the key to the 'run' position and press the little button on the side and pull the cylinder out
3. Install the New Ignition Cylinder
Stick the new ignition cylinder in and click the button in
Click the cylinder bezel back in, making sure the little mark indicating the top position is pointing up
Put the steering column cover back on, starting with the bottom piece, and click the top one over
Screw in your two T15 screws and your T30 screw
4. Reconnecting the battery
Use your 15mm wrench
Brought to you by 1AAuto.com, your source for quality replacement parts and the best service on the internet.
Hi, I'm Mike Green. I'm one of the owners of 1A Auto. I want to help you save time and money repairing or maintaining your vehicle. I'm going to use my 20-plus years' experience restoring and repairing cars and trucks like this to show you the correct way to install parts from 1AAuto.com. The right parts installed correctly. That's going to save you time and money. Thank you and enjoy the video.
In this video we're going to show you how to replace the ignition lock cylinder on this 2004 Dodge Intrepid, same for most of these Intrepids for this era. It's pretty easy. The only tools you'll need are a T15 and T30 Torx screwdrivers and a 15 mm wrench to disconnect your battery.
First you are going to want to disconnect your negative battery cable, which is on the passenger side up by the top of the shock tower. You are going to start by removing a T30 screw for your tilt lever. Now, underneath you want to remove two T15 screws. Now, kind of press in right here and pull up to break that loose. It's the same thing on this side. Remove the top portion, it pulls down and around. Now, there is a clip here and on the other side. Now you didn't have to take that off, but it makes it easier for me to show you this little button here. With the key in you change it to the run position and then you press up on a little button here and pull your key lock cylinder right out.
Here's the new lock cylinder from 1A Auto. Here's the lock cylinder for the OE. The only difference you can see here is that this kind of turns that way. Obviously there is nothing wrong with this one, but I'll just show you the new one from 1A Auto. It should go right in. Install the original one. Put this back on. There's a little tab that marks the top position. Put that on. Take this lower bezel, put it around the lock first and just kind of push it up into position. The upper one, kind of push it against the steering wheel. Make sure it goes down over the hazard there. Push that up and together over on the other side. Squeeze it tight together.
Now we'll fast forward through putting on those T15 screws in the bottom and then securing your tilt lever with the T30 screw. Then you want to use your 15 mm wrench and reconnect the negative battery cable.
We hope this helps you out. Brought to you by www.1AAuto.com, your source for quality replacement parts and the best service on the internet. Please, feel free to call us toll free, 888-844-3393. We're the company that's here for you on the internet and in person. Thank you.
Tools used
Flat Blade Screwdriver
Phillips Head Screwdriver
10mm Socket
Ratchet
Needle nose pliers
1. Disconnect the battery
Unclip the air box
Use an 8 mm wrench to disconnect the negative battery terminal
2. Remove the ignition lock cylinder.
Use a flat blade screwdriver to slide into the steering column and depress the button in the cylinder
Turn the key to turn the cylinder to depress the tab to remove it.
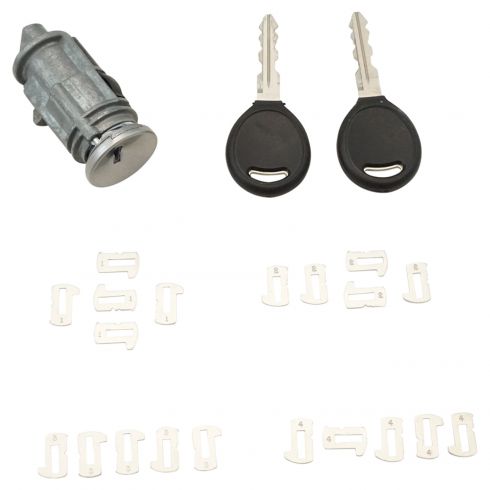
The new lock cylinder from 1A Auto comes with a new key.
If you don’t mind using a new key, skip to the last step.
3. Install the new cylinders tumblers to match the old one.
Depress the two tabs on the sides at the top of the cylinder
Have someone turn the key to remove the core.
Use a pair of pliers to remove the tumblers and springs in the cylinder.
Start with the first tumbler.
Take your spare tumblers and lay them out and remove the core of the new key lock cylinder.
Select the new tumblers that match your old ones.
Insert the selected tumblers and springs into the lock cylinder in order.
Clip the core into the lock cylinder.
4. Install the lock cylinder
Turn the key to the 'run' position
Insert the cylinder and turn the key to the 'off' position.
5. Reconnect the negative battery terminal
Unclip the air box.
Use your 8 mm wrench to connect the battery.
Replace the air box cover.
Brought to you by 1AAuto.com. Your source for quality replacement parts and the best service on the internet. Hi. I'm Mike Green. I'm one of the owners of 1A Auto. I want to help you save time and money repairing and maintaining your vehicle. I'm going to use my 20 plus years experience restoring and repairing cars and trucks like this to show you the correct way to install parts from 1AAuto.com. The right parts installed correctly. That's going to save you time and money. Thank you and enjoy the video. In this video, we're going to show you ignition lock cylinder replacement, as well as recoding it for your existing key. We're going to do this on this 2001 PT Cruiser, but it is the same for a whole bunch of different Chrysler models. Tools you'll need are a 10 millimeter wrench to unhook your battery. Then you'll be able to get by with just a small flathead screwdriver, and a pair of pliers, as well as a nice clean workbench to work on.
Start out by disconnecting your battery. Undo 2 clips that hold the air box down. Lift it up. Then magically a 10 millimeter wrench appears and loosen up that battery cable. Then pull it right up and off, and move it out of the way. If your lock cylinder is giving you trouble, to remove it, after you've disconnected the negative battery cable, there's a hole right underneath the lock cylinder. You want to turn your vehicle to run. I'm poking up in here. There's a little button you want to press. When you find it... Just poking to see if I can find it. Straight up in there. I actually already found it. Press it up and the lock cylinder comes out to about there. Put your screwdriver right under. Pry up a little bit, and there's your lock cylinder out. New lock cylinder from 1A Auto. It comes with a key, if you don't mind having a different key. You need to turn it to the run position. Insert it. Now your original key will no longer work. If you want your original key to work, I'll show you how to do that.
If you want your old key to work in your new lock cylinder, the first thing you're going to have to do is take your old lock cylinder out. There's 2 little buttons here. First, I'm going to make sure this is all the way back. I'm going to turn it to the run position. I'm going to stick a fingernail in there. This is kind of the caveman way to do it. A fingernail in there. Then I'm going to spin this back beyond... I didn't quite get it far enough. I'll stick a fingernail on top of there and a fingernail on top of there. Spin this back beyond its auxiliary position and it pulls out. This is my old lock cylinder, so I'll put that off to the side. Now what I want to do is... You can see when I take the key out here that my tumblers are going to come up. I want to start on this side top. You can see that the tumblers come up. The first tumbler is closer to the lock cylinder, so I want to start with that one.
What you want to do is get those tumblers down. Pair of good needle nose pliers. Pull it up. Pull each tumbler up and out. Be careful of the springs. Spring out there as well. Next one. Tumbler's kind of stuck down. Use a small screwdriver to push though from the other side. Pull it out. We're going to repeat that for the other two on that side. That's the side closer. Now we're going to do the bottom side. I'm going to line these up. Because they're further away, I'm going to line them up a little further away. Now I'm going to take my new one apart the same way. If you lay your tumblers out like this, you should be able to see... Can't even see it on this one. Let's see. Clean it off. You should be able to see it says 0 1 right there. What you want to do, I have my tumblers laid out here, you want to have the same corresponding numbers. Here's all my 1s. I'll put a new one here. I'll just lay out all my new tumblers in the exact same spots as my old ones.
I've matched them up. This one I can't read the number, because it's too worn. Not really a problem, because what you can do... I'm going to slide it down here. There's 2 basic shapes. There's a single tooth, and then there's a dual tooth. The dual tooths are either 1s or 2s. The single tooths are either 3s of 4s. What you can do is flip your original over and bring your new one right next to it, and see how it lines up. I'm going to take it right in close here. You can see that that 4.... Hopefully I can focus in here. The 4 is just a little bit lower on the tooth. Slide the 3 up in place. Get it nice and perfect here. You can see that the 3 lines up very well. We will use the 3 here.
Here's our new lock cylinder. I've kept the springs in it. This is the top side. You can see the slot with the springs are closer. I'm going to grab each one, slide them down in. You always want to use the new tumblers, because usually the reason your lock cylinder wasn't working is because the old tumblers were worn out. New tumblers on that side. Flip it over. Grab them one by one. This side goes to the spring. It's what holds on the spring. If I coded this correctly, when I stick my old key into the new cylinder, all my tumblers should be down. New lock cylinder and a new cylinder here. All goes together fine, so that's the right code. Old key, new lock cylinder. Put it in. Make sure you're on the run position. Reinsert. Turn the key off. Just fast forward a little bit as we put the negative battery cable back on, and then tighten it up with our 10 millimeter wrench. Once you have it nice and snug, put the top of the air cleaner box back on. Clamp it into place.
We hope this helps you out. Brought to you by www.1AAuto.com. Your source for quality replacement parts and the best service on the internet. Please feel free to call us toll-free 888-844-3393. We're the company that's here for you on the internet and in person.
924-703
In Stock
Product Reviews
Loading reviews
5.00/ 5.01
1review
5 Stars
4 Stars
3 Stars
2 Stars
1 Star
1
0
0
0
0
Pleased that this worked for our 2002 Cruiser! (May 2022)
Christina
May 31, 2022
Glad we were able to purchase this for our 2002 Cruiser while you had it in stock. My husband installed it using your video, and instructions. All seems to have worked out well. So glad there are companies like 1A Auto! You guys are great!
Customer Q&A
No questions have been asked about this item.
Customer service
877-844-3393
Monday - Friday 8:00am - 9:30pm ET Saturday - Sunday 8:00am - 4:30pm ET
Dodge is a registered trademark of FCA US LLC. 1A Auto is not affiliated with or sponsored by Dodge or FCA US LLC.See all trademarks.
Enter Vehicle Year Make Model
Specify your vehicle's year, make and model to guarantee fit.
Year
Make
Model
Options
Drivetrain
This part doesn’t fit a . Select from parts that fit.