Hey friends, it's Len here at 1A Auto. Today we're going to be working on our 1996 Dodge Ram 1500. This is the Laramie. And we're going to be replacing the fan clutch. It's going to be super easy. I can do it. You can do it too. As always, if you need this or any other part, you can always check us out 1aauto.com. Thanks.
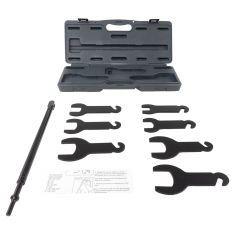
All right, so we have our fan clutch here. I just want to show you you've got a 36 millimeter nut right here. That screws onto the water pump pulley, the shaft that comes out of that. You're going to turn this counter-clockwise to get it to remove. You're going to need a tool that looks something like this. It's going to go right on here like this. And an air chisel, we sell air chisels right on 1aauto.com. Then there's going to be four bolts that hold the fan directly to the clutch.
Now that you see what we're going to be dealing with where it might be a little bit hard to see inside there, let's get started. All right, so I'm going to use a little bit of penetrant right here. I'm just going to spray it down in there where we're going to be working, just like that. Set this aside. Get my flashlight so it'll stay. Got my air chisel and my kit. You don't want to take off your serpentine belt before you start doing this. You need your serpentine belt to hold this from spinning. Let's get it right on there like this .
That looks like you broke free already. That's nice. Trying to do this with a 36 millimeter wrench without an air chisel setup is going to be very difficult to say the least. If I would say that it would even be possible, which I don't think it is. I would just go with the air chisel method. Then you're going to climb up in there. Give it a couple of spins now that we know it's nice and loose. Before we continue, we're going to take out these bolts right here that hold the fan to the clutch. I'm going to grab our wrench and we'll be able to continue.
Let's try spinning this off real quick. When it comes loose, it's going to want to fall down. If it falls down, the fins from your fan could hit up against your radiator fins. That's going to cause issues. All right, so we got this loose and coming out. I'm just going to come right up through here. You can do it. A little bit of finagling. There we go. There's our fan clutch with our fan. We're going to remove the fan from the fan clutch now.
All right, so now we're going to remove the fan from the clutch itself. We're going to remove these bolts right here using a 13 millimeter. I'm going to be using an air gun for this, so of course we're going to be wearing our safety glasses as we have been throughout the video. There's our four bolts. They all look the same. This right here, let me grab a hammer. I'll give it a little loving bonk and help it along.
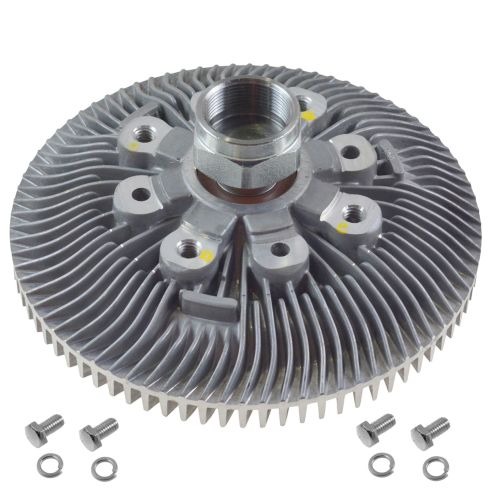
Here we are. Here's our fan clutch. So here we are, friends, a quick product comparison for you. Yeah, when you take a quick glance at these, they do look different. But that's okay. You know why? Because 1A Auto went with an upgraded version of the fan clutch. This right here is original from way back in 1996. And it's been working great ever since until just recently. So what we did, 1A Auto went out, got us a brand new fan clutch for it. Like I said, it's upgraded. It's a little smaller. Lightweight in comparison. It's going to be a little bit better for fuel economy. The important parts to mention though is the underneath.
You've got the same 36 millimeter nut. You've got the same thread pattern and depth in here where it screws onto the water pump. Then right along here, you have four screw holes. These right here are not screw holes, just so you know. But anyway, four screw holes. It's also important to mention when you put them like this and you look underneath, right here's one screw hole and right here is another.
These are both the same height from the table, so that means that the fans going to be writing in the same exact area. With all that said, I don't see any reason why this wouldn't be a quality part to install into the vehicle. So I'm going to go ahead and do it. And as always, if you need this or any other part, you can always check us out at 1aauto.com. Thanks.
All right, so we've gotten a brand new hardware. 1A Auto supplied us with that. That's nice. It comes with a bolt and some locking washers. These are called locking washers because they have a slit just like that. You put this on. When you tighten this up, it crushes down. Then if it tries to loosen up on its own, the neurals kind of grab in and it goes nowhere. It just applies a little bit of pressure and this also eliminates your need to use something like blue Loctite. Some people may still use it. It's your prerogative. You do you booboo. So we'll set these aside. We've got our fan here, four holes. We have our four threaded holes on the clutch itself. Set it on there, just like this. It should want to sit right on. That's beautiful. Love it. Get our bolt on there.
This one, this one and this one. Now we're just going to zip these right in. Safety glasses. We know we bottomed them all out. I'm just going to go around one more time and make sure they're all snug. You notice I went in a crisscross pattern, right? The reason for that is because if I went around in a circle and this thing was off kilter, I might think that it's tight and it might be sitting up on a lip over on this side. Driving down the road after a long period of time or even a short period of time, it might finally click in and then the is going to be loose on the clutch. You need to go in a crisscross pattern. Let's install.
Here we go friends, it's time to get this back in here. It's going to come right like this. We got it out this way, so I'm sure it's going to go back in. Just need a little bit of patience. Fanangle it in there, just like that. Try to get the threads lined up. Getting the first thread started is the hardest one. Once it started, generally speaking, they screw right on very easily. Just take it and spin it. You don't need to use any thread locker on this. Some people will say you can. I personally do not.
The way that the engine turns, it's going to continually tighten this. So you don't have to worry about this trying to free up on its own. The engine cranks the right way. That makes the fan want to tighten, not loosen. If you end up using thread locker on this, well good luck getting it back off someday because it's just really going to be a chore.
Now that we've got that screwed down as far as it'll go by hand, we're just going to snug it up real quick. I'm going to use the same tool that I used to remove it except in the opposite direction. I'm going to go down the right side. So I'm tightening. Safety glasses, of course. Here we go. All right, let's start it up. So sound of power right there. The ole V8 magnum. Take a look. Looks like the belt's blowing right where it's supposed deal. Fan's turning. Everything looks great.
Let's turn it off. Take a double peak at all those pulleys. That belt looks great. Give that a tug. It feels good. Double check over on this side. Yep, all right. Climb underneath here. Take a peek. Oh yeah, it looks great on the crank under there. Sweet. Well, that wraps that up. Easy peasy.
Thanks for watching. Visit 1aauto.com, your place for DIY auto repairs for great parts, great service, and more content.