Direct Fit Replacement - Guaranteed to fit and function for your specific application Quality Tested - built to a strict level of product standards.
Item Condition:New
1 Year Warranty
This item is backed by our 1-year warranty. In the event this item should fail during intended use, we will replace the part free of charge. This warranty covers the cost of the part only.
Returns: Parts with electrical components cannot be returned once installed.
FREE Shipping is standard on Orders shipped to the lower 48 States (Contiguous United States). Standard shipping charges apply to Hawaii, Alaska and US Territories. Shipping is not available to Canada.
Expedited is available on checkout to the United States, excluding Alaska, Hawaii and US Territories as well as P.O. Boxes and APO/FPO/DPO addresses. Final shipping costs are available at checkout.
How to Replace MAP Sensor 1982-2004 Chevy Monte Carlo
How to Replace Engine MAP Sensor 1988-1999 Chevy K1500
How To Replace MAP Sensor 1992-99 GMC K1500
Created on:
Tools used
7mm Socket
Ratchet
1. Removing the MAP Sensor
Remove the 7mm bolts from the MAP Sensor
Push down the tab on the MAP Sensor harness
Pull the MAP sensor up and off the vacuum hose
2. Installing the New MAP Sensor
Push the harness halfway back into the MAP sensor
Push the MAP sensor onto the vacuum hose
Push the harness on
Replace the two 7mm bolts to the MAP sensor
Clip the harness into the bracket
Brought to you by 1AAuto.com, your source for quality replacement parts and the best service on the Internet.
Hi, I'm Mike from 1A Auto. I hope this how-to video helps you out, and next time you need parts for your vehicle, think of 1AAuto.com. Thanks.
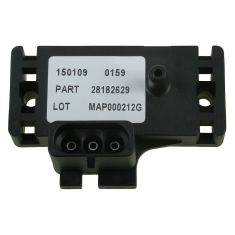
In this video, we're going to show you how to replace a MAP sensor on this 2003 Chevy Monte Carlo with the 3.4 liter V6 Engine. The items you'll need for this include a new MAP Sensor from 1AAuto.com, a 7mm socket, and a ratchet.
Your MAP sensor's located right here, and it's got two bolts that go all the way through. Just push this harness through and then remove the bolts from the other side of the MAP sensor. We'll fast forward as Mike does this. Now push down on the tab of the harness and pull it free. Then lift up on the MAP sensor. Pulls from that hose. On the right is the old MAP sensor, on the left is the new one from 1A Auto. You can see they're identical and they'll fit exactly the same. Push the harness back into your MAP sensor. And you don't want to push it down all the way just yet. Just do it about half the way onto the harness. Then push it down onto that vacuum hose. Once you've got the hose all the way on, push the harness on the rest of the way. Then line it up and replace those two bolts. Clip this harness back into the bracket and you're all set.
We hope this video helps you out. Brought to you by www.1AAuto.com, your source for quality replacement parts and the best service on the Internet. Please feel free to call us toll-free, 888-844-3393. We're the company that's here for you on the Internet and in person.
Tools used
Pocket Screwdriver
Tools used
Pocket Screwdriver
Once you've got the hood up, you're gonna come right over here. We're gonna take off these two wing nuts. Lift this cover, take a peek at your air filter. If it needs to be replaced, now's the time. We'll set that aside. Now I'm gonna remove this from here. You can either take this right off or, you know, set it aside, whatever you wanna do. I'm gonna take it off.
Now that we had the air filter housing out of the way, we have a clear view of the MAP sensor right here. Just gonna take our pocket screwdriver, come right in between here, and this should just pop right up. Do the same on the other side. See if I can get it to pop up. There you go. You got your little hose on there. Go ahead and get that off of there. Bring this up. We're gonna take off the wiring. There should be a clip that comes all the way down and around there. This is obviously broken. So there isn't much I can do about that right now. Take a peek. Look for any funny colors. This looks great.
We're gonna take our new MAP sensor, should slide right in. Put it in as far as it can. It should click if it has the piece. Give it a nice tug. Make sure it doesn't slide right out. Hook in your little hose just like that, this down through here, and then lock this down so it's nice and secure. You don't want it flopping around. Perfect. Now we're gonna get our air filter housing back on here and we should be good to go.
If you look at the bottom of this, you're gonna see this tube, that needs to go down along the side of the engine. There's a little shield that goes along the manifold. I'll show you that in a second. For now let's get this over the top of this, we'll get this lined up. Launch that in. This should set perfectly flush. We're gonna put the air filter on and then the cover. Make sure you snug these right up. Obviously you don't want any dirty air getting into that engine. Give it a nice wiggle. That feels good. All right, so this just comes right down along here. You've got your spot on the manifold shield. Put it right on there. Perfect.
213-1545
In Stock
Product Reviews
Loading reviews
There are no reviews for this item.
Customer Q&A
will the map sensor cause a no crank?October 27, 2017
Johnny M
10
Yes, this could cause a no crank symptom.
October 27, 2017
Alex P
Customer service
877-844-3393
Monday - Friday 8:00am - 9:30pm ET Saturday - Sunday 8:00am - 4:30pm ET
Oldsmobile is a registered trademark of General Motors Company. 1A Auto is not affiliated with or sponsored by Oldsmobile or General Motors Company.See all trademarks.
Enter Vehicle Year Make Model
Specify your vehicle's year, make and model to guarantee fit.
Year
Make
Model
Options
Drivetrain
This part doesn’t fit a . Select from parts that fit.