Complete Repair in One Purchase - Stop searching for parts individually and complete your repair with a customized kit or set from DIY Solutions.
High-Quality Parts from Trusted Brands - DIY Solutions' kits and sets are selected from the best automotive brands and include hard-to-find and even obsolete parts you may need for your vehicle.
Guaranteed Fit - DIY Solutions ensures its selected parts are quality-tested to guarantee fit and function.
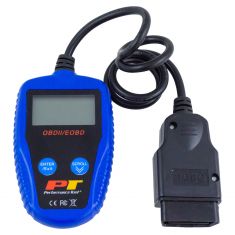
Install Tip: You may be required to reset the vehicle computer after installation of this part.
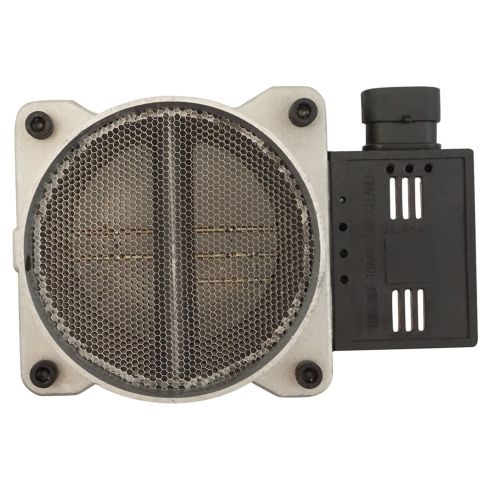
Quality Tested - built to a strict level of product standards. Air Flow Sensor Housing OptionIncludes Housing
Item Condition:New
Attention California Customers:
WARNING: Cancer and Reproductive Harm - www.P65Warnings.ca.gov.
Lifetime Warranty
This item is backed by our limited lifetime warranty. In the event that this item should fail due to manufacturing defects during intended use, we will replace the part free of charge. This warranty covers the cost of the part only.
Returns: Parts with electrical components cannot be returned once installed.
FREE Shipping is standard on Orders shipped to the lower 48 States (Contiguous United States). Standard shipping charges apply to Hawaii, Alaska and US Territories. Shipping is not available to Canada.
Expedited is available on checkout to the United States, excluding Alaska, Hawaii and US Territories as well as P.O. Boxes and APO/FPO/DPO addresses. Final shipping costs are available at checkout.
How to Replace Mass Air Flow Sensor 1996-2005 Chevy Blazer S10
How to Replace Mass Air Flow Sensor 1995-2005 Chevy Monte Carlo
How to Replace Mass Air Flow Sensor with Housing 1997-2005 Buick Century
How to Replace Mass Air Flow Sensor with Housing 1997-2005 Chevy Venture
Created on:
Tools used
Flat Blade Screwdriver
1. Removing the Mass Airflow Sensor
Disconnect the harness on the sensor.
Loosen up the two hose clamps on either side of the sensor.
Pull the hoses off of either side of the airflow sensor.
Remove the rubber gasket.
2. Replacing the Mass Airflow Sensor
Put the gasket back on to the hoses.
Put the sensor down in between the hoses.
Reconnect the hoses.
Tighten the hose clamps.
Reconnect the harness.
Brought to you by 1AAuto.com, your source for quality replacement parts and the best service on the internet.
Hi, I'm Mike Green. I'm one of the owners of 1A Auto. I want to help you save time and money preparing and maintaining your vehicle. I'm going to use my twenty plus years' experience restoring and repairing cars and trucks like this, to show you the correct way to install parts from 1AAuto.com. The right parts installed correctly that's going to save you time and money. Thank you and enjoy the video.
In this video, we're going to show you how to replace the Mass Air Flow Sensor and also called MAF sensor or air flow meter. On this 2000 Chevy Blazer with the 4.3 Liter, same as most Blazers and GMC Jimmy's and the pickups with this body style and the 4.3 Liter V6. Only tool you'll need is a flat blade screwdriver.
Air Flow Sensor is located right here, right above your air filter, on the driver side of the vehicle. There is one plug going into it. You can either use a screw driver or your finger, pull out this tab and lift the plug off, and then you're going to want to loosen up two hose clamps, one here and then one over here.
Now what you want to do is grab hold of your airflow sensor and try and twist it, and also twist on this hose here. Once you can get it to move, and you might want to use your screwdriver a little bit just to separate the rubber from it.
You can pry that right off, and then force that down underneath. Now just pull your sensor off the air box. There's my old one out. You want to take this rubber and hold it off the sensor as well. Again probably use your screwdriver, separate it from the aluminum. See the rubber just kind of sticks to it all the time.
Here is your old sensor. New one from 1A Auto, you can see it's exactly the same. It's going to plug in the same. This one's actually in fine shape for this vehicle, so I will reinstall it. I just want to show you that the one you get from 1A Auto is exactly the same.
Reinstall this tab right over that slot there. Actually the tab goes into those two slots there. Then put your meter down in. Just push it in nice and firm, the arrow right on top, which should be right on top like that. Push your hose back, straight up, get it on. Then tighten up these two screws. Then obviously plug your lead back in.
We hope this helps you out, brought to you by www.1AAuto.com, your source for quality replacement parts and the best service on the internet. Please feel free to call us Toll Free, 888-844-3393. We're the company that's here for you on the internet and in person.
Tools used
Flat Blade Screwdriver
1. Removing the Mass Air Flow Sensor
Remove the two hose clamps on either side of the air flow sensor
Pull off the intake hose from the air box
Remove the mass air flow sensor
Disconnect the wiring harness
Disconnect the vacuum hose
Push part of the intake hose back onto the air box
2. Installing the Mass Air Flow Sensor
Insert the mass air flow sensor into place, lining up the arrow with the mark on the air intake hose
Tighten the hose clamp on the side of the sensor
Push the sensor onto the air intake hose on the air box
Tighten the hose clamp on the side of the sensor
Connect the wiring harness
Connect the vacuum hose
Brought to you by 1AAuto.com, your source for quality replacement parts and the best service on the Internet.
Hi, I'm Mike from 1A Auto. I hope this how-to video helps you out, and next time you need parts for your vehicle, think of 1AAuto.com. Thanks.
In this video, we're going to show you how to replace the mass air flow sensor on this 2003 Chevy Monte Carlo with a 3.4-liter V6 engine. The items you'll need for this are a new mass air flow sensor from 1AAuto.com and a flat blade screwdriver.
Your mass air flow sensors right here, and on either side of it, there's these two hose clamps. Just loosen both of those up with a flat blade screwdriver. Now, pull your intake hose back and free from the intake box. Then just pull the mass air flow sensor out. Then lift up the tab and disconnect the harness and pull this small hose free.
Take the smaller piece of hose and put that tab in between those two slots as you push it into place.
On the left is the old mass air flow sensor; on the right is the new one from 1A Auto. You can see they're identical and they'll fit exactly the same. Take your new mass air flow sensor, and you wanted it at this angle. You want to just fit it into that larger part of the intake hose first, and that arrow on the mass air flow sensor should be lining up with the mark on the hose. Then just tighten up the hose clamp.
Now push the mass air flow sensor into the smaller part of the hose on the air intake box, and then tighten up that hose clamp. Reconnect the harness and you're all set.
We hope this video helps you out. Brought to you by www.1AAuto.com, your source for quality replacement parts and the best service on the Internet. Please feel free to call us toll-free, 888-844-3393. We're the company that's here for you on the Internet and in person.
Tools used
Flat Blade Screwdriver
Phillips Head Screwdriver
1. Remove the mass air flow sensor
Use a screwdriver to loosen the clamp on the air hose
Pull the hose off the air box and throttle body.
Disconnect the air flow sensor lead.
Unclamp the hose from the air flow sensor.
2. install the new mass air flow sensor
Connect the sensor to the air box.
Reconnect the wiring lead.
Hook the air hose back up to the sensor and throttle body.
Secure the clamps with your screwdriver.
Brought you by 1AAuto.com your source for quality replacement parts and the best service on the internet. Hi, I'm Mike Green. I'm one of the owners of 1A Auto. I want to help you save time money repairing and maintaining your vehicle. I'm going to use my twenty plus years experience restoring and repairing cars and trucks like this to show you the correct way to install parts from 1AAuto.com. The right parts, installed correctly. That's going to save you time and money. Thank you and enjoy the video.
In this video we show you how to replace the mass air flow sensor on this Buick Century. Same as many GM front drive vehicles with the 3.1 or 3.8 liter V6s. You're going to remove your intake hose by loosening up this clamp over here at the engine and this clamp here at the air box. Then you pull your hose off the engine and then pull your hose off the air box. That comes up and out of the way. To replace your airflow sensor obviously you unclip it here from the harness. Remove or loosen this clamp here. You can see these arrows line up. You want to make sure those line up when you put it back together. You may want to use some force from the screwdriver to pry the hose off. There's your sensor, out.
You can see I'm putting this old one back in because there's nothing wrong with it. What I'm going to do here is put this collar on the air box first. I'm putting this piece onto the air box to get it nice and secure. You want to make sure that nothing folds over or gets around. Make sure it's on there good. Now, take this sensor and move this hose up here. Put the sensor in. Shake it around just a little bit. My hose, push it down on. Again, you want to line up these two arrows. Tighten up this first clamp. Make sure those arrows are lined up. Plug in my airflow sensor. Tighten up this second clamp. Make sure my air hose is on the engine well and tighten up this third clamp under here.
We hope this helps you out. Brought to you by www.1AAuto.com. Your source for quality replacement parts and the best service on the internet. Please feel free to call us toll free at 888-844-3393. We are the company that's here for you on the internet and in person.
Tools used
Phillips Head Screwdriver
1. Removing the Mass Air Flow Sensor
Disconnect the mass air flow sensor wiring connector
Loosen the two intake hose clamps with a Phillips head screwdriver
Twist the hoses off the sensor
Pull the sensor up and out
Remove the rubber cover from the old sensor
2. Installing the New Mass Air Flow Sensor
Attach the rubber cover to the sensor with the tab on the bottom
Put the sensor into place, lining up the back tab with the hose
Tighten the hose clamps with a Phillips head screwdriver
Reconnect the wiring connector to the harness
Brought to you by 1AAuto.com, your source for quality replacement parts and the best service on the Internet.
In this video we're going to show you how to replace the air flow meter, or mass air flow sensor, in this '99 Chevy Venture, same as most of the '98 to '05 Venture or Montana. This has the 3400 series engine in it, also the same as a Silhouette. The only tool you'll need is a flat-blade screwdriver.
Your mass air flow sensor on this vehicle is right here. It is on the driver's side. There's your radiator fill. Obviously, there's your engine, and here's your intake box, and then the tube. There's two clamps, one here, and one over here. You want to loosen those up. This is your electrical connection. Just use your thumb to pull that off and remove it. I'll speed it up here while I just loosen up those two hose clamps.
Once you have those clamps loosened up, you can just grab this big accordion hose and twist it, and then pull it off, and then the same thing with your sensor. Sometimes, actually, it's better to pull it off the plastic box first, then pull it up and out. This part here will go on your new sensor, so gently, you need to break it loose. Maybe use your screwdriver a little bit. This is your old sensor. Here's the new unit from 1A Auto, and actually, ours sometimes come as rebuilt, which is actually a new sensor. This is the plastic, this is actually the sensor part, and then the housing has been refinished. It goes in like that.
When you go to install it, you can see there's a tab right down here. So you want to line that up there, and then put it into a tab here, which lines up with this tab. Life this up, push the sensor in, and push it down and in, and bring it against the box here. Just make sure you squish it all together, and then tighten up your clamps. Plug your lead back in. Then you're all set.
We hope this helps you out. Brought to you by www.1AAuto.com, your source for quality replacement parts and the best service on the Internet. Please feel free to call us toll-free, 888-844-3393. We're the company that's here for you on the Internet and in person.
EMS00627
In Stock
Product Reviews
Loading reviews
4.76/ 5.029
29 reviews
5 Stars
4 Stars
3 Stars
2 Stars
1 Star
25
3
0
0
1
Good For The money
Charles
January 23, 2017
I put this in my 1996 Chevy s10 pickup 4.3L Vin X Model truck due to my truck shuddering. Installation was easy enough only took 10mins tops. Over all no complaints.
mass air flow sensor
David
January 24, 2017
Unit arrived very quickly and was a perfect fit. I had no trouble with installation. How-to video on web site was very helpful.
Great Price and Service
H
October 22, 2017
I searched online for this part and found this to be the best price. And the best part it fixed the problem and my truck dives much better. The price was so good that I was able to pay for quick shipping and it arrived just when I needed it.
W
November 3, 2017
The price saved us over 50%. Perfect fit. Good quality. We will definitely order parts from A1again.Write
great !!!
T
January 10, 2018
telling all my friends and co-workers how good it is !! and half the price of a local dealer (( advance auto parts ))
Exact fit!
B
January 13, 2018
This was a perfect fit and very easy to install for my 2003 Buick Rendezvous. I will be ordering more parts for my vehicle from 1aauto. The bonus is that they had videos to show you how to remove/install parts!
New MAF made a huge difference.
James
January 13, 2018
My car was running rough and throwing a code indicating a MAF sensor error. I always try to go to 1A Auto because they have great prices and I have benefitted a lot from their YouTube videos. The new MAF makes a huge difference. Car idles as smooth as silk.
Mass air flow
J
February 26, 2018
Perfect fit, works perfect. for 2001 Chev S10 4.3L
Mass Air Flow Sensor with Housing (1AEAF00003)
Michael
March 31, 2018
Thank you for sending the part I ordered in a timely manner. I was pleased with your service and that part fixed my vehicle problem. I have recommend your company to my co-workers and friends, so keep up the good work. Once again thank you.
Instant improvement.
shane
July 5, 2018
Changed the MAF sensor even though the old one looked fine. Instantly noticed smoother idle, easier start and better performance and gas mileage. Awesome price is just icing on the cake. Super pleased.
S-10 MAF sensor
T
September 14, 2018
Good price came fast and fit perfectly. Have to take a star for the packaging was a bit on the light side. Not much bubble wrap around the item. Was slightly concerned. But the item seems to work fine.
Works for me.
E
October 29, 2018
I was worried about buying and aftermarket throttle body and was told that it would have to be programmed to my vehicle and it wouldnt last...I havent had a single problem with it. My Jeep runs like new, I didnt have to get it programmed, and it wasnt difficult to replace. But Ill never buy another FCA vehicle again.
Quick service
Tami
November 10, 2018
Required the equipment to get vehicle check engine light to turn off. Parts arrived quicker than I expected. Packaged well and functioned as original. Thanks for the rapid service 1a Auto.
M.A.F
W
November 25, 2018
Recived right part the first time fast shipping saved about half of what local parts stores wanted..thanks
Great price...Excellent service!
Willard
February 13, 2019
Price for MAF sensor was half of what local auto store wanted. Was direct replacement and worked as new. Improved performance and shifting of transmission on 2001 Blazer. Did not expect that.
Great service
W
February 16, 2019
Cheap prices for great products I've ordered from here 4 times for different parts for my 96 s10 pickup I've have saved some where in the neighborhood of about 350 bucks if had went to my local part stores for these items and the delivery is pretty fast normally i receive my stuff within 2-3 days
Good part
J
April 19, 2019
The part came quickly and in great shape. After installing, my car's intermittent hiccup problem was alleviated. The video was absolutely crucial and I wouldn't have been able to install myself without the instructions.
Mass air flow sensor
R
May 1, 2019
U guys had the part I needed for alot cheaper than anyplace around me. First time buying from u guys and now u won me over! Expect more orders from me in the future! :)
Great parts
D
June 22, 2019
Love this site has great prices and quick delivery!
No good
R
July 22, 2019
Part did not work left my 77 year old father broke down on road
Direct Fit no hassle
Gary
October 22, 2021
Works great!
Mass airflow sensor
Michael
December 7, 2021
Part worked perfect very fair price.
Jose
December 14, 2021
Exact fit for my 1998 chevy blazer. Works like it should.
Byron
January 3, 2022
good
Gary
April 7, 2022
I have not been able to use it yet. I now need to do a brake job on the truck.
Jerry
December 6, 2022
Worked well for two weeks but once in a while I feel car Buick on slow acceleration not sure if its from mad or ignition module hard to find cause right now but overall it works fine compared to one it replaced I would buy it again
cecil
May 10, 2023
Part is great
Craig
August 26, 2023
Works great easy to install
Fernando
August 20, 2024
Excellent. My van still working properly
Customer Q&A
How do I reset the vehicle computer after replacing the mass airflow sensor. HOW ???February 24, 2017
John N
10
Et a scanner and reset the computer
February 24, 2017
Linda B
10
I have a OBDII code reader and after replacing the Mass air flow sensor I cleared all codes and have not had any codes since. If you do not have a code reader then you can disconnect the positive terminal of the battery for at least 5 minutes and that will also reset all codes. Good Luck - Larry
February 24, 2017
Larry P
10
I would recommend clearing the code with an OBDII scanner, then install the new MAF sensor.
February 26, 2017
Tim K
10
You have 2 options, you can do a soft reset by plugging in a OBD-II sensor and resetting the ECU or you can unplug the battery for 10-15 mins, plug it back up and drive it for 50-60 miles straight so that all the sensors reset and it reads everything like it should... the latter is usually recommended for parts that deal with emissions...
June 26, 2017
P O
Is this part made of plastic or aluminum?October 30, 2023
Wayne W
10
The part is mostly aluminum, and is well built. Had no problems installing!
October 30, 2023
Dana L
Customer service
877-844-3393
Monday - Friday 8:00am - 9:30pm ET Saturday - Sunday 8:00am - 4:30pm ET
Oldsmobile is a registered trademark of General Motors Company. 1A Auto is not affiliated with or sponsored by Oldsmobile or General Motors Company.See all trademarks.
Enter Vehicle Year Make Model
Specify your vehicle's year, make and model to guarantee fit.
Year
Make
Model
Options
Drivetrain
This part doesn’t fit a . Select from parts that fit.