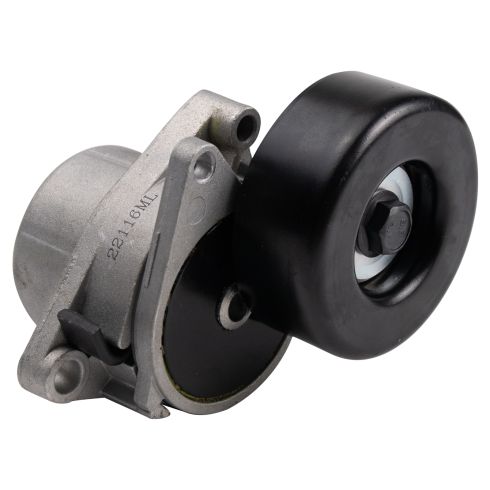
Hey, friends, it's Len here at 1A Auto. Today, we're going to be doing a fairly simple job. We're going to be replacing a Serpentine Belt Tensioner on a 2010 Nissan Altima. It's going to be a fairly easy job. I want to be the guy that shows you how to do it. So, if you need this or any other quality part, you can always come and check us at 1AAuto.com.
So, removing this wheel, we're going to use a 21 millimeter socket. We're going to go around and just loosen up all five of these lug nuts. We don't need to take them off all the way, and we don't want to loosen them up too much. We just want to break them free while the wheels are just barely on the ground, with a little bit of the weight of the vehicle, just so the wheel doesn't spin. So, I'm going to go ahead and turn them to the left.
So, now I'm going to continue with removing all the lug nuts. You can use something like an air gun if you wanted to or continue with your ratchet. These are loose enough that I can do on by hand. I'm just going to remove all five of these. Okay. So, last lug nut. I'm holding the wheel. I'm just going to set this out of the way. Move this right out of the way. So, we have the forward part of the bumper off for another video we're doing, but I'm just showing you what we're doing for this part, right?
We get the wheel off, so we can get to this plastic shield right here. We're going to remove this. And then we're going to come from up and under. And we'll be able to see the tensioner and how the serp belt's ran under there. So, I'm just going to go ahead and remove some of these push clips. Basically, you pull the center out and then the outer side comes out with it. The center is the part that locks it in. So, just take these out. See if I can get this down and out of here. Come on baby. There we are.
Now, we have view of the serpentine belt. Should be the tensioner right here. So, what we'll do is we'll relieve tension from the tensioner, so we can get the belt off. And then we'll go ahead and remove the tensioner, as well. So, I'm going to be taking a 14 millimeter on my Serpentine Belt Tool. I'm going to put it right on the tensioner bolt here. I'm going to try to turn this clockwise. Get it re-ratcheted. There we go. It relieves pressure on this belt. So, now if I wanted too, I could take the belt off, which I do want to. So, I'm going to go like that. There we are. I'm just going to get my tool out of here. Okay.
You can leave the belt in, take the belt out. We're going to be replacing it. So, I'm just going to take the whole belt out. If I wasn't replacing it, I would probably just try to leave it on as many pulleys as I could, to be less work for me when I go to put it all back together. See if I can pull it out. Here's our serpentine belt. So, one of the first things we do, once we get the belt off, we're going to compare it to our new belts, right?
We want to make sure that the length is the same. The thickness is the same, and the count of the ribs on the inside is the same. Okay? So, here we go. I'm just going to take both of them, I'm going to lay them across one finger. Bring my hand ... Straighten out the belt first, sorry about that. Okay, we got it on one finger there, one finger here. Stretch them. They're about the same. It feels good. Okay. We'll just compare the thickness of the belt. As you can tell, it's about the same thickness. Wonderful. And go like this. We'll count the ribs. I count six on each belt, so it looks perfect. This belt should be great to install. Let's do it.
So, now we're going to remove our tensioner, which is this unit right here. There's two mounting bolts. There's one located right up here, one located right there. Those are 13 millimeter heads. So, you're going to need a socket on your ratchet that will come out far enough, so you won't hit up against anything. But not too far where it's going to get jammed up, up against the inside fender. All right? Or inside body, I guess you'd say. Because what'll happen is, is as you're unscrewing these bolts, they're going to keep pushing out.
So, that means that your ratchet's going to keep moving out. It might get jammed up in between here and the bolt. Then it's going to cause you an issue. So, you're just going to want to pay attention as you're unscrewing it, just to see how far you can go. You might have to take the ratchet out and just use your hand the rest of the way. But we'll do that, and we'll see how it goes. Okay? I'm just going to get this 13 millimeter on here. There isn't too much room inside here to work and that's okay. You know, that's part of the fun of it. The challenge, right? That's why we're here, why we're not paying somebody else to do it.
I'm just going to see if I could break this free. It's going to be a little bit hard. There we are. I'm turning counterclockwise or to the left, with my ratchet. Seems like it's nice and loose. I'm going to do this one. Just going to try to turn it counterclockwise again. Feels pretty loose. I can move the tensioner around. It means we're going in the right way with everything, so that's always nice. I'm going to go ahead and try to remove that upper one. And then I'm going to come back down here and finish removing this one, which is much easier to see, and do things and, hold onto.
I got my hand jammed in here a little bit. I'm trying to get this top bolt out. That was fun. Hands a little crampy. That's okay. Now, we're just going to remove that lower bolt that I told you about. So, I'll put this one bolt aside where I can find it. I'm going to continue with the lower bolt. Turning into the left. Dinnertime. I wish it was dinnertime. It's nice and loose. I'm just going to wiggle the tensioner around. Sometimes with the weight of the tensioner or the way it wedges in, it might make the bolt feel like its kind of jammed. Here we go. I got that. Last bolt. Okay.
Now, I'm going to see about getting the tensioner out of here. Let's see if we can bring it out this way. Oh boy, what are we going to do? Let's try spinning it a little bit. See if there's anything else we can do. Yeah. Okay. So, there we go. This is the way it came out. Like that. To go back in, I'm going to try to do the same thing. I'm going to go and move it and get it. And then assumatively, it'll end up like this. Top bolt, bottom bolt, in. Tensioner will be installed.
We have our tensioner out of our 2010 Nissan Altima, and we have a new quality 1A Auto part right here. Brand new tensioner. I like to just notice a couple things. We've got our mounting holes on the original. Stay, thank you. Our mounting holes on the new one. Perfect. We got two, two. Nice. Our pulley. Brand new pulley. Great quality bearing in there. This one right here.
Part of the reason why we're replacing it. Bad bearings, just keeps going for days. Makes a little noise. We'll turn them around. Everything pretty much looks the same here. We'll match it up. That looks good. So, as you could tell, we have a great quality part to re-install. So, we'll put this one aside. If you need this or any other part, you can always check us out at 1AAuto.com
So, now it's going to be time to install our new quality 1A Auto part. When it's in, and it's going to be sitting inside the bracket, it's basically going to be sitting looking like this. Not like this or like this or like this or like that. Okay? It's going to go just like this. To get it in, we're going to start in this general way, and then we're just going to kind of finangle it, and hope that we can squeeze it in. We got it out, so we know it's going to have to go and somehow too. Might just take a little bit of finagling. We'll work at it. Take our time.
You might get it jammed in there pretty good. Of course, watch your fingers for any pinch points. That stuff moves around when you start getting more aggravated, things are going to start flopping around. Okay. So, we're in. So, I'm going to get my hand, hopefully, up here a little bit. There we are. So, it definitely doesn't go here, right? It's going to go up there. But while I've got it sitting here, I'm going to grab my mounting bolts. Or at least one of them. And we're just going to get it lined up with the bottom bolt, which is the one that I can try to reach. And I'll try to start it in. Okay?
I'm not going to tighten it up, I'm just going to start it in a few threads. And then I'm going to be able to move the tensioner around to try to line up the second hole. I'll get that one started in. And I can even tighten it up completely at that point, as long as the other one's already started. And then we'll move on. Okay. So, I'm using a 13 millimeter socket, small wobble socket or extension. It just kinda makes it so I could try to get to where the bolt hole is, and I'm not hitting up against here, hopefully.
Next, I'm going to try to line up my tensioner bottom hole with the threaded hole on the engine, right there. You're going to need to use a lot of patience for a lot of this type of stuff. Just go slow. The more times you try, the faster you're going to go, the harder it's going to get. Let's get it kind of started in there a little bit. If it seems like it's getting stiff, you could try wobbling the tensioner around a little bit. Okay. Feels like it's in there a little bit. I'm just going to grab my socket, my little 1/4 inch drive setup I used here. I'm just going to try to get it in a couple more threads.
Like I said, I'm not going to tighten this right down. I don't want it tight. I want to still be able to move my tensioner around. Okay? Now, I'm going to try to look. It looks like that second hole should line up perfectly. So, I'm going to grab my second bolt, right here. And see about trying to get my hand up in there, which is going to be pretty much impossible, but I'm going to try. That's what I'm here for. I'm going to go through the pain, and I'm going to show you.
Now, it's really hard to get both hands up in here. It's harder than getting just one. And getting one up in there is hard. Okay. I'm pretty sure I got it at least semi-lined up with the hole. The tensioner is not tightened at all. I need to be able to move it around. I feel like I got a couple threads on it. There we are. So, now I'm just going to grab that small ratchet, and I'm going to try to tighten it down. I know I have the bottom one in a few threads. So, this top one, I can just go ahead and tighten right up if I want, which I do. Yep, we are. I can tell because it's pushing the tensioner out. Pushing my hand.
So, now I'm just going to use my ratchet. I've got it pretty much bottomed out. Just going to give it a little bit more. There we go. Maybe I'll just go one more. Just like that. Feels pretty good. This isn't a very long ratchet. Okay? If I was using a ratchet out this long, well, I mean you're going to have a lot of leverage there, so going that little bit is going to be putting a lot of torque on that little bolt. And we are just threading into aluminum, so you have to think about that as well. Use your best judgment. We want it to be tight. We don't want to strip out any of these holes.
It's going to be a really hard to chase down these threads and/or make a new hole if you end up having to do that for some reason. So, I'm just going to tighten this one up. It's going to take a minute because I'm only doing little, I don't know, 1/8th inch turns here or 1/8th-turn turns. All right. So, I would say we're pretty much bottomed out there. I'm just going to give it a little bit more. That was just the thing slipping, that's okay. Go one more. There we go. Give it a little wiggle. Feels pretty great.
Now, we're clear to mount our serpentine belt. So, we've got our serpentine belt. We've got our quick drawn belt routing here. Pretty easy. Alternator, water pump, power steering pump, tensioner, crank, AC, back up. I'm going to start up here. So, basically, I'm just going to try to weasel my belt all the way up to the top. Get it around that alternator pulley up at the top. Try to make sure that it's inside all the grooves. I'm going to let it hang down. And then I'm going to work it.
I'm going to come down around here, around the water pump, over the power steering, back around this way to the tensioner, crank, AC. It all should line up by the time I'm done. If you can't get this up over the alternator, up top, from down here, just, you know, pop the hood. Pop the hood, set it up from up there. And then work it a different way. But this is the generalized way that it's going to have to go in the long run. You do you, boo boo.
So, I'm going to go. I'm going to try to get the serpentine belt in between all these pulleys. I'm going to use my pry bar. Try to work it. Hopefully, this pry bar's long enough to get me above that alternator pulley. There we are. I'm just going to push it on. Okay. Water pump, being a pain in the butt. Oh, soon as I got in on, it came right off. That's fun. Okay. There we go. So, we're on the alternator up there. Now, what do we got to do? We're going to come around that water pump, if I don't lose the alternator up there, hopefully. Yeah. Okay. So, it came back off. That's all right.
We're going to do this a few times. If you're doing this on the ground, you might find it easier just to come from the top and do this. At least get it over the alternator. And we'll bring it down around everything. Okay, so we went alternator, water pump, we're bringing it around. We're going to come to the power steering pump pulley, which is this one right here. Okay? Now, I'm going to take it, I'm going to go straight across the engine to our tensioner pulley, right here. It's going to go up and over the top of that.
You can tell, which way the belt goes, generally, because if it's a flat smooth pulley, it goes on the backside of the belt. If it's a ribbed pulley, like that right there, obviously, the ribs sit in there. It's pretty easy to figure that out. I'm going to bring this side down around the AC compressor pulley, there we go. Okay. So, I'm just going to hold a little bit of tension on it with my hand. Nothing too crazy. I'm going to look up, see how everything looks. It looks like I'm on that AC up there. No, sorry, not the AC, the alternator. I'm on the AC down here. Power steering pump, looks good. Okay.
So, we're going to grab our tool with our 14 millimeter, whether you're using a wrench or something like this with a socket on it. I'm going to turn it clockwise, which relieves tension from the tensioner. Just try to slide it up and over. I want to try to make sure it goes into all the grooves. Slowly relieve pressure. Make sure my tool's still together. It is. Okay. Now, we're just going to look at the serpentine belt and all the pulleys, once again. Make sure everything's sitting in nice. We can give the serpentine belt a little tug. Feels good. It's going around. Perfect.
Now, a good habit to do would be to spark up your vehicle. Let it run for, I don't know, 10 seconds, 20 seconds. Turn it off, come back, check all your pulleys. Make sure the belt wasn't off a tooth. If it is, it'll probably work its way off quite a bit at that point. But hopefully, you didn't run it for too long, where you would've destroyed your belt. Right? If you run it for two minutes, well, it's been off a tooth all this time, you're going to ruin your brand new belt. So, we'll go 10, maybe 20 seconds. You just want to start it up. Let it run for a little bit. We know that the belt does all it's looping around all the things. And then we'll turn it off. And then we'll check it. Right?
All right. So, now that we've double checked to make sure our belt's all lined up on all the pulleys, we're going to go ahead and reinstall our little plate here. Should be fairly simple. We got this right here. This is going to come in and right through the backside there. So, what we're going to have to do, is we're going to have to try to get that in first. And then work this up and over, being very careful for our ABS wire that's hanging down here, and our brake hose.
So, let's see what we can do. We can go one way, we can go the other way, whichever way we go ... Oh, first try. Wow, that's a surprise. Anyway. I'm just going to make sure the center's pulled out. I'm going to put it in, lock that one in. Now, we can just go around and line up all the rest of them. Sometimes you'll get it, and the center pushed in. Now, it's in the locked mode. You can tell because all the prongs are pushed out. They all kind of made their way like that, just probably me holding onto them. There isn't too much pressure involved there.
So, I'll just grab my little pocket screwdriver again. Just going to pry it. Okay? You can do that, or you can use your little fork tool, if you have one. We basically, just want the senator to come up and out. I'm not going to jump ahead and do the next one yet because once they put this back in my other hand, it's probably going to roll around and close up again. Just be a pain in the butt. Or, like that kid chasing around the ice cubes, picks one up and drops it out of this glass every time you bend over. There we are.
So, now it's time to put the wheel back on. So, what we're going to do is we're going to make sure that we don't lift it with our back. We don't want to come from the front, try to bend over and lift it up, squish our back. We want to come from the side, put her leg up against it, just roll it up our leg. We can use our ab muscles to lift it up. That's why we got them. Put her on there. I'm just going to hold it, so it can't roll off. I'm going to line up our hub cap hole with our little valve stem. Pretty easy.
We'll get one lug nut on. Get it started, so we know the wheel can't fall off. Nice. Now, we'll grab our other four and get those going. And then we'll just bottom them all out. And then we'll torque them up when we get it closer to the ground. We got the wheel on the ground. We don't have all the weight of the vehicle on it. We just want it enough, so the wheel can't spin while I torque it. I'm going to go with my 21 millimeter socket, torquing this wheel to 83 foot-pounds. And I'm going to go in a star pattern.
I'm going to Start here, there, there, there, there. Make a nice pretty star, just like we did in art class. And then if you want to go around again, you can go around again. I could have probably bottomed them out a little bit more. But at least I didn't over torque them, right. The reason for torquing in a star pattern like this, is because if I just went around in a circle, I went here, here, here, let's say that the wheel was kind of cockeyed onto the hub, and it wasn't sitting perfectly straight. And I went ahead, and I torqued over here. And it kind of kinked it in. And then I could come around here, and I might get a click, even though it's 83. It might not be enough to really suck it in and get it up right up against the hub.
So, if you go here, here, here, it has no choice but to start it and then pull it in there, then pull it in. And everything's nice and situated, at that point. And it's always a good habit to just go around again. It doesn't take too much extra time. It doesn't cost you any extra money. So, just go around. There we go. So, now we've completed our service. Great job, everybody.
Thanks for watching. Visit 1AAuto.com for quality auto parts shipped to your door. The place for DIY auto repair. And if you enjoyed this video, please click the Subscribe button.