Hi, I’m Mike from 1A Auto. We’ve been selling auto parts for over 30 years!
Open the glove box to remove it. There are two pins at the bottom. Push them towards the center. It will unlock the hinges. I'll give you a better view of these once I have the glove box out. One just fell. That's okay. With those loose, you can unhook from these pins. It will lower down. There's a tether that keeps it from slamming when you open it. You have to unclip that. It's just going to push down. It's got tension to it, so it's going to zip back up. We'll reattach that later.
So these pins go through here and they go through the glove box and they make the hinge, so we're pushing them to the center to unlock it, and then they just fall out on the floor. We reinsert them when we install it.
Put this aside. This dashboard trim has to come out. This is basically the glove box holder. Have to remove these Philips head screws here, here, here. There's one underneath here. There's another one here, and the rest should be clips. Start removing this one up here. This one here. Actually, we need to pop this trim out, too. It's down here, and this will just pop out. Pull that out of the way. Pop this trim out, too.
Plug the light by turning it. Turn it clockwise to pull it out. Unplug the trunk switch. There's a lock on the bottom. Push it in, pull it out to remove this trim. Put this aside. Disconnect the electrical connections. One here at the motor. Push the lock in on the side, and work the connector out. Underneath here for the resistor. It's behind this little plastic protector. There's a push lock on the other side of this protector here. We'll use a flathead screwdriver just to reach up and push it in, just because I can't quite get it with my fingers. I just had to push that lock in to pull it out.
Here's our replacement one. Just to give you an idea, there's going to be a screw here, and there's ones in the back. I've already got this one here, so now I'm going to go reach up and get these two in the back. These tabs right here are the same as these here. We're going to push them in once the screws are removed, and drop the blower motor assembly down. All right, so these rear screws actually aren't there, which is good, but there is a screw here that needs to be removed.
Take a flat bladed screwdriver push these in, pull that down over here. Be careful, don't break these tabs, this piece here, because that's part of the heater core box. As you pry this down, you're more than likely going to break these tabs off. They're very thing, but since we're replacing this anyway, it's not a big deal. I'm just going to keep working it out of here. There is a harness back here that's clipped to it. Get this unclipped. Got it unclipped. Be sure you get all the screws out, and pull it out.
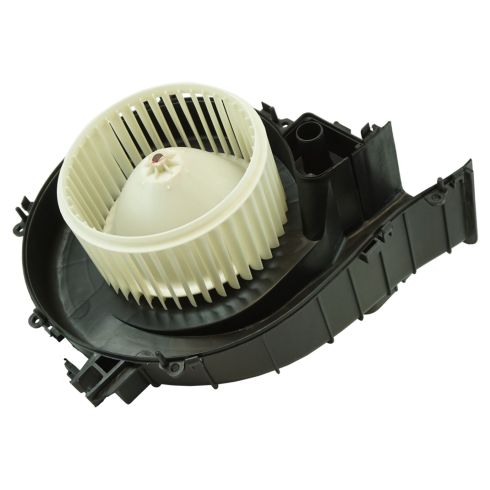
There's our old blower motor assembly from our vehicle. It still has the blow motor resistor in it. This is our new one from 1AAuto.com. See, it's the same style. There's a couple of things we'll have to switch over, but it comes with the actual fan part. Sometimes people call this a squirrel cage motor, but it's got all the same style tabs, alignment pins. This will fit into place and work great for us.
I'm going to swap this little flexy hose off and put it on our new one. Simple as that. I'm going to transfer over this clip for the screw. It's got two push tabs in the back. I'm just going to push it through and install it into our new one. Now I need to swap the resistor. Use a Phillips head screwdriver. Just pull straight out. It's got an alignment tab to match with that one there. Push in, and reinstall the screws. I'm also going to swap this protective rubber cap over. It's just double stick taped on. It's still pretty sticky. Actually, it has to go around this. Just pop that off, push it down, pop this back on. It's ready to be installed.
It's time to install our new blower motor assembly. I'm not going to worry about reinstalling these screws because some in the back are really hard to get to. It's got enough of these push clips and these alignment pins that once it's clipped up in there, you won't have to worry about having that screwed in. There is some foam that's back here. I'm just going to push it out of the way. Sometimes it's really hard to get that back in there. That shouldn't really matter because it has this nice lip anyways, so it's going to meet up against the air box here, the heater box, so I'm going to get it set up. Slide in that back portion. There's these pins here. I'm going to try to line them up.
There's corresponding holes in the bottom of the heater box. I'll do my best to line them up. Give yourself some more room. This harness is getting hung up on this clip as I'm trying to install it. I've slid it up, the narrow part between the heater box and the EC connector here. I'm just going to lay it on top for now. I'm just trying to give myself some more room because you want to try to hook the back part of this in that duct first.
Okay. The screws I can get to, I'll install. The back ones are really, really difficult up against the firewall, so I'm going to ignore them. Put these in here. This is our lowest screw that was in here. Push that pin, blower motor into place. So I'm going to get this harness back into place if I can. It's got some room. It can move, could be pushed up, and I'm going to slide the thin part through here, and I'm going to slide it here. I'm going to pull it down just like that. It'll plug into here. Resistor will then plug back in over here, and I'll just tuck the harness up out of the way. Plug it back in. Tabs, just got to find the holes there, turn it clockwise. It locks back in.
I'll reinstall the panel. It's got some push clips there and towards the bottom. There's an edge here that needs to go underneath this part of the dash. You've got to feed it up into there, and push it up over here. You've just got to push it up over that little bumper to hold it. Start finding our trim screws. Before I get too far, I'm going to install this trim panel back. Push this in.
Reinstall this trim panel. It needs to go underneath this, and in this little channel here. So it's probably best to lift it up like that. Push it down. Finally, reinstall the glove box lock bracket. Get some of those little tabs, and hold it in place. And there's one final screw. Don't forget, it's under here.
We'll reinstall our glove box. Now you don't want to forget this. It's kind of up here. It's this tether that's on a spring like a damper. Just so when you open the glove box it doesn't slam open. It's got to hook into here in the glove box. Of course, it doesn't go that far, so you've got to lift the glove box up and try to slide this little button in to the side of the glove box. It's a bit tricky to hold the glove box up. There. We got it.
Now those hinges. Let's see. There's a hinge here. It's going to slide in-between those two. There's one on each side, so I'm going to actually put the holding tabs that are here and here, I'm going to slide them into place. Get one end to go on in. The glove box will sort of sit there. Want to get lined up where the hinges go. Now we can just take our hinge pins and push them into place. They're going to go in from this direction, in all the way through.
We're going to line it up with the box, the glove box. All right. I've got one. We need to get the other one. You can actually lift the glove box up a little bit if it's easier. There's the other one. The glove box now hinges.
Thanks for watching. Visit us at 1AAuto.com for quality auto parts, fast and free shipping, and the best customer service in the industry.