Hi, I’m Mike from 1A Auto. We’ve been selling auto parts for over 30 years!
Before you raise and support the vehicle, take a breaker bar and a mm socket, and break the lug nuts free while the vehicle is on the ground. Raise and support your vehicle. Once the lug nuts are loose, I can use the socket and finish removing them. Remove the wheel, place it aside.
Working at the sway bar link, there are two nuts holding it on, and there is a 19mm socket, or there's a 19mm head on the back of this that you can counter hold. We're going to work on the upper one before it comes completely out. I've switched to a ratchet now that I've got it free, and I'm just going to turn it off. Start locking nuts so they can be a little slow moving. It's pretty common that the part on the back of the sway bar link that you want to counter hold, there's sometimes just basically a round part with two flat spots for your wrench, and they can strip really easily. It's very, very common, so now I'm going to use some locking pliers because it's almost out.
I'm going to try to lock the sway bar link in place. This part, so I can turn the nut without spinning the link inside the ball joint, tightens these up. It's actually starting to smoke from the friction. Now I've got it past the locking part of the nut. It's coming a lot smoother. You can actually see it steaming a little bit. It's not a completely round opening, it's sort of an oblong opening. That's what makes this nut a locking nut. It'll be easier to see on the brand new one, but that's why it's so difficult to come off.
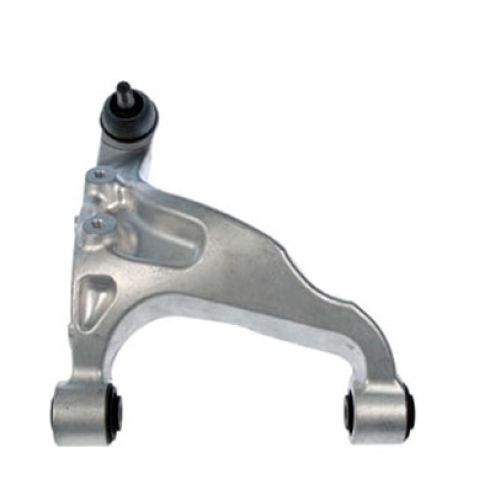
You can put an allen key in here and try to counter hold it. That might work for a little while. Usually the allen key strips out. The best bet is trying to get something behind it, like locking pliers or a wrench that fits to try to counterhold this while you take it off. You can remove the locking pliers now. This link should come out of this up here. I'm going to remove this upper control arm. It has two through bolts under the rear subframe. There's one here and one here. It's kind of hidden by the spring, and then it connects to a ball joint at the rear knuckle here.
Now start by removing these two through bolts. The clearances are pretty tight. You're going to have to get creative with sockets and extensions, and ratchets and wrenches, and we'll see how we get in there. I'm going to start by spraying them with some rust penetrant so they're easier to remove. Get up and spray the other one. We've got a breaker bar with an extension. It's half inch. 17 millimeter—it's a 12 point socket and it's not ideal for breaking things loose, but the clearances are so tight that I need to have more movement to get the wrench, or to get the breaker bar in a position that I can pull it to release it.
I'm going to try to take it up through here between the subframe and the gas tank, and I've got it on a pretty good spot. I'll try to pull it. I don't have the bolt counterhold yet, I just want to see if I can break the nut free. Sometimes the bolt will stay. All right. The bolt with the nut will move, which is good. I can reposition that. Keep pulling it. I'm watching the head of the bolt to see if it turns. It's not turning yet. You're going to keep loosening the nut.
If I see the bolt start to turn, then I will counterhold it. I've switched to a 3/8 drive ratchet, and a 17mm deep six-point socket, because I know this nut is fairly loose. I've broken it free. I just need to get it off, and the 3/8 drive gives me a little more space in here. It's just a matter of working it in there. It is coming loose. Very slowly, but it's coming loose. Just a core turn a time. It looks like it's starting to get loose enough that I can reach up there with my hand. See if I can remove it with my fingers. Yep. There it is. I'm going to leave that bolt in there for now, so it holds the suspension arm in place.
I'm going to go work on the other one. Let me go to the back one. I'm using a breaker bar and a long extension, a swivel and a 17mm. The nut is up here, so I'm going to trying to go through the rear. I'm going to give it one more turn with the breaker bar, then I'll switch to a ratchet. We'll use the mm socket on the breaker bar, to counter hold it because I really can't get a wrench in there. I'll go up through the subframe.
Now we need to remove this cotter pin. Remove this nut, then we can separate the ball joint from the rear knuckle. I'm going to spray this with some rust penetrant, and get my needle nose pliers and side cutters, and get that cotter pin out. I'll take my needle nose pliers, and I'll try to bend these out as best I can. They look pretty rusty. They might break off which is okay, as long as we can get them out. The best plan of attack since these are so rusty.
Let's use some side cutters. Either try to pry it out, but I think I'm just going to cut the bent ends off, and the try to pry with my needle nose, looped end out. The little trick I'm going to try. I've got a pic, and sometimes you can use a small punch that might not be too big, but I'll put the pick through the looped end, and trying to pry it loose. I don't want to break the back either. Sometimes I can open up the hole. Maybe this punch will fit. The punch is a little stronger. Put the punch in there and pry it out. Power pins can be tricky sometimes. That's what I wanted to do. Now this punch is a lot stronger than the pic. I'm going to try to break the end off. That's fine. I'll try with needle nose again. Pry it out.
This is a ball joint at the top here, it goes into a taper into the knuckle. It's come loose so the ball joint can spin, so as I'm trying to remove the nut I'm just spinning the ball joint, to try to help me remove it. I'm going to take a floor jack and just put some weight on the suspension to try to push the ball joint up tighter, into the taper of your knuckle. Picking up some of the suspension slack. The jack here might work for you pushing up on it. We found using a large pry bar up on top of the control arm, running over where the top of the ball joint is, and then holding down on it. This helps hold it in the taper and helped us remove the nut. Now it's pretty loose. I can take it out.
This control arm is loose. Let's see. I'll just pry it up a little bit. Just like that. The taper that I'm talking about is in the control arm. It's got a sort of a tapered cone, and this is a matching cone here. When sits in here, the friction holds the ball joint, and typically it keeps it from spinning. Ours started to come loose, so it started to spin, and that's why we had to hold down the control arm. if this doesn't come out real easily, if it's stuck, both this knuckle and his arm are aluminum, you shouldn't really hit on these with a hammer, you should use a ball joint removal tool that would slide underneath here, and you'd use it to press this apart and it would pop out. But since we got lucky this one came loose, now I can remove the two bolts that I left in there. There's no nuts on them, I just need to push them out, and the arm should come out. Let's see if we can push them out. There's one. We'll get the other bolt out. It's a little tight against the body, you might have to work with it to get it out. Got it. I can slide the arm out.
Here it is. Take our arm, feed it back in into position, then we'll sit here in the control arm. The rear bolt originally came out in this direction. It's a bit tight to get it in and out because of the body, it sort of sits on it like that. It's just a through bolt. I'm going to put it in from this way. It fits better. It's easier to go in. I'm going to reach up. Control arm lineup. There is the front bolt, there's enough room. Hard to go back in the way it came out. I'm pulling the subframe for it. I'll reinstall our rear nut, so I have to reach in this way. A lot of this you just have to do by feel, it's hard to see the clearances are closed. Let me install the front one. Slide the hand up here. I'll use a 17 millimeter socket and my breaker bar to counter hold the bolt as I tighten it. You can get a 17 millimeter socket and a ratchet on this side, and just bring this down till it's tight. I'm going to use this extension swivel socket and a breaker bar to hold the bolts, and just bring this down till it's tight. We can use a floor jack. We're going to use the stand jack to seat the ball joint in the taper, and also put some weight on the suspension before we torque the control arm.
We can install the nut for the ball joint. You can use a 19mm socket. Throw it down. Torque for this is 65 to 78. I'll get my torque wrench set to 70 foot-pounds. Now I can reinstall the cotter pin. Our counter pin is installed. Torque is 48 to 59 on these bolts, so we're going to do. I'm going to 50 put the sway bar back link into place. Counterhold the back of the sway bar link. I have to turn it, torque is 46 to 52 on the sway bar link nut, so I'm going to do 50. The upper control arm installed. I can release the jack from the suspension.
I'm going to install the wheel. Thread them on by hand first. Torque on these is 72 to 85, I've got the torque wrench set to 80 foot-pounds. I'll go a cross pattern. The wheel is installed and torqued.
Thanks for watching. Visit us at 1AAuto.com for quality auto parts, fast and free shipping, and the best customer service in the industry.