Replaces

This part doesn’t fit a . Select from parts that fit.
Frequently bought together
Part Details
Product Features
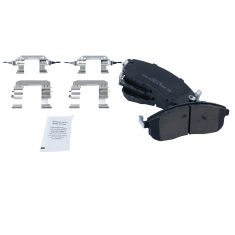
TRQ brake pads are manufactured using premium raw materials and design standards to restore original performance. TRQ brake pads are positive molded and utilize a multi-layer shim for enhanced performance and service life. TRQ’s combination of materials and design ensures a low dust and low noise braking experience. TRQ recommends replacing your brake rotors when you replace your brake pads to ensure even wear of components and improved braking comfort. All products are fit and road-tested in our Massachusetts R&D facility to ensure we deliver on our promise of Trusted Reliable Quality.
Item Condition:
New
Attention California Customers:
 WARNING: This product can expose you to chemicals including Lead and Lead Compounds, which are known to the State of California to cause cancer, and birth defects or other reproductive harm. For more information, go to www.P65Warnings.ca.gov.
Lifetime Warranty
This item is backed by our limited lifetime warranty. In the event that this item should fail due to manufacturing defects during intended use, we will replace the part free of charge. This warranty covers the cost of the part only.
FREE Shipping is standard on Orders shipped to the lower 48 States (Contiguous United States). Standard shipping charges apply to Hawaii, Alaska and US Territories. Shipping is not available to Canada.
Expedited is available on checkout to the United States, excluding Alaska, Hawaii and US Territories as well as P.O. Boxes and APO/FPO/DPO addresses. Final shipping costs are available at checkout.


Created on:
Tools used
Brought to you by 1AAuto.com, your source for quality replacement parts and the best service on the Internet.
Hi, I'm Don from 1A Auto. I hope this how-to video helps you out, and next time you need parts for your vehicle, think of 1AAuto.com. Thanks.
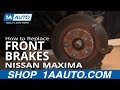
In this video we will be showing you how to replace, or do a front brake job on this 2003 Nissan Maxima, pretty much the same for a lot of different years Nissan Maxima, but it will be very similar for any 2000 to 2003 Maxima, as well as the same years of the Infinity I30. You are going to need a new pad and rotor set from 1aauto.com, jack, and jack stands 14, 19, and 21mm sockets.
You'll need a ratchet, and you'll probably also need a breaker bar or a pipe for some extra leverage for some of those bolts, a wire brush. You may need some penetrating oil and the hammer if your rotors don't come off easily. You'll need some brake grease or white grease for reassembly, a torque wrench, and a large C-clamp, or large Channel lock pliers to reset the pistons in the caliper.
Let's start off by removing the wheel. You're going to want a 21mm socket and ratchet or breaker bar, or your tire iron, and you'll probably want to start with the wheel on the ground. Loosen the lug nuts, then raise and secure the vehicle with jack stands, and then remove the wheel and the tire. Okay, turn the wheels by hand or by using the steering wheel, to access the back of caliper.
We're going to just do a general inspection of the brakes. We're going to check the pad life. We're going to check the rotors. You can use a flashlight and look through the inspection in the caliper, to look for your pad. These have a little bit of pad left on them, a little bit of serviceability, but we're going to go ahead and replace them just to show you how to do it. In terms of the rotor, you're going to want to look for excessive rust, excessive wear, and lips, as you run your finger across the rotor itself. This one is in pretty good shape, but we're going to go ahead and replace it with a 1A Auto part, just for your reference.
The next step is going to be removing the two 14mm bolts that hold the caliper to the caliper bracket. Let's speed up as Don removes those two 14mm bolts. These bolts should come off without too much resistance. We're going to pry the brake pad away from the rotor, thus pushing the caliper piston in, creating more room for us to get this off. As you can see, I went right through the inspection port into the rotor and pulled towards me. At this point, we've gained enough access and enough clearance that it will allow us to take the caliper right off. Take the caliper; put it in a position where it's not hanging from the brake line. At this point now, you can remove the outer pad, inner pad if necessary, and you can always use a screwdriver to pry it out. Now, we're going to do just another inspection; take a look at the caliper guide slides. These are both fluid and go in and out, as they should. In the event that you find one that isn't, they can lead to premature brake wear. What you would do is pull it out. You can see this is greased correctly, but if it wasn't, you would take a wire brush to it, clean it up nicely, grease it, put it back in, and re-secure the boot.
Next, we are going to take off the caliper guide with the two 19mm bolts. These are the tools that we're going to use to remove the 19mm bolts: either a conventional half-inch ratchet with a 19mm socket, or if you experience heavy resistance, a breaker bar, and if even further force is needed, you can use a pipe as leverage through the breaker bar. Apply the pipe over and apply even pressure down, adding more force as necessary, so safely, it breaks the bolt free. I will speed up here as Don breaks lose that second bolt. Again, when using the pipe method, you can use it with just a regular ratchet as well, and just apply nice even pressure. Increase the pressure gradually until the bolt breaks lose. At this point now, the 19mm bolt, the second of the two is about to come out, and you want to be careful when you pull it out because your rotor could loosen up, which is still supported by the lugs, which your caliper guide is coming off.
Now, it's time for removal of the brake rotor. In this case, we have an ideal situation because the brake rotor is free. In some cases, you'll find that the brake rotor will be rusted and solid against the hub, in which case you can use some penetrating oil, spraying it around. Let it soak in for a little bit, and then give a tap from the back, breaking the rotor free. You've got to use a wire brush to clean off the hub, to get a nice surface for the rotor to lean against.
I've got the brake rotor. Something that you can do is take some mineral spirits, or brake part cleaner and clean the surface of the rotor, and make sure there's no residual oil left over. Once that's done, slide the rotor on the hub. Install a lug nut hand-tight to hold the rotor in place. Now use your wire brush and clean the stainless steel slides. They're on the brake caliper bracket.
That caliper guide cleaned up. We then install the 19mm bolts. Speed up here; Don first pressed those in by hand, and then uses a socket ratchet to preliminarily tighten them. I set the torque wrench to 98 foot-pounds. I'll go ahead and torque the 19mm bolts. At this point, we're going to recommend using brake grease on the surfaces of the pad that come in contact with the caliper and the caliper slide. You can see I've got a little bit of it sprayed here on the back of the pad, working that in. Then also at the edges that are going to fit into the caliper slide itself. We're going to be careful not to get it on the pad itself. When we took the pads out before, notice that the inboard pad had the clip on the end, so that's going to go in first on the inside, snapping into the caliper bracket; same goes for the outboard pad, snapping right in and leaning up against the rotor.
In order to fit the caliper back over the pads, we're going to compress the piston back into the caliper, using a C-clamp. I'm just going to fast forward as Don works that C-clamp in. You can see, as the C-clamp compresses the piston, it goes back into the caliper. You can also use a large pair of water pump or Chanel lock pliers to do this. You open the pliers up as far as they will go and squeeze the caliper and piston. What we're going to do when we're doing that, is use our fingers to keep the slides in, so that the caliper itself fits right back in. If you find that you're getting any resistance, make sure that these are pushed in, and slot it right up. Re-install my 14mm caliper bolts. Speed up here again, as those bolts are tightened up preliminarily. Now, we are going to set our torque wrench to 25 foot-pounds, and that's it.
Fast forward here, as we take that lug nut back off, put the wheel and tire on, and just put the lugs on by hand first, and then preliminarily tighten them. Set your torque wrench to 100 foot-pounds and tighten the lug nuts. Use a star pattern; draw a star pattern as you tighten them, and then just re-check them.
Every time we do brake work, we just make sure that we get in, pump the brakes a number of times, make sure you have you have a good solid pedal, and then do test stops from 5 and 10 MPH before road testing the vehicle.
We hope this helps you out. Brought to you by www.1AAuto.com, your source for quality replacement parts and the best service on the Internet. Please feel free to call us toll-free, 888-844-3393. We're the company that's here for you on the Internet and in person.
Tools used
...take the wheel off, we're gonna use a 21-millimeter socket. Remove the wheel.
...these two caliper bolts out, I'm gonna use a 14-millimeter socket. Loosen this one up. Loosen this one up. And take those out. Take that one out, take this one out. Now just take a screwdriver, straight blade screwdriver. Just pry the caliper out a little bit. That's just gonna compress the piston. And then slide the caliper off. You can use a hanger, and just hang it from the coil spring. Make sure there's no tension on the brake hose.
Take the brake pads off. Can use a straight blade screwdriver. Slide them out. Gonna use a 19-millimeter socket. Take these two caliper bracket bolts out. Take those bolts out. Slide the bracket right off.
All right, grab the rotor. Slide it off. If it didn't come off that easy, you can just use a hammer and hit right in those areas, and it should pop right off.
And now just take a wire brush. Just clean up the surface where the rotor's gonna sit on the hub. There's a little bit of rust here. It's a good idea to take a little copper anti-seize and just put it on the hub, just so the rotor doesn't stick to it. All right, take the rotor, put it on backwards, take a little brake parts cleaner, spray it down. Wipe it down. Flip it over. Do the same on this side.
Now we're gonna clean up the brake caliper bracket. I'm gonna take a straight blade screwdriver, just slide these pad clips off, or anti-rattle clips. Take a wire brush, just clean some of the rust off of here. And it looks good. Take a little brake caliper grease. Take one of the new clips, slide it in position, and lock it in place. And we're gonna do the same on this side, but the only thing is, these clips are a little bit different. These have these extra ears, so keep that in mind. Now, just take a little brake caliper grease and just do a nice thin coat. And, same on this side.
Now, pull the brake caliper slides out. Take a little brake parts cleaner, clean off the slide pin. Wipe it off. Can spray a little brake parts cleaner in here, and clean that out as well. Take some fresh brake caliper grease, grease up the pin. Slide it back in the caliper bracket. Make sure that's sealed properly. Do the same on the other side.
And take the brake caliper bracket, slide it in position. Put the bolts back in. And torque these bolts to 122 foot-pounds.
Now we're gonna take the new brake pads. On the outside, you're gonna have the brake pad low warning indicator on the top, and that's gonna slide in this little tab right here, just like that. Slide that on. And on the inside one, it's still gonna be on the top. And just slide it in that tab right there. It's a little bit tricky. There we go.
Now we're gonna compress this brake caliper piston. I'm gonna use a brake caliper compressing tool. Just slide it in here. If I can get the tool to work. There we go. And just compress it slowly. As you compress it, it's gonna push the fluid through the lines, back up into the master cylinder. All right, the piston's all compressed. Take the hanger off the caliper. Slide it over the brake pads. Just like that. Take the bolts, get the bolts started. Now I'm gonna torque these bolts to 20 foot-pounds.
Put the wheel back on. And the lug nuts. Now I'm gonna torque these lug nuts to 83 foot-pounds, in a star pattern, to tighten the wheel down evenly. Just go around again, double check.
And pump the brake pedal. Nice and slow. There's gonna be an air gap between the brake caliper piston and the brake pads.
And then check the brake fluid level, and adjust accordingly.
Tools used
Brought to you by 1AAuto.com, your source for quality replacement parts and the best service on the Internet. Hi, I'm Don from 1A Auto, I hope this how to video helps you out and the next time you need a part for your vehicle, think of 1AAuto.com. Thanks.
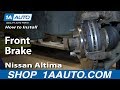
In this video, we're going to show you how to replace the front brakes on this 2003 Nissan Altima, it's the same process on the Altima's from 2002 to 2006. We show on the passenger side but it's the same process on the driver's side. The items you'll need for this is new brake pad and router kit from 1AAuto.com, flat blade screwdriver, 14 mm, 21 mm and 22 mm sockets and ratchet, a wire brush, a large C clamp, brake cleaner, brake grease and jack and jack stands. Start off by removing your wheel, if you don't have air power tools you are going to want loosen the lug nuts while the vehicle is on the ground and then jack it up and remove them the rest of the way. Now to inspect your brakes, you just want to look in here and you can see how much life is left on your brake pads. Ours is in pretty rough shape. Then the next thing you want to do is just check your router for any deep gouges.
You want to pry in here with a screwdriver to push the caliper piston into place, this will make it easier to remove the caliper and then you want to remove this two 14mm bolts. Then you can pull that caliper off and you want to set aside and secure it with a wire tie or something up and out of the way and then pry off the brake pads. Pry off your brake pad slides. Next you want to remove these two 22 mm bolts, you can see Don uses a piece a pipe to give him some extra leverage to help break those bolts free. Once those bolts are removed, your caliper bracket will come right off and then using a hammer you want to hit the back of your router to break it free and pull that off as well. On the right is the old router and brake pads, on the left is the new ones from 1A Auto. Using some brake cleaner, clean up your new router. Use a wire brush to just clean up your caliper bracket a little bit. Also clean up your brake pad slides. Take some brake grease and just apply it to the ends of the brake pad on these tabs. Then take your caliper bracket and make sure that these slide bolts have grease on them. If they don't, apply some. Both of ours are all set.
Now put your new router into place and put on one lug nut just to hold into place. Then take your caliper bracket and put that into place and replace those two 22 mm bolts. Then just torque these bolts to 100 foot pounds. Push your brake pad slides back into place. Push your brake pads into place and if you need to you can use a hammer, just carefully tap into place. Then bring your caliper down and using a large C clamp, you just want to twist that piston in until it's flat. In the end it should look like this. Now you can put the caliper into place and you want to put it over those slide bolts and then replace those two 14 mm bolts and torque them to about 25 foot pounds. Replace your wheel, hub caps and lug nuts. Tighten the lug nuts preliminarily, lower the vehicle and tighten them the rest of the way. Then you want to torque the lug nuts in a crossing pattern to 100 foot pounds. After doing any repair on the brakes, before taking it out onto the road it's important to do a couple of things first. First you want to just pump the brakes until the brake firms up and then you want to do a stop test from 5 miles per hour and then 10 miles per hour.
We hope this helps you out. Brought to you by www.1AAuto.com, your source for quality replacement parts and the best service on the Internet. Please feel free to call us toll-free 888-844-3393. We're the company that's here for you on the Internet.
Tools used
Tools used
Tools used