Hi, I'm Mike from 1A Auto. We've been selling auto parts for over 30 years.
Hey, everyone. Sue, here from 1A Auto. And today we have a 2010 Murano in the shop and we're gonna show you how to replace lower control arm in the front. If you need this part or any other part for your car, click on the link below and head on over to 1aauto.com. I have the vehicle somewhat supported, 21 millimeter socket and I'm gonna take the lug nuts off with some weight on the tires. Just gonna break them free. This has a lock, wheel lock, so I've got the wheel lock key lined up.
Now, I'm gonna raise my vehicle on two post lift. You can use a jack and jack stands at home and we'll take the tire off. Now the vehicle is in the air and I can just take the lug nuts off by hand. Take the tire off. Loosen up the ball joint jam nut that goes into the knuckle, 18 millimeter socket. Once we take this nut off, see if we can get that bolt to turn, 18 millimeter wrench on the bolt. Let's see if we can get that to spin and come out. Lot of times with steel and aluminum mix you have an oxidation--it's like a white powder and it causes things to freeze up.
We lucked out with this. There we go. Now, I'm gonna use a what they call a pickle fork to separate the knuckle from the ball joint, that being the knuckle, this being the ball joint, control arm. It's one piece. Now I have the pickle fork in there, definitely separated. I can see the ball joint and stud came through the knuckle. I'm just gonna grab my long pry bar and I'm just gonna help it go the final movement. Pull that out. I don't want to damage the knuckle. I don't care about the actual control arm because I'm replacing that.
Let's try this. I'm gonna give it a tap with the hammer. See if I can convince it. Pry it out a little bit. There we go. So it technically is, it's out. Okay. There we go. Wonderful. Now we have to take the two bolts that go vertical into the subframe. Now the nut on top is a 21 and the bolt head is a 21 millimeter. So I'm gonna see if I can break it free first. Take my 21 millimeter wrench put it on top and it bottomed out on the sway bar link which is perfect for me because now I don't have to hold it.
Nice. Now, I'm gonna do the same on this side. Break this free. Let's see, there we go. Okay, now we'll take the bolts out. Let's see, there we go. Okay, now we'll take the bolts out. See if I can use a wrench, there we go. There's one, now they might be ... there's definitely different links. So the longer one goes to the back vertical and then the front one. And then the front you can see the size difference, so you know that the shorter one goes to the front hockey puck and the longest one goes to the rear.
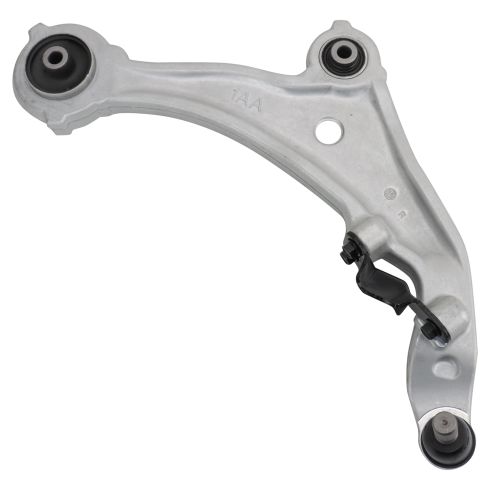
I'm gonna take a pry bar and I'm just gonna put it right between the subframe and the control arm, pry it right out. Here we have our brand new lower control arm for 2010 Nissan Murano. We got it from 1A Auto. And here is the factory one, OA style, came right out. I'm gonna have to say that they're pretty exactly identical. They even have the same stamp on them. The one double A. That's a L for left side and the other side will have an R on it. Same stamp. They come with the actual stock brackets, come with a ball joint, come with both control arm bushings into the subframe and this is a protective plastic, you take that off before you install it.
If you need this part or any other part for your car, click on the link below and head on over to 1aauto.com. So now I'm gonna install my lower control arm. First thing I'm gonna do is take this shipping plastic off, make sure it's off and out of the way. Then I'm gonna line up my bushings. So I'm gonna put the front hockey puck in first. So make sure that the ball joint side is in front of the knuckle and the brake system. Line that up, take a rubber mallet, see if we can tap it in.
A little bit more. Take the shorter bolt, put that through. Just needs a little bit of more convincing. Might need to take a ... yep, now take your pry bar and just move this control arm around, just a hair. Manipulate it so it gets into place. So now I got the hockey puck bushing lined up and I'm gonna start my ball joint into the knuckle. That's almost in the housing. Let's see if I can move this around. Take a rubber mallet, there we go. Make sure you use a rubber mallet, if you use a obviously a steel one, you can damage that, there will be zero warranty.
You're gonna line this ball joint, there's a notch for the bolt that goes through. Now, the pry bar just gonna place it under the subframe. Just give it that last, its movement to go up. And you can put the bolt right through. Now, I'm gonna put the nut on to secure it. This also now takes the pressure off the inside bushings so we can now line them up a lot easier. I'm just gonna take a dowel tool and line up that bushing. There we go. I can put the bolt through. That's a bit lined up. Now I can take the bolt, line it up, and just take my rubber mallet and now I know that the top of the bushing has to go inward just a hair.
I'm gonna try to line the back bolt up, maybe I can get the front to go in a little bit easier, the backs in. There we go. Okay, so I'm gonna use a socket extension and try to straighten that out, see if I can hammer that out. Beautiful. Put that nut on. Let's do the same to the front. So I'm gonna tighten, hand tighten both front and back before I torque either one of them. Now, I'm gonna torque the inner bushing to our lower arm bolts to 114 foot pounds. Now we'll tighten the ball joint jam bolt and that's 18 millimeter socket and wrench. In the torque spec is 46 foot pounds.
We're gonna remount the tire. Put your five lug nuts on. I like to start the bottom one that way I can snug it in and hold the rim steady. Even though I'm still doing it by hand, I always do everything in a star pattern. Just becomes a good habit. It keeps the rim snugged up against the hub. Now we can lower it and torque it to the specs. 2010 Murano, the wheel torque is 80 foot pounds. I'm gonna put my wheel lock key on. Start in a star pattern, start on the bottom. One more time. Ready to go.
Thanks for watching. Visit us at 1aauto.com for quality auto parts, fast and free shipping, and the best customer service in the industry.