WARNING: This product can expose you to chemicals including Lead and Lead Compounds, which are known to the State of California to cause cancer, and birth defects or other reproductive harm. For more information, go to www.P65Warnings.ca.gov.
Lifetime Warranty
This item is backed by our limited lifetime warranty. In the event that this item should fail due to manufacturing defects during intended use, we will replace the part free of charge. This warranty covers the cost of the part only.
Returns: Parts with electrical components cannot be returned once installed.
FREE Shipping is standard on Orders shipped to the lower 48 States (Contiguous United States). Standard shipping charges apply to Hawaii, Alaska and US Territories. Shipping is not available to Canada.
Expedited is available on checkout to the United States, excluding Alaska, Hawaii and US Territories as well as P.O. Boxes and APO/FPO/DPO addresses. Final shipping costs are available at checkout.
How To Replace Oil Pressure Sensor 1995-2019 GMC Savana 6-0L
Created on:
Tools used
10mm Socket
Ratchet
1-1/16 Inch Socket
1. Removing the Access Panels
Undo the latches on the center console
Remove the two 10mm bolts from the driver’s side lower dash panel
Pull off the driver’s side access panel by hand
Remove the two 10mm bolts from the passenger’s side lower dash panel
Pull off the passenger’s side access panel by hand
Undo the latches underneath the center console
Lift the center console and pull it forward
Remove the storage panel by hand
Remove the four 10mm bolts from the cup holder panel
Pull off the cup holder panel by hand
Remove the top piece from the central access panel
Push the central access panel underneath the dash
2. Removing the Oil Pressure Sensor
Disconnect the Oil Pressure Sensor Wiring Harness
Loosen the sensor with a 1 and 1/16th inch socket
Pull the socket out by hand
3. Installing the New Oil Pressure Sensor
Press the new sensor into place
Twist the sensor in by hand
Tighten the sensor with the 1 and 1/16th inch socket
Connect the wiring harness
4. Reinstalling the Access Panels
Put the top piece back onto the central access panel
Push the central access panel into place
Line up the access panel latches
Hook on the latches
Put the cup holder panel into place
Start the four 10mm bolts by hand
Tighten the 10mm bolts
Clip the storage panel into place
Clip the driver’s side access panel into place
Insert the two 10mm bolts into the driver’s side access panel
Clip the passenger’s side access panel into place
Insert the two 10mm bolts into the passenger’s side access panel
Brought to you by 1AAuto.com, your source for quality replacement parts and the best service on the Internet.
Hi, I'm Mike from 1A Auto. I hope this how-to video helps you out, and next time you need parts for your vehicle, think of 1AAuto.com. Thanks.
In this video we're going to show you how to replace the oil pressure sensor on this 2005 GMC Savannah 2500 with the 6-liter V8 engine. The tools that you'll need are a 10 mm socket and a 1 and 1/16th socket and a ratchet.
To start off go to the driver's side of the vehicle and you will see there is a panel right here and you're going to want to remove these two 10 mm bolts that secure that panel. Also, you'll see that there's a latch back here. Pull that back towards you and it should unhook that clip there. Then you just want to remove those bolts and we'll just fast forward as he does this. Now with the bolts removed you can just pull on that panel. Just reach underneath it and pull it out. Be careful not to pull out the panels above it. Now on the other side there are, again, two more 10 mm bolts securing a panel. You want to just remove these two 10 mm bolts and also, like on the other side, you want to pull back this clip and unlatch that. We will fast forward as he removes these two 10 mm bolts.
Now, you just want to pry this panel off. It should pry off pretty easily. In the center of the center console, underneath there's two more of these latch clips and what you want to do is you want to just push up on the clips and free them and then once you have this unlatched, just lift up and pull forward. It should pull right out. To make more room for yourself, the engine is behind this panel so what you can do is you can see it can't come out of this vehicle because the seats are in the way. The seats are only a few bolts if you want to remove them, but if you just want a little bit more room to save time what you can is you can just remove, you see those four 10 mm bolts inside this panel? You just want to remove those. With those bolts out you can now pull that panel up and off and remove that little top piece and now with the overall access panel being shorter you can push it under the dash in that case. Just to give you a reference to where it is, you will see from the passenger's door it's actually right in the center at the back of the engine.
What you want to do, is disconnect the harness, pull up on that tap. Pull the harness right up and out and then using a 1 and 1/16th inch socket just put that over the sensor and just start loosening it up and twisting it out. You have it loosened enough it will just pull straight out.
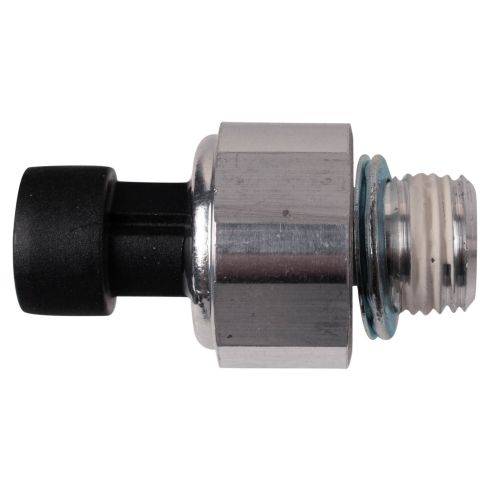
You can see the old one's on the right and the new one from 1A Auto is on the left. They are exactly the same. You just want to take that sensor and press it down into the hole and just twist it in by hand. Once it's in there firmly you just want to get your 1 and 1/16th socket and ratchet and tighten it up the rest of the way. Now just plug the connector back into the top of the oil pressure sensor and that's all set.
To put the panel back together what you want to do is put that top piece on. Line up the access panel and you just want to keep pushing it back into place. You'll see those clips have to line up. There are hooks on the van, on the floor of the van that you need to line the latch hooks up with. One you have it lined up you just want to start connecting all those latches so just hook onto the hook, pull the tab and lock it. You want to do that with all four of them. Now you can replace the cup holder panel. Put it into the place and replace those four 10mm bolts. It helps if you do it by hand. You can hold on to it and line up all the bolts to start it out by hand and then we'll fast forward as he uses the ratchet to tighten them the rest of the way. Now you can put on that little panel right there. It just clips into place. Replace the panel underneath the driver's side. Just push all the clips in. You should hear them snap. Then you just want to replace those two 10 mm bolts and we'll fast forward as he does this. Now you just want to push that panel into place on the passenger side. You want to line up the clips, push it in and then replace those two 10 mm bolts. Then you are all set.
We hope this helps you out. Brought to you by www.1AAuto.com, your source for quality replacement parts and the best service on the Internet. Please feel free to call us toll-free, 888-844-3393. We're the company that's here for you on the Internet and in person.
SWA41738
In Stock
Product Reviews
Loading reviews
4.93/ 5.027
27 reviews
5 Stars
4 Stars
3 Stars
2 Stars
1 Star
26
0
1
0
0
Easy Use Site
Anna
April 19, 2018
I was able to find part needed at reasonable price and received it fast. And it fixed my problem.
Great Part and Replacement Video
Thomas
May 24, 2018
When I diagnosed the problem and found it was this sensor I searched for videos on how to replace it. Seemed simple and was easy to replace. Fixed an extra problem with windows locking up as well.
Fixed my problem
Matthew
July 20, 2018
Had a oil pressure problem and this product fixed it.
So far so good
P
September 15, 2018
So far so good. Came on time, good price. Requires a special socket.
When I need a part 1AAuto is where I shop
Josue
July 11, 2019
The oil pressure was all over the place I had no idea what the problem could be till I found 1 AAuto and the how to videos. Thank you 1 AAuto now the oil pressure is acting how it should.
Great product that is accurate and working.
Robert
December 7, 2019
Had been having problems with my Tahoe's gauge and this sender fixed it!! Had the pressure checked at the shop and thisa one is accurate. Saved me from a new instrument cluster. Thanks 1A Auto for selling top quality products.
Sender worked perfect!
Daniel
June 22, 2020
Kept getting irattic oil pressure and a check engine light. This sender fixed both issues! My Yukon is on the road again...
Excellent service as always!
Brian
July 30, 2020
Prices were good, quality was great and everything arrived a day ahead of the promised delivery date! To top if off the the free instructional videos are very helpful and customer service/return was a pleasure! Very satisfied customer.
work perfectly
Erik
September 6, 2020
will buy again..A+
GREAT PRODUCT FROM 1A, AS EXPECTED
Jordan
April 26, 2021
1A's instructional videos have gotten me out of more jams and saved me more money that I can count. I determined that it was time to shift my loyalty from the chain stores. This was my first purchase and the quality of the part was great, as expected, and shipping time was quite fast.
2006 Sierra 5.3 oil pressure sending unit
Todd
May 17, 2021
Fit perfect and functioned perfectly.
Brian
February 26, 2022
Came on time , swapped it out , now everything is back to normal ! Easy to install
Oil pressure sending unit
ROBERT`
April 25, 2022
Worked great! Now my oil pressure guage in my 2003 chev truck is reading 40 at idle like it should.
Keith
August 9, 2022
All good
Donald
August 16, 2022
Not as accurate as I would like. Shows lower than the master gauge I used on it
BETTER THAN AC DELCO
Bruce
November 23, 2022
Originally I bought a AC Delco oil pressure sensor after my factory sensor went bad at 185,000 miles. It made the needle bounce. So I bought another AC Delco somewhere else and it did the same thing. So I bought one from 1A AUTO and it works great.
Low Oil Pressure Warning Fixed
joshua
December 31, 2022
Fixed my occasional low oil pressure warning. Changed the screen below this for good measure too.
Parts
Alfoster
January 8, 2023
Awesome
sammy
March 6, 2023
Good item . Fast shipping.
Jason
April 23, 2023
Fit perfect for my 03 Tahoe works great!
C5 Oil Pressure Sender
Leo
May 1, 2023
Has worked perfectly for over 5 years.
Ronald
July 15, 2023
Good
Darryl
October 26, 2023
Works great price was great and shipping was great.thanks, D Moore
Best prices!!
Domingo
November 2, 2023
Never have any issues with ordering parts for all my vehicles here. If you have to return they make it easy with no problems and prices are always the best, definitely recommend giving them a try.
LARRY
November 19, 2023
One of the better oil pressures sending units I have installed. Working great so far. I woul recommend this product.
Randall
April 6, 2024
Sender fit and is working fine
Nathan
August 22, 2024
It works great.....just as it should. I recommend this product.
Customer Q&A
What size socket is needed?March 9, 2019
Michael R
10
Actual Measurements are not listed or available. Our parts are exact replacements for your vehicle's OEM parts. As long as your year, make, and model match up with our listing, these parts will directly fit and function like the originals.
March 9, 2019
Peter L
Where is the sensor located. .??August 31, 2019
Larry S
10
It is located on the back of the engine behind the intake manifold
August 31, 2019
Michael W
10
Its on the rear of the engine top side close to the fire wall. You will need an extension and knuckle to help get access. Its hard to see but if you reach down you can feel the sensor.
August 31, 2019
B O
10
On the back of the engine under the intake. You can get to it with out taking the intake off. Its a tuff one. Take the intake off and you can really get to it
August 31, 2019
Jacob M
10
Behind and to the right of the intake manifold. It worked out for me, I had to replace the knock sensors also. I believe there is a way to do it without removing the intake manifold on youtube.
August 31, 2019
P E
10
Thank you for the question. This part is located on the back of the engine under the intake. Please let us know if you have any other questions.
September 2, 2019
Christa R
10
On the back side of engine of drivers side upper corner kinda tough to get at look it up on You Tube on how to change it.
September 3, 2019
E L
Is it OEM ?January 16, 2021
Michael B
10
No but works I have had one in mine for a couple years.. the cam position sensor has to be oem tho
January 16, 2021
B R
10
No but worked great
January 18, 2021
Carl W
10
DIY solutions brand parts are manufactured by various aftermarket companies specifically for us and built to your vehicle's exact OEM specifications.
January 18, 2021
T I
Does this include the filter screen?February 25, 2021
Cody H
10
The screen is not included with this item. You may be able to reuse your original if it is in good condition.
February 25, 2021
Adam G
10
No. Worked fine plug and play
March 4, 2021
Carl W
Will this work on a 07 Yukon Denali with the 6.2L?June 26, 2021
Travis H
10
Currently, we do not carry this part for your vehicle. We're always updating our inventory so please check back soon!
June 26, 2021
Cristina P
Will this fit 4200 or 4.2 straight 6 04 trailblazer?September 24, 2021
Richard B
10
Currently, we do not carry this part for your vehicle. We're always updating our inventory so please check back soon!
September 24, 2021
Adam G
What is the life expectancy of this sensor?March 3, 2022
Brad B
10
This is backed by our limited lifetime warranty. In the event anything should fail due to manufacturing defects during intended use, we will replace the part(s) free of charge. This warranty covers the cost of the part only.
March 3, 2022
Cristina P
The computer is not throwing any low oil pressure codes, but I'm seeing between 4 and 8 pounds oil pressure on dash gauge and around 20 while driving. Engine runs great with no symptoms. What information can you tell me about this problem? I'm doubtiNovember 7, 2022
Gregory P
Customer service
877-844-3393
Monday - Friday 8:00am - 9:30pm ET Saturday - Sunday 8:00am - 4:30pm ET
Pontiac is a registered trademark of General Motors Company. 1A Auto is not affiliated with or sponsored by Pontiac or General Motors Company.See all trademarks.
Enter Vehicle Year Make Model
Specify your vehicle's year, make and model to guarantee fit.
Year
Make
Model
Options
Drivetrain
This part doesn’t fit a . Select from parts that fit.