WARNING: This product can expose you to chemicals including Lead and Lead Compounds, which are known to the State of California to cause cancer, and birth defects or other reproductive harm. For more information, go to www.P65Warnings.ca.gov.
Lifetime Warranty
This item is backed by our limited lifetime warranty. In the event that this item should fail due to manufacturing defects during intended use, we will replace the part free of charge. This warranty covers the cost of the part only.
Returns: Parts with electrical components cannot be returned once installed.
FREE Shipping is standard on Orders shipped to the lower 48 States (Contiguous United States). Standard shipping charges apply to Hawaii, Alaska and US Territories. Shipping is not available to Canada.
Expedited is available on checkout to the United States, excluding Alaska, Hawaii and US Territories as well as P.O. Boxes and APO/FPO/DPO addresses. Final shipping costs are available at checkout.
How To Replace Oil Pressure Sensor 1995-2019 GMC Savana 6-0L
Created on:
Tools used
10mm Socket
Ratchet
1-1/16 Inch Socket
1. Removing the Access Panels
Undo the latches on the center console
Remove the two 10mm bolts from the driver’s side lower dash panel
Pull off the driver’s side access panel by hand
Remove the two 10mm bolts from the passenger’s side lower dash panel
Pull off the passenger’s side access panel by hand
Undo the latches underneath the center console
Lift the center console and pull it forward
Remove the storage panel by hand
Remove the four 10mm bolts from the cup holder panel
Pull off the cup holder panel by hand
Remove the top piece from the central access panel
Push the central access panel underneath the dash
2. Removing the Oil Pressure Sensor
Disconnect the Oil Pressure Sensor Wiring Harness
Loosen the sensor with a 1 and 1/16th inch socket
Pull the socket out by hand
3. Installing the New Oil Pressure Sensor
Press the new sensor into place
Twist the sensor in by hand
Tighten the sensor with the 1 and 1/16th inch socket
Connect the wiring harness
4. Reinstalling the Access Panels
Put the top piece back onto the central access panel
Push the central access panel into place
Line up the access panel latches
Hook on the latches
Put the cup holder panel into place
Start the four 10mm bolts by hand
Tighten the 10mm bolts
Clip the storage panel into place
Clip the driver’s side access panel into place
Insert the two 10mm bolts into the driver’s side access panel
Clip the passenger’s side access panel into place
Insert the two 10mm bolts into the passenger’s side access panel
Brought to you by 1AAuto.com, your source for quality replacement parts and the best service on the Internet.
Hi, I'm Mike from 1A Auto. I hope this how-to video helps you out, and next time you need parts for your vehicle, think of 1AAuto.com. Thanks.
In this video we're going to show you how to replace the oil pressure sensor on this 2005 GMC Savannah 2500 with the 6-liter V8 engine. The tools that you'll need are a 10 mm socket and a 1 and 1/16th socket and a ratchet.
To start off go to the driver's side of the vehicle and you will see there is a panel right here and you're going to want to remove these two 10 mm bolts that secure that panel. Also, you'll see that there's a latch back here. Pull that back towards you and it should unhook that clip there. Then you just want to remove those bolts and we'll just fast forward as he does this. Now with the bolts removed you can just pull on that panel. Just reach underneath it and pull it out. Be careful not to pull out the panels above it. Now on the other side there are, again, two more 10 mm bolts securing a panel. You want to just remove these two 10 mm bolts and also, like on the other side, you want to pull back this clip and unlatch that. We will fast forward as he removes these two 10 mm bolts.
Now, you just want to pry this panel off. It should pry off pretty easily. In the center of the center console, underneath there's two more of these latch clips and what you want to do is you want to just push up on the clips and free them and then once you have this unlatched, just lift up and pull forward. It should pull right out. To make more room for yourself, the engine is behind this panel so what you can do is you can see it can't come out of this vehicle because the seats are in the way. The seats are only a few bolts if you want to remove them, but if you just want a little bit more room to save time what you can is you can just remove, you see those four 10 mm bolts inside this panel? You just want to remove those. With those bolts out you can now pull that panel up and off and remove that little top piece and now with the overall access panel being shorter you can push it under the dash in that case. Just to give you a reference to where it is, you will see from the passenger's door it's actually right in the center at the back of the engine.
What you want to do, is disconnect the harness, pull up on that tap. Pull the harness right up and out and then using a 1 and 1/16th inch socket just put that over the sensor and just start loosening it up and twisting it out. You have it loosened enough it will just pull straight out.
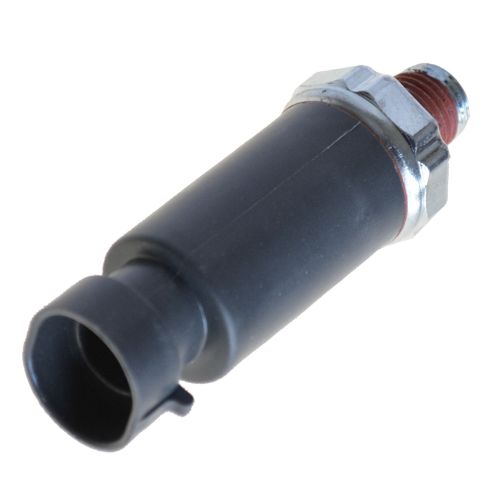
You can see the old one's on the right and the new one from 1A Auto is on the left. They are exactly the same. You just want to take that sensor and press it down into the hole and just twist it in by hand. Once it's in there firmly you just want to get your 1 and 1/16th socket and ratchet and tighten it up the rest of the way. Now just plug the connector back into the top of the oil pressure sensor and that's all set.
To put the panel back together what you want to do is put that top piece on. Line up the access panel and you just want to keep pushing it back into place. You'll see those clips have to line up. There are hooks on the van, on the floor of the van that you need to line the latch hooks up with. One you have it lined up you just want to start connecting all those latches so just hook onto the hook, pull the tab and lock it. You want to do that with all four of them. Now you can replace the cup holder panel. Put it into the place and replace those four 10mm bolts. It helps if you do it by hand. You can hold on to it and line up all the bolts to start it out by hand and then we'll fast forward as he uses the ratchet to tighten them the rest of the way. Now you can put on that little panel right there. It just clips into place. Replace the panel underneath the driver's side. Just push all the clips in. You should hear them snap. Then you just want to replace those two 10 mm bolts and we'll fast forward as he does this. Now you just want to push that panel into place on the passenger side. You want to line up the clips, push it in and then replace those two 10 mm bolts. Then you are all set.
We hope this helps you out. Brought to you by www.1AAuto.com, your source for quality replacement parts and the best service on the Internet. Please feel free to call us toll-free, 888-844-3393. We're the company that's here for you on the Internet and in person.
SWA41744
In Stock
Product Reviews
Loading reviews
4.83/ 5.012
12 reviews
5 Stars
4 Stars
3 Stars
2 Stars
1 Star
10
2
0
0
0
L
December 25, 2018
Parts atriver earlier than expected fit great no problems. Thank you for your good service
Rick
June 17, 2019
As close to OEM as possible
As promised
jonah
August 1, 2019
No complaints everything was just as they said it would be
No surprises or misleading information
Thanks
Solved my problem!
Gisselle
December 20, 2019
I suspected that my oil leak was related to the age of the oil pressure sender (OEM 17 years old). Part was delivered very quickly. I didn't know I needed a special socket for the installation, once I figured that out, the install took less than 5 minutes. I followed the video to get to the part, remove the old one and install the new one. I appreciated the video instruction on how to remove the dashboard to get to the part.
Part works great.
Jeffrey
January 26, 2020
Replace my old switch, works great. 1aauto is the best!
Replacement oil sender unit
Marcos
January 18, 2021
I recently received my replacement oil pressure sending unit . My gauge was not working and it really bugged me not knowing the oil pressure. This product I purchased fixed the issue. I took a while to get my replacement shipped to me but I didnt mind since Im happy with the results.
Fixed it
Rick
May 19, 2021
Great price, fixed my wonky guage. I've usedA1 many times yet to be disappointed. There car fix videos are on point as well thanks for doing those big help especially for finding were all these sensor s are
Robert
July 12, 2022
good price, correct item and shipping was fast.
good quality
erik
November 5, 2023
direct fit and works like it should
Quick job once I had the tool and the doghouse off. oofta.
DAN
June 24, 2024
Exact fit. It might read high...or my old one was low. Don't have a way to tell, but it plugged the leak and gives a relative reading on the guage.
Not sure if they sell it, but get the special long socket the same time. It was the only way to do the job on my vehicle.
Recommended
Angel
June 24, 2024
No issues this far, fit perfectly in my 99 2 door Tahoe.
'02 Duramax Oil Pressure Switch
Sammie
November 16, 2024
Fit right in. Just plug & play
Customer Q&A
Do I need any thread tape on the threads of this oil pressure switch? If so what type with the heat ?October 17, 2015
John J
10
Hello and thank you for your question. No you will not need any other materials to mount the oil pressure sender. This will come ready to install. Thank you and have a great day!
October 21, 2015
Derek C
The wiring harness on my 96 c 3500 hd has flat wiring connectors not round. Do you have oil sending unit that will work. 7.4 motor?February 20, 2022
Del G
10
This is not the correct part for your vehicle, but we do carry the one you need. The correct part number is: 1AOSU00024
February 21, 2022
Kelly S
Customer service
877-844-3393
Monday - Friday 8:00am - 9:30pm ET Saturday - Sunday 8:00am - 4:30pm ET
Isuzu is a registered trademark of Isuzu Motors Ltd. 1A Auto is not affiliated with or sponsored by Isuzu or Isuzu Motors Ltd.See all trademarks.
Enter Vehicle Year Make Model
Specify your vehicle's year, make and model to guarantee fit.
Year
Make
Model
Options
Drivetrain
This part doesn’t fit a . Select from parts that fit.