WARNING: This product can expose you to chemicals including Lead and Lead Compounds, which are known to the State of California to cause cancer, and birth defects or other reproductive harm. For more information, go to www.P65Warnings.ca.gov.
Lifetime Warranty
This item is backed by our limited lifetime warranty. In the event that this item should fail due to manufacturing defects during intended use, we will replace the part free of charge. This warranty covers the cost of the part only.
FREE Shipping is standard on Orders shipped to the lower 48 States (Contiguous United States). Standard shipping charges apply to Hawaii, Alaska and US Territories. Shipping is not available to Canada.
Expedited is available on checkout to the United States, excluding Alaska, Hawaii and US Territories as well as P.O. Boxes and APO/FPO/DPO addresses. Final shipping costs are available at checkout.
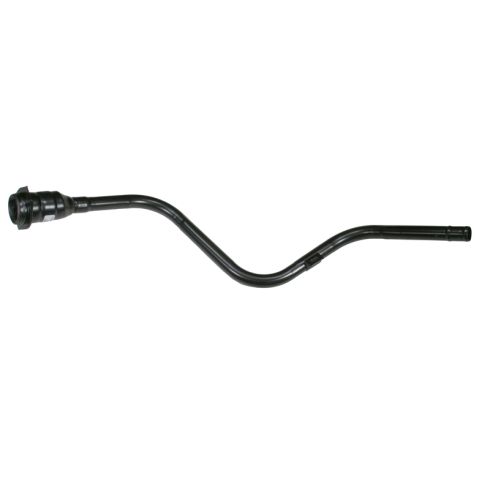
How to Replace Fuel Tank Filler Neck 1999-2004 Oldsmobile Alero
Created on:
Tools used
Socket Extensions
Flat Blade Screwdriver
T20 Driver
Rust Penetrant
Channel-Lock Pliers
10mm Socket
Ratchet
1. Removing the Fuel Filler Neck
Remove the gas cap
Remove the two T20 Torx screws from the gas neck
Remove the clips from the filler neck with a flat blade screwdriver
Remove the 10mm bolt from the bracket around the filler neck
Loosen the clamp on the rubber hose with a flat blade screwdriver
Grasp the rubber hose from the filler neck with pliers
Twist off the rubber hose
Remove the fuel tank funnel
Pull the fuel filler out through the car
2. Installing the New Fuel Filler Neck
Insert the filler neck into its same route between the frame and body
Place some penetrating oil on the end of the filler neck
Insert the rubber hose into the filler neck
Tighten the 10mm bolt preliminarily to the bracket around the filler neck
Insert the fuel tank funnel after cleaning it
Place the neck into the funnel and insert the clips
Insert and tighten the T20 Torx screws to the gas neck
Tighten the 10mm bolt to the bracket around the filler neck
Tighten the rubber hose clamp with a flat blade screwdriver
Brought to you by 1AAuto.com, your source for quality replacement parts and the best service on the Internet.
Hi, I'm Mike Green. I'm one of the owners of 1A Auto. I want to help you save time and money repairing or maintaining your vehicle. I'm going to use my 20-plus years experience restoring and repairing cars and trucks like this to show you the correct way to install parts from 1AAuto.com. The right parts installed correctly: that's going to save you time and money. Thank you and enjoy the video.
In this video, I'm going to show you how to replace the fuel filler neck on this 2000 Oldsmobile Alero, same as any '99 to '04. Both the two-door and the four-door use the same filler neck. You'll get a "service engine soon" light that comes on even though your engine is running fine. That's usually a good sign of either your gas cap being loose or this filler neck being rusted. The tools you'll need include a T20 Torx driver, flat blade screwdriver, 10mm socket and ratchet with a long extension and a large pair of pliers.
If your engine seems to be running fine but you get a "check engine" light, a lot of times what you want to check and make sure your gas cap is on nice and tight. Also, check if there is a gasket here. Sometimes that dries up and causes a leak in the gas cap.
The other thing to check if that looks good, is your filler tube that runs right back in here. You can see this one's pretty crusty. This will set off your evaporative systems because this starts to leak and it needs to be replaced.
To change your neck out, first you'll take your gas cap off here. There are two T20 Torx screws to remove here. Loosen those screws and then you kind of have to grab them with your fingertips and twist them out and pull them the rest of the way. Use the screwdriver and pull those out. When I say those, I mean the little clips or pins that go into the filler neck. The filler neck on this car, you can see it comes down here and then runs right through here.
Right up through here is a 10mm bolt, and in a lot of cases these are pretty rusty and don't always come apart. I'll get my wrench on there if I can. It appears I got it. I'll just fast-forward as I remove that bolt the rest of the way. The tube comes in right in from here. I'm not sure if you can see it, but there's a clamp right here. Use a nice big regular screwdriver and loosen up this clamp. This is where the large pliers will come in handy. Pull this back, grab on. I'm holding the tube next to the wheel and just twisting and pulling this hose off.
Now you take this right out and pull the tube through and out. You can see on this old one it's really crusty in here. Any pin holes or anything in here which there's some pretty deep rust divots so any pin holes in here will cause an evap leak.
A new filler neck from 1A Auto. You're going to feed it down in. You need to look down and make sure it goes through the same slot and routes the same way. Just make sure it routes between the frame and body just like before. We'll just leave it like that for right now. Here's the tube through. I'm just going to shoot a little oil on the outside just to make it slippery. Make sure our clamp is on our hose and then put that right together.
Now, you want to go underneath and move your neck into position and just start the bolt in. You don't want to tighten it up yet; you just want to start it in. Actually, clean this off. Two areas you want to pay attention to: There is a little drain hole right here make sure that's clear then clean off this area right here. That's what's supposed to seal onto the neck. This just kind of pushes into place and I put it in like that.
Now I have the base of those pins. Insert them and while you're holding up the neck, push the clips in, and just do that for a second one and hold the neck up towards the plastic piece. Push the pin in and then grab the centers, and you basically you just push these right in. Again, hold the neck up and push them in. See I kind of put the screw onto the Torx driver. I start it in couple turns and then hold the neck. Just push it right down in. Then I put the other screw on, kind of get it started into place. Reach under, hold the neck and push that in.
Put the gas cap in place. Now go under. I just fast-forward as I tighten that bolt up. Last but certainly not least, put the clamp in place and tighten that up.
We hope this video helps you out. Brought to you by www.1AAuto.com, your source for quality replacement parts and the best service on the Internet. Please feel free to call us toll-free, 888-844-3393. We're the company that's here for you on the Internet and in person.
FNA64891
In Stock
Product Reviews
Loading reviews
5.00/ 5.02
2 reviews
5 Stars
4 Stars
3 Stars
2 Stars
1 Star
2
0
0
0
0
Works great
Aaron
June 13, 2016
Good part. Solid material. Easy install. Just needed to replace the stock part after 15 years
Alan
May 25, 2024
Worked real well
Customer Q&A
No questions have been asked about this item.
Customer service
877-844-3393
Monday - Friday 8:00am - 9:30pm ET Saturday - Sunday 8:00am - 4:30pm ET
Oldsmobile is a registered trademark of General Motors Company. 1A Auto is not affiliated with or sponsored by Oldsmobile or General Motors Company.See all trademarks.
Enter Vehicle Year Make Model
Specify your vehicle's year, make and model to guarantee fit.
Year
Make
Model
Options
Drivetrain
This part doesn’t fit a . Select from parts that fit.