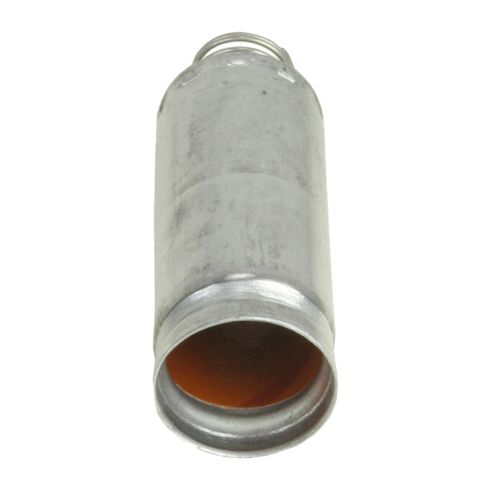
This item is backed by our 1-year warranty. In the event this item should fail during intended use, we will replace the part free of charge. This warranty covers the cost of the part only.
Returns: Parts with electrical components cannot be returned once installed.
FREE Shipping is standard on Orders shipped to the lower 48 States (Contiguous United States). Standard shipping charges apply to Hawaii, Alaska and US Territories. Shipping is not available to Canada.
Expedited is available on checkout to the United States, excluding Alaska, Hawaii and US Territories as well as P.O. Boxes and APO/FPO/DPO addresses. Final shipping costs are available at checkout.
How to Replace Spark Plug Insulator 2003-08 GMC Savana
Created on:
Tools used
10mm Socket
Ratchet
1. Removing the Lower Dash Panel on the Driver Side
Pull back the latch to the right of the gas pedal
Remove the two 10mm bolts on the lower dash panel
Pull out the lower dash panel
2. Removing the Lower Dash Panel on the Passenger Side
Pull back the latch on the left side of the passenger side
Remove the two 10mm bolts on the lower dash panel
Pry off the lower panel
3. Removing the Cup Holder Panel
Push up on the latching clips below the cup holders
Remove the holder panel
Remove the cup holder panel
To create more space, remove the four 10mm bolts on the panel
Remove the upper part of the panel
Push the panel out of the way to access each side of the engine
4. Removing the Spark Plug Insulator
Pull out the spark plug insulator
Remove the spark plug cable
5. Installing the Spark Plug Insulator
Insert the cable into the insulator
Insert the insulator into the engine
6. Reinstalling the Cup Holder Panel
Reattach the upper piece of the panel
Push the panel into place and align it with the hooks on the floor
Connect each of the four latches
Insert the four 10mm bolts to the cup holder
Insert the cup holder panel into place
Insert the holder panel
7. Reinstalling the Lower Dash Panel on the Driver Side
Insert the lower panel into place
Push in the clips on the panel
Insert the two 10mm bolts
8. Reinstalling the Lower Dash Panel on the Passenger Side
Insert the lower panel into place
Push in the clips on the panel
Insert the two 10mm bolts
Brought to you by 1AAuto.com, your source for quality replacement parts and the best service on the Internet.
Hi, I'm Mike from 1A Auto. I hope this how-to video helps you out, and next time you need parts for your vehicle, think of 1AAuto.com. Thanks.
In this video, we're going to show you how to replace the spark plug wire insulator on this 2005 GMC Savana 2500. It's a pretty easy process. You will need a 10mm socket and ratchet to remove the engine access panel.
To start off, go to the driver side of the vehicle and you'll see there is a panel right here. You're going to want to remove these two 10mm bolts that secure that panel. Also, you will see that there's a latch back here. Pull that back towards you and it should unhook that clip there. Then you just want to remove those bolts, and we'll just fast-forward as he does this.
Now with the bolts removed, you can just pull on that panel. Just reach underneath it and pull it out. Be careful not to pull out the panels above it. Now, on the other side, there are two more 10mm bolts securing a panel. You want to just remove these two 10mm bolts, and, like on the other side, you want to pull back this clip and unlatch that. We'll fast-forward as he removes these two 10mm bolts. Now you just want to pry this panel off. It should pry off pretty easily.
Now, in the center of this center console, underneath there are two more of these latch clips. What you want to do is you want to just push up on the clips and free them. Then once you have this unlatched, just lift up and pull forward. Should pull right out.
Now, to make more room for yourself, the engine is behind this panel. What you can do is you can see it can't come out of this vehicle. The seats are in the way. The seats are only a few bolts if you want to remove them. But if you just want a little bit more room, to save time what you can do is you can just remove these four 10mm bolts inside this panel. With those bolts out, you can now pull that panel up and off, and remove that little top piece.
Now, with the overall access panel being shorter, you can push it under the dash. Now you can access those spark plugs and ignition coils. If we push it under the driver side, now you can see the other spark plugs and ignition coils. On each spark plug, the insulator, you can see it it's right here. You just pull that out. Pull the insulator right off. That's it.
There's your old one, and your new one from 1A Auto is on the left. Pretty simple, reinstall it on the wire. Put it on the plug then just repeat that for the other eight plugs. To put the panel back together, what you want to do is you put that top piece on. Line up the access panel. Then you just want to keep pushing it back into place. What you'll see, you'll see those clips have to line up. There are hooks on the van, on the floor of the van, that you need to line the latch hooks up with. Once you have it lined up, you just want to start connecting all those latches. Just hook onto the hook, pull the tab and lock it. You want to do that with all four of them.
Now you can replace the cup holder panel. Just put it into place and replace those four 10mm bolts. Helps if you do it by hand. You can hold onto it and line up all the bolts. Just start it out by hand. Then we'll fast-forward as he uses the ratchet to tighten the rest of the way.
Now you can put on that little panel right there. It just clips into place. You want to replace the panel underneath the driver's side; just push all the clips in. You should hear them snap. Then you just want to replace those two 10mm bolts, and we'll fast-forward as he does this. You just want to push that panel into place on the passenger side. You just want to line up the clips and push it in. Then replace those two 10mm bolts. Then you are all set.
We hope this video helps you out. Brought to you by www.1AAuto.com, your source for quality replacement parts and the best service on the Internet. Please feel free to call us toll-free, 888-844-3393. We're the company that's here for you on the Internet and in person.
8006
In Stock
Product Reviews
Loading reviews
There are no reviews for this item.
Customer Q&A
isthere 8 heat sheilds in package or 1 for 17.95?March 24, 2016
Sam A
10
There is 1
March 24, 2016
Brian F
Customer service
877-844-3393
Monday - Friday 8:00am - 9:30pm ET Saturday - Sunday 8:00am - 4:30pm ET
Buick is a registered trademark of General Motors Company. 1A Auto is not affiliated with or sponsored by Buick or General Motors Company.See all trademarks.
Enter Vehicle Year Make Model
Specify your vehicle's year, make and model to guarantee fit.
Year
Make
Model
Options
Drivetrain
This part doesn’t fit a . Select from parts that fit.