I'm Mike from 1A Auto. We've been installing auto parts for over 30 years.
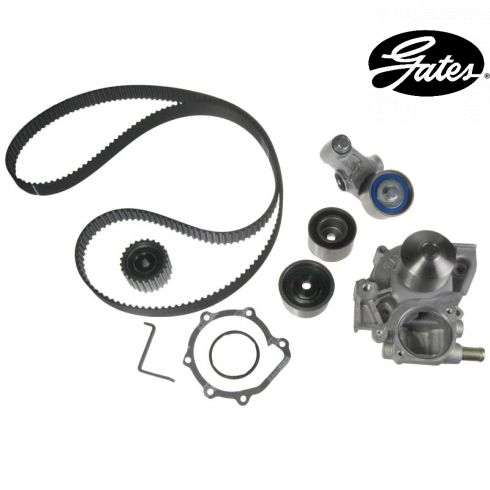
Hi folks. We've got our 2008 Subaru Outback here. It has the 2.5 liter, single overhead cam engine. We're going to replace the time belt in it. You can buy this complete time belt kit at 1aauto.com and you follow on the video, we'll show you how to replace it.
Open the hood and go under here. Release lever--there's a little indicator and a pictograph of a car. Release lever for the hood is here. Lift up on the hood and find the safety. It's right here above the grill, so push it to the passenger side. And just put the prop right up.
If you put your hood in the service position by lifting it up, and if you fall down here, you put the prop down here in this extra little hole here on the hood. And we'll let that sit here, and now your hood's open higher and you've got some more space to work.
We need a 10 millimeter open-ended wrench. Disconnect the negative battery terminal. Just loosen it up. You don't have to thread it all the way off, just get it to a point where it's loose. It'll slide off the battery terminal. And we'll put it aside here. Use the trim clip tool to pop these two clips out, holding it this air intake duct.
Just pry them up. Put them aside and we can reuse them. Lift up this intake duct and we'll kind of slide out the air box and we put that aside. We're gonna remove the protective covers from the drive belts. I'm gonna start with this one over here.
We use a 10 millimeter socket, an extension, and a ratchet. Put it aside so we can reuse it. And grab this one here and thread it out with my fingers. And I'll put that cover aside with the bolts.
Wanna remove the metal cover here that's over the alternator. Let's start with this 10 millimeter bolt over here, using the same 10 millimeter socket, ratchet and extension. Now it won't come off because it's bolted here where the alternator bolt goes through. So I need to loosen that. This is a 12 millimeter head bolt. We use a 12 millimeter socket extension and ratchet. You just have to loosen it up because it's like a U shape to it. And then this will slide right off.
And very important to loosen the tensioner for the alternator. We need to loosen the 12 millimeter bolt that's under here. Before you loosen the tensioning bolt, 'cause otherwise it's not gonna move. This locks it in place, so I'll use my 12 millimeter socket extension and ratchet.
I'll loosen this up. And then I can go up here with it and loosen this. This bolt is new. Yours might be kind of rusty. We have had this off before, and it had already broke from being too rusty. So you'll wanna use some sort of rust penetrant on this probably. But just loosen it up. This belt will start to get loose and the alternator will move because it's also loose in here. Should get to a point where it's pretty loose and it will just come right off. Get it off the crank pulley, and just put this belt aside. We're gonna loosen this 12 millimeter nut down here for the tensioner pulley for the AC belt. Using a 12 millimeter socket and ratchet. Get it free, don't need to take it all the way off. Spray some rust penetrant on the tensioning bolt. Use the 12 millimeter socket extension, ratchet will loosen it up. Just wanna make sure that you definitely loosen this lock nut first, 'cause if you try to loosen the tensioning bolt, the part that holds this pulley on can either be plastic or sometimes it's a real soft metal and you can break it, if you don't loosen that lock nut. I'm gonna keep loosening it so I can get the belt off.
Pop the belt off and put it aside. I'm gonna take a 22 millimeter socket and a breaker bar and you loosen the crank pulley bolts. I'll try doing it without using a crank pulley right now. Might be able to get it to move. Nope. What we're gonna do is remove that crank pulley bolt without using a special tool, but in the process we're gonna ruin the alternator belt. Because we're gonna loop the alternator belt around the crank pulley. And then around the alternator pulley and then down, and it's gonna kind of fold over itself. We're gonna wedge it in here.
And what you do when you go to loosen this, it's gonna tighten up against it. And we're gonna pull against it. Break that free. Make sure that's loose. And yup, the bolt is loose, so I can spin it out with my fingers. And I can move this a little bit here. Get the belt off. But it does ruin the belt 'cause I put a crease in it, and you'll have to replace this belt. But that is a way to do it without having a special tool to hold the cranky pulley.
Now that that bolt's loose, just thread it out by hand. And pull the crank pulley off. Just kind of wiggle it back and forth, get it loose. Careful not to drop it. So this is your crank pulley and your harmonic balancer. Same thing. Now pull the AC tensioner bracket out of the way. Using the 12 millimeter socket extension and ratchet, this two bolts, one on the top here. And then one just slightly below it.
I might take the extension off here. So get those loose. Thread 'em out by hand. And now I'll put that aside so we can reuse it. Now start to remove the plastic covers. There's a little half cover on this side of the engine. There's a 10 millimeter bolt on the top. I'll start with the top one using a 10 millimeter socket, a short extension and the ratchet.
Put aside. So there's three holding this cover on. You slide your hand down the edge here and you can feel the one that's sort of towards the outside. And then there's another one a little bit further down towards the bottom. So I'm gonna grab this one that's on the outside. And just do the same for the three of 'em. Loosen 'em up, take 'em off. Take the cover off.
Now it turns out since this is a rust belt car, unfortunately the two bottom ones have these little square nuts that are probably into the plastic cover underneath. And because they've just rusted together they've been broken off, so somebody had done the time belt on this car before, and they'd broken in there. You don't really need them 'cause this does have a nice solid fit, and once it's hanging on there, it just sort of slides back on. Get it lined up. And then that single bolt will hold it there. But for now we'll take it off and keep going. Get this plastic timing cover. The other half of it, it's a lot wider than this one. It goes from here all the way across to the passenger side.
It's got some 10 millimeter bolts along the edge of it that are holding it on, and you're just gonna have to go along and just kind of feel for them. And some of them you might not be able to really see them. Might be kind of hidden. But just go along, find them, take them out, and then remove this cover.
Start with this one over here, 'cause we can see it. 10 millimeter, couple of these might be 12s. So if you find that your 10 millimeter doesn't fit on it, try a 12 millimeter socket. But they're really hard to see. Just go on the outer edge and just feel for 'em.
So the last bolt out, this cover's very loose, and it should come right off. Slide it out. Around these O2 sensor wires. Get it up. Out of the engine compartment. Now thread the crank pulley bolt back in. Okay. I'm gonna use a large ratchet and a 22 millimeter socket. And we're gonna turn the engine over clockwise. 'Cause we want the timing marks to line up.
Rotate the crank until all your timing marks line up. This may take a couple revolutions. Going to start by checking the timing mark at the crank sprocket. There's a tiny dot here, and then if you follow it up, there should be a line here. They typically have little white paint on them. And that lines up with this white mark here on the engine block.
So now the crank is at the top dead center. Then if you follow this around, you wanna make sure that the cam gear on the driver's side of the car, there's a white mark here and a timing line. And then another one in here, and it lines up in here with this white mark and cutout in this plastic cover here. So that is lined up there on that side. That's perfect.
And then when you come to the passenger's side, again there's another white mark on the timing. This one's a little bit more difficult to see. There's a line here on the cylinder head. And the paint probably wore off. You can just see the indentation and that one's lined up there. But it's a pretty good indication that since the crank is lined up and this one is lined up, and the engine was running really well before, that this is lined up correctly. So with those lined up, we can now take the belt off. Because what's actually happening on a Subaru engine here, they're opposed cylinders. It's not actually a top dead center. These timing marks, the way they're lined up, the pistons are pulled into the block, so the valves are kind of in a safe place. But it is still interference engine. But just for service purposes they're not in the point where they can hit the pistons. And you wanna make sure that they just stay lined up.
After the belt comes off, they typically do, but just be aware of it. As with all timing belts, take your time, make sure your timing marks are all lined up, and you'll have a good repair.
To get the timing belt off the engine, I'm gonna remove this smooth idler pulley down here. There's a 14 millimeter bolt down in here, so I'll use a 14 millimeter socket and my ratchet and break it free.
Take that right off. Bolt is inside of it. We're gonna reuse this bolt. Now I can remove the hydraulic tensioner. So it does have tension to it, so I'm gonna use the 14 millimeter socket. Remove this mounting bolt. It's gonna kind of wanna go sideways on you 'cause it doesn't have any down in there.
Now, the washer that was on the back side of it did fall off. There's a little O ring here, so I picked that out here. That's what's holding the bolt on. Keeps it from falling all the way through. But we also wanna make sure we grab, there's a washer here, and you don't want that to sit in there and forget about it, 'cause it'll jam things up. So that's on the backside of the tensioner. Make sure you get all the parts out of there of the old tensioner. Now the belt just come off. Now we have the old timing belt. Remove this idle sprocket. 14 millimeter socket. Get it loose. Now just taking it off with my fingers. We have a new one in the kit, so I'm gonna replace it. I'm gonna take it off and I'm gonna put the bolts back in place so I don't confuse the location of it for now. So we see this one is kind of worn out, the bearing in it. It's got some play to it and it's making some noise. It's time to replace it with a new belt and the kit comes with one.
Now with this idler pulley. We use the 14 millimeter socket and ratchet. I'll put that bolt back in place so I know where it went. Now here's something you have to be careful of when you're doing this. While I was removing that idler pulley, I maybe bumped this cam here and it moved. So if you weren't paying attention and you went to put your timing belt on, this side of the engine is out of time. So we're gonna re-time it. I'm just gonna use a 17 millimeter socket and a ratchet and just gently turn it back to where it lines up.
Actually isn't taking much force. Get it lined up with that mark right about there. Here we have our original parts from our vehicle. Now this is a brand new time belt kit components, you can get from 1aauto.com. Comes with a new hydraulic tensioner. New idler pulley, new idler sprocket, there's another idler pulley. Comes with threadlocker. This is all imet tool. If you have a manual transmission car, the instructions, you need to use this to align a small little spacer. And of course a brand new timing belt.
So if we look at the original hydraulic tensioner, you can actually see it's a little pushed out there and it's got some oil residue on it. This was starting to fail. Should be nice and dry, even after it's been used like this brand new one. These brand new timing belt components from 1Aauto.com will fit great and work great for you. They're excellent replacements for the original. It'll keep your car running great.
Now we'll reinstall this sprocket that goes down here. So I'll take that bolt out that I put in place. So I wouldn't mix them up. The bolt will go through here. Go down and get it started in the engine lock with my fingers, make sure it threads in nice and straight and even. Get it threaded all the way down, and then I will torque it.
So I'm gonna torque that bolt. The specification is 28 and a half foot pounds. I don't have half foot pound increments on this torque wrench, so I'm just gonna round up to 29 foot pounds. That should be just fine. So I'll turn it until the torque wrench clicks. And that's it. And then install the smooth idler pulley, goes up top here. Get this bolt out. Put the bolt through. Get it started with my fingers. It is recessed into the pulley, so you might only be able to get it so far. Now let's grab the socket. You can use the socket on the extension here, I'll just thread it down by hand, then I'll come back and torque it. This one's recessed so I have to use an extension on it.
It's gonna get torqued to 28 and a half, but I have my torque wrench set to 29. Once it clicks you're all set. Before we can install our hydraulic tensioner, the instructions recommend bleeding it. Just due to shipping and stuff there may be air bubbles in the hydraulic tensioner. So we're going to bleed it. We've got a bench vice set up with a C clamp. You wanna bleed it vertically. Now if you just go to pull this pin, there's a lot of force in here. The pin's probably gonna get stuck and you won't get it all the way out because the piston wants to push it up. So before we do that, we'll get it set up here. And I'll tighten it just gently. And it will let me remove the pin. Put the pin aside 'cause we never use it. And we'll release this.
You have to repeat this three times. It's lined up. And just compress it down. You don't have to do it fast. It just kind of goes a steady rate. When it gets down, the C clamp is just touching the aluminum of it, just stop. And then--so that's once, we'll just do this three times. Once we get it lined back up, reinstall the locking pin. Make sure you put the part that you pull towards the pulley. If you put it in this way, and you go to put it in the car, this is where it bolts in. You're not gonna be able to pull the pin out and you'll be really annoyed. So make sure it goes on this side with the pulleys, that way it's installed in the vehicle you can remove it.
Now this is ready to go on the vehicle. So to install the hydraulic tensioner, there's a threaded opening. It's hard to see. It's above the water pump. It's in place here. We'll get the bolt started and caught. And then I will torque it. So here's something to look out for. I went to install the hydraulic tensioner. I've pushed that locking pin too far through the hydraulic tensioner, and it's contacting the engine block. So you can only thread it in so much, and then it doesn't want to rotate up into place. Because that tensioner rod should contact this little steel insert in the aluminum engine case. That's what it's gonna push against.
So it should be more like--if I open this bolt up a little bit. So it should come up and it should touch that like that. But then be pushed farther into the engine. So I'm gonna correct that and reinstall it.
I went in, I used that C clamp. I compressed it a little bit. I pulled the pin out so it's just flush with the edge of it. This should give me the clearance I need to install it. So we're gonna go down just above the water pump, just a threaded hole. It's kind of hard to see, it's up into here. Just thread this tensioner in by hand. Get it started. So this is correct now without that pin interfering. This is gonna come up here and push against that steel insert. And I'll torque this bolt. 29 foot pounds.
It's very important when you're installing this timing belt, the writing here you should be able to read it. It should be facing you, because there are marks on the timing belt that are gonna coincide with the timing marks on the engine and the pulleys. So this one that goes on the passenger side cam sprocket has this specific distance that goes to the crank sprocket. And it is longer than the one on the other side. So if you reversed this, and were trying to put it on this way, assuming that these would be the same, they are not. You'll have a tough time getting these to line up. You might even put the engine out of time. So just make sure when you install it, you can read this writing and you'll be able to line up these marks as they're supposed to be.
Before you reinstall your belt, just make sure that your crank shaft sprocket is nice and clean. This one looks nice and clean. And same for the cam gears. Make sure those are nice and clean. If not, take some brake parts cleaner, spray 'em down, make sure there's no dirt, debris, oil, coolant. You don't want that to contaminate the belt and ruin it. These are in good shape, so I'm gonna go ahead and put the belt on.
I'm gonna feed the belt into the engine compartment. And you need to get it around those O2 sensor wires. Getting this all lined up is one of the tricker parts. I'm gonna push this down. You want the line to be as close to the tire mark as possible. That tooth back, that's too far off. And we ... tooth forward. That's pretty much perfect. If this doesn't line up perfectly with the tire mark, that's okay. As long as the tire mark still lines up with the mark on the engine. Those are just a rough guide.
This smooth part is gonna go around this pulley. And then it's going to go up and line up with the mark on the crank shaft sprocket. Now run it underneath the tensioner. You're not gonna pull the pin yet. Wing it there. Get it run around the tube idler.
All right so if you're having trouble getting the timing belt over this little idler sprocket, a lot of the instructions do have you put the sprocket on first. You can loosen it, take it back off, and then we'll take the bolts, put them in there. I'll get the timing belt set up in place, over the water pump. And it's gonna go down in the mounting hole, it's right here for the sprocket.
We're gonna kind of work the sprocket down in there and get the bolt caught. Both tire marks are lined up. Just try to get this sprocket into place. It's fairly tight. Supposed to be that way, you just have to work at it. I've got it started with my fingers. You're probably gonna struggle with it for a bit. Just make sure your timing marks stay lined up. Once it's in there, you don't want to put any type of oil or silicone spray, nothing on here. It's just gonna ... 'cause that can damage the belt. You just wanna get it in place. Make sure it's started by hand. The belt will sort of self center afterwards. I can thread it in by hand nicely, so it's not cross threaded. I'm just gonna snug it, then I'll come back and torque it.
Now I'll torque this again to 29 foot pounds. Perfect. One final check before I put on the last idler pulley. This one on the driver's side. The timing's lined up. And then we look in the crank. It's also lined up. And then we go to the passenger side and that is lined up as well, so I'm happy with that. So we'll take the final idler pulley, the lip goes towards the engine. This keeps the belts from slipping towards the engine. I put the bolt through it and we go down in. In the hole. It's gonna be hard to see under the belt, it's right about here, kind of diagonal from the other one above it. And put the lip of the pulley underneath the belt. And then kind of lift it up into place. Just get the bolt started by hand, then snug it up and torque it afterwards. I'm just gonna take a socket and a little short extension and just tighten it up with my fingers. Now we torque this, 29 foot pounds, just like the rest. Once it clicks you're all set. Now all the new idler pulleys are installed. New belts installed. All the tire marks are lined up. And the moment everybody's been waiting for is you pull the pin on the tensioner to release it.
And that's it. Now we can finish putting the rest of the front of the engine back together. So now I need to remove the crank bolt that I threaded back in there to turn the engine over with. Just using the 22 millimeter socket and the long ratchet. That shouldn't be on there too tight, but it might have a little bit of force to it, so I'm just gonna hold this passenger side cam here with the hand.
A couple quick hits like that to get it loose. This is the inside of our timing cover. It's called the front of the engine. Has some rubber seals that go around the edge of it. Now when I took these off, I did clean it up and then this rubber must swell up over time because this is definitely where it goes, but it's too big now. So all they really do is keep out a little bit of dirt and water. It's not a huge deal. What I'm more worried about is that if this doesn't fit that well and I gotta put this on, I'm not paying attention, this might end up inside and then get wrapped around the timing belt. And that would cause a huge problem.
So for what this is, I'm just gonna take it off. I'm gonna leave it off, just so it doesn't get caught in the timing belt. I feel better with it out. I could get replacements but it's not really a big deal. This top one is still sitting okay, so we're gonna reuse this top one.
Slide this cover into place. This seal has totally fallen off. All right, I'm gonna take that top seal off too. It doesn't fit well. I don't really need it. I'd be more concerned with that seal doing more harm than good if it gets caught into a moving timing belt. So we'll take these shoulder bolts, start threading them in. Get this lined up. Just gonna go along, get all these bolts caught, then we'll come back and tighten them. Just gonna go along, tighten up all the bolts. These don't have to be overtightened. Once you feel them get tight you just stop. And just go along and find all of them and tighten them up.
Putting our final cover back on there. Now if your two bolts aren't rusted in here like ours are, you'd wanna put these two in at the bottom. But we don't have those, so I'm just gonna hang them on the top here. Get 'em into this groove. Slide it in place. That one uses S style bolts. We're gonna install the harmonic balancer. We're gonna find the keyway for it, match that up, make sure the key should be in there, in the crank shaft.
We'll put in our new crank pulley bolts. And no thread locker on here, just some light grease or oil. So there's some on there. I'll get this into place. So I'm gonna try and line it up. There it is. Once you find it, it'll slide right on. Get the bolts started. We'll use the alternator belt that we already ruined. And we're gonna put this on here in the opposite direction the way we used it to take it off.
Set the initial torque at 33 foot pounds. Once it clicks you're all set. Using a larger torque wrench and we're gonna torque this to 133 foot pounds now. Once it clicks you're all set. So now I'm gonna reach down with my regular ratchet and just turn this a little bit backwards just to release that. Take that off. That works really well but you can see it definitely ruins the belt.
Put the air conditioning tensioner pulley assembly back on. It's the two bolts, they mount here. Get them started by hand. I'm just gonna tighten these bolts down. There's two, just line them up and then go just a little bit tighter. You don't have to kill them. Once you feel them get tight, should be good enough. We install the air conditioner belt that goes on the inside and down around the tensioner, up over the AC compressor. Make sure it's sitting in all the pulley rims. Use the 12 millimeter socket ratchet and it's pretty long. I'm starting to tighten this up and I can feel the belt tension starting to increase. So I'm just gonna go a little bit more. You don't want to over-tension it. It should have a little bit of a deflection, but you also don't want so much that it slips on you.
That feels pretty good. And we go down, tighten the locking nut here on the pulley. Just so it gets tight, then you stop. AC belt is tensioned. And install our new alternator and power steering belts. I'm gonna start on the crank. Always easier to get it on here. Make sure it's fully seeded. Sometimes that holds you up. There it is. Now with all the pulleys, tension the alternator up.
The tensioner bolt, we had trouble with it before. It was sticking, and replaced it. And there was a little bit of copper and [inaudible 00:36:21] seeds on there. And again, just check this belt. That feels pretty good. Now we'll tighten down the lock bolts here. So now you've got to put your protective cover on here. Got these little ears, they're gonna go around this bolt here. Kinda goes in between this washer and this other washer. Get this out with the gloves on. Slide under here. Lowers down. Can actually put this bolt in so it's adjusted. Just put it in by hand right now.
Now I'll tighten up the alternator. Mounting bolts. Once you feel it get tight, you should be all set. Gonna tighten up this bolt here. So that gets tight, just stop. There's a little plastic cover, go over the AC compressor. Install this bolt here. This one installed. These don't have to be super tight. It's only on this plastic. Once it stops, it's tight enough. And the same for this one. That one's all set. Reinstall the intake duct. Slide into the air box. Wind it up on the radiator support. Push the little push clips back in. Reconnect the battery. And the job is complete.
Thanks for watching. Visit us at 1aauto.com for quality auto parts. Fast and free shipping and the best customer service in the industry.