Hi, I'm Mike from 1A Auto. We've been selling auto parts for over 30 years.
Hi, everyone. Sue here at 1A Auto, and today in this video we're going to be working on this 2008 Subaru Outback. Going to show you the location and how to replace your crank sensor. If you need this part or any other part for your car, click on the link below and head on over to 1aauto.com.
Remove the drive belt shield. Remove the battery cable from the alternator. And I like to put the nut back on so I don't lose it. Remove the alternator bolts. Both these mounting bolts are a 12 millimeter socket. There we go. Remove the alternator. You might need a pry bar to help you out. Crank sensor is located under the alternator, right behind the harmonic balancer. It's right here. We have a connector. I'm gonna push down on this tab and push it back, get that out of the way. 10 millimeter socket head.
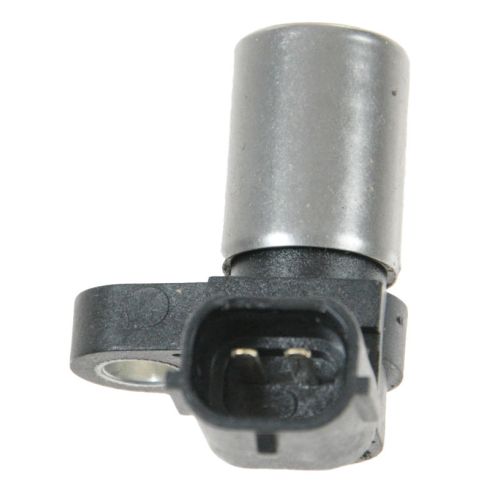
And to lift it up, just turn it back and forth and lift up on it at the same time. If you need to, you can use a flathead screwdriver to give it a little help, pry it up. There's our crank sensor. Here we have our new crank sensor from 1A Auto, and this is the original equipment factory one we just took out of our '08 Subaru. You can see they have a two-prong connector. The locks are in the same, guides are in the same spot. Single-mounted bolt. Metal casing, magnets in the end. If you need this part or any other part for your car, click on the link below and head on over to 1aauto.com. Now I'm going to take my new sensor, I'm just gonna push it down in there. Put the mounting bolt on.
I'm just gonna snug that down, 10 millimeter socket, and then take my connector and reconnect it. To install the alternator, you line up this back bolt to that bracket. And as you can see, it's really tight going down. That's because all alternators have this spacer that is movable. But once it's tightened, a lot of people don't realize it moves. It's a floating bracket in there. A way to loosen that up is put in on a hard surface. You get a vise or something. And I like to use a brass punch. You line it up and hit it with a hammer. There you go. See how it seeded down? You can see the difference over here, came out some.
Now when we go to put that in I'm not struggling with it. Falls right into place. The long bolt in. The bolt on that is designed to have a bracket on it so it lines right up. The nut won't spin because it has those ears on it that line it up. I'm just gonna put my hand back there, make sure it starts and guide it in. Now I can carefully mount my adjustable bolt. I'm not tightening this. I just wanna get it snug. Now we have the long adjustable bolt, so that'll go up. You can't go this way, obviously it doesn't line up. Spin it around. It goes on the ear of the alternator, threads right in there. Both these mounting bolts are a 12 millimeter socket. Just gonna snug this, bottom it out. I'm not gonna tighten it 'cause I'm gonna have to make adjustments once I put the belt on.
This alternator has what you would call a belt guard. See how there's two washers here? You have the big thick one that mounts against the alternator and that thin one. I'd like to put it right in between there. There we go. And that mounts there. I'm not gonna completely mount that, because I have to see the belt. Just snugging it up. Perfect. You want to make sure that your AC tensioner is adjusted enough so that you can get the belt over the AC pulley. Now the harmonic balancer. Around the AC, and there's the AC pulley. Now you're gonna reverse the direction and you're gonna bring that long bolt down on that idler pulley for your AC belt or tensioner pulley. Make sure that all the ribs are lined up. And don't forget that once you tighten that pulley, the mounting bolt for that pulley, that's gonna make it tight as well.
What I'm doing is while I'm adjusting this, I'm spinning the belt side to side and feeling the tension. And I like it right there. I don't want it too tight, it'll burn out the bearings. Now I take a 12 millimeter socket and I'm going to tighten up the mounting bolt. Install the alternator belt. It'll go down over the harmonic balancer, power steering pump, and then over the alternator pulley. Gonna have to loosen up on the alternator a little more. Pretty much it. There we go. Now I can adjust this adjuster. Check your belt. Okay, we're gonna leave it right there, then I'm gonna snug up the adjuster bolt mounting bracket.
Now I can bring this bracket down and tighten up. Now you can mount the bolt on the power steering bracket. And then we have this cover that goes here in there, but first, we're gonna bring the electrical over. And I think I'm gonna bring this rope through here. This is a connector here for the ... This clamp thing goes around this oil pressure oil fill. There we go, like that. Connect the AC compressor. This mounting bracket goes there. Now we can plug in the internal regulator on the alternator.
And we have the alternator nut already available to us 'cause I left it right there, so you're not fishing for it. That's why I like to do things like that. And that mounts right there. That's a 12 millimeter socket. You want to make sure you hold onto that harness and just snug it. If you just rank on it, that's a copper bolt, it'll snap off inside the alternator. Now we can put that cover on. I've got a long bolt and a short bolt. One bolt will go up here in the bracket, 'cause it goes down and mounts into that belt guide. This is a 10 millimeter socket.
Thanks for watching. Visit us at 1aauto.com for quality auto parts, fast and free shipping, and the best customer service in the industry.