Hi, I'm Mike from 1AAuto. We've been selling auto parts for over 30 years! We're dedicated to delivering quality auto parts, expert customer service, and fast and free shipping, all backed by our 100% satisfaction guarantee. So visit us at 1AAuto.com, your trusted source for quality auto parts.
In this video, we're going to be working with our 1998 Toyota Camry 2.2-liter 4 cylinder. We're going to show you how to remove and replace your harmonic balancer, or crank pulley. If you like this video, please click subscribe. We have a ton more information on this car as well as many other makes and models. If you need this part for your vehicle, you can follow the link down in the description over to 1AAuto.com.
Here are the items you'll need for this repair: 10-21mm wrenches, sockets, ratchet, socket extension, breaker bar, torque wrench, hammer, pry bar, two jaw puller, brake cleaner, paper towels, flat blade screwdriver, jack and jack stands
Open the hood and secure the hood prop. Disconnect the negative battery terminal before starting by loosening the bolt with a 10mm wrench, removing the terminal, and hanging it off to the side where there's no risk of it coming back in contact with the battery. Loosen the 12mm bolt on the tensioner, as well as the 14mm bolt on the pivot point. Then we'll loosen the belt on our alternator and remove it.
Make sure you have a belt path drawn somewhere on the vehicle, or that you keep track of how the belt was removed. There's no need to remove any of this hardware fully. Once the belt is loose, you can remove it from the pulleys, and place it off to the side.
We are going to raise and support our vehicle to make it easier to access. Remove the lug nuts with a 21mm socket and breaker bar. You just want to break them loose, about one turn for now. We'll finish removing them when the vehicle's in the air. With the vehicle in the air, either on a lift, or if you're doing this at home, on a jack and jack stand, go ahead and finish removing the lug nuts followed by the wheel and tire.
Inside of your wheel well is this little splash shield which prevents water from getting up onto your belt, along with road dirt and debris. This comes out with these two 10mm bolts at the top, which we'll remove our socket and ratchet. Once the bolts are out, pull down, and remove the splash shield. Loosen the tensioner bolt for the power steering pump down here at the bottom. You can reach this with a 12mm socket, a ratchet, and a good size extension. Loosen that up a couple of turns to make sure that pump moves nice and smooth.
We'll also have to loosen this 12mm bolt at the pivot, up at the very top of the pump. That, you usually have to get at with a 12mm wrench. You have to be patient, because you can only get a couple of turns at a time out of this one. Twelve millimeter wrench on that nut. You can usually just push the pump in. Remove the belt from the pump side first, and then off of the balancer.
Remove the 19mm bolt in the center of the harmonic balancer. Occasionally, you can grab these with a strap wrench or an old belt and vice grips, and break that bolt loose with a 19mm socket and a breaker bar, however, ours has been on there for a long time and isn't budging. We're going to have to remove it with an impact gun. Once the bolt is out, you may be able to tap back and forth on the harmonic balancer to make it work off. Be sure that you hit this inner edge, because the outer edge is separated with this rubber bushing, and this rubber can become damaged if you tap the outside.
Because we have a plastic timing cover, we can't pry on the backside of the pulley without the special puller tool. We can try to use a two-jaw puller with the center bolt partially installed. This will prevent us from damaging the threads inside of the pulley. Set the jaws off of the puller behind the pulley. Tighten up the center bolt by hand until they're locked against the back. Actually, we don't even need to use a ratchet this time. Our pulley's actually sliding off nicely. Now that we've got it started, we can remove the puller. Take the center bolt back out, slide our balancer off the rest of the way.
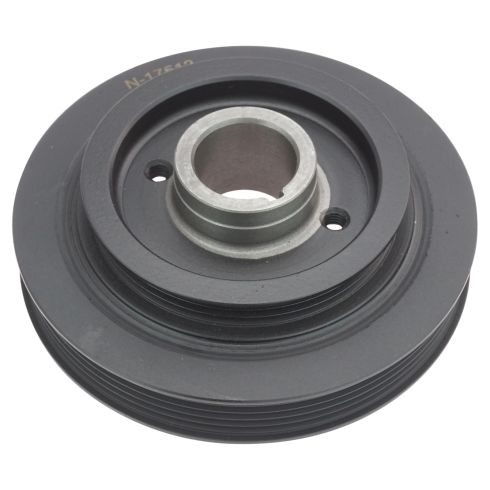
Here we have our old part that we removed from our vehicle, and our new harmonic balancer, or crank pulley, from 1AAuto.com. As you can see, these parts are exactly the same, with the same center bore and keyway. We have the same rubber separating our main section from the actual grooved portion of the pulley. On the backside, we have the same grooves to allow for our power steering pump belt to be driven as well. What these pulleys do is rotate the actual serpentine belts, which, on this vehicle, operate the alternator, air conditioning, and power steering. Over time, the rubber that insulates the center section and the outer drive portion of the pulley can go bad.
I've actually seen some of these separate to the point that the center section would spin, and not turn the outer portion, because it was just freewheeling in there with the rubber torn out, and it would grind and fall off. If your rubber has failed, or the pulley's become cracked or damaged when removing it, this new part from 1A Auto is going to go in direct fit, just like your original equipment, and fix you up right.
Install the harmonic balancer with the keyway onto the flat stock on the crank. Reinstall the 19mm bolt and washer. Reinstall the power steering belt, first over the harmonic balancer. Remember, it sits into the grooves on the backside of the balancer. Then place it over the power steering pulley. I find the easiest way to put tension on the belt is to put a pry bar between the block and tab where the slide is for the tensioner. Tighten the belt up by prying out against it. When it's nice and tight, get your 12mm socket, ratchet, and extension on there. Tighten that bottom bolt down.
Reinstall the serpentine belt, which goes under the A/C compressor, as well as under the crank, and over the alternator pulley. Tighten the 12mm tensioner bolt at the top until the belt is tight. Once the belt is tight, you can tighten the 12mm bolt on the backside of the adjuster block.
Reinstall your splash shield on the bottom, along with the two 10mm bolts. Be sure to tighten these down with the 10mm socket and ratchet.
Reinstall your wheel and tire. Get the five 19mm lug nuts on as tight as you can by hand. With the weight of the vehicle back on your tires, torque your lug nuts to 76 ft-lbs with a torque wrench and a 21mm socket. Always tighten your lug nuts in a cross pattern. Tightening them in a circle can cause them to pinch on one side, create a vibration while driving, or possibly make the wheel loosen and fall off.
Reinstall your negative battery terminal. Tighten it down with a 10mm wrench.
Thanks for watching. Visit us at 1AAuto.com for quality auto parts, fast and free shipping, and the best customer service in the industry.