Hi, I’m Mike from 1A Auto. We’ve been selling auto parts for over 30 years!
Open the door. To remove the master window switch we're going to use the plastic trim tool. You can get these from 1AAuto.com. Otherwise, you'd have to use a flat bladed screwdriver, and you could damage your trim with the hard metal. These are nice, soft plastic, and then kind of get underneath here, it's a little tight fit, and kind of slide it to the middle. There's a clip, we're going to push in this way, and at the same time pry up to pull the master window switch out of the door panel. Put this aside here. Now you can unlock the connector. There’s a tab here, push down and pull out on the switch to pull it out. Put the master window switch aside.
We need to remove this little door handle pull. This little pocket here, where your hand goes. Use the plastic prying tools to kind of go underneath to kind of catch the metal and then pop it up, just like that, and if this side doesn't come, you have to do the same thing, there's a similar clip, pop it up, pull it out, see what you were doing is you were going underneath, pushing in on this metal tab to unlock it.
To remove this black trim cover, take the plastic prying tool, reach in here, just pop it out, and pull that right out. You need a small flat blade screwdriver to carefully open this little door here to expose the screw that's behind it. Use a Phillips head screwdriver to remove the screw. Take the plastic prying tool, there's a slight opening just above the lock, push the plastic prying tool up, and then pop it up off, pull it down so it pulls down from this one. That needs to go out this way, and then you'll have to move this. So you're unhooking it by going this way, and then you're just feeding it off the lever.
To remove this push clip, actually push in on the center. It unlocks it, and then you can take the other side of your plastic prying tool and get underneath it and pry it right out, then to reuse it. Just push it right back out through, and put that aside. Remove the Phillips head screw that was inside our opening for our little cup here, pull handle. Using a Phillips head screwdriver.
The rest of the door panel is held on with clips along the edge. As you pull this off you will need to unplug the courtesy light that should be the only thing that is plugged into the door panel. You just kind of reach underneath, and if you need to, you can use a plastic trim tool, but there's a little bit of a finger hold here I can get it in, get my fingers in, and pull out. And we're going to lift up off of the steel part of the door. The door panel kind of hooks around the top, so lift up and straight out. And the only thing plugged in, I can turn this, so I can see it, is the courtesy light. You’re going to push in on the lock, pull it right out, and we'll put our door panel aside.
To remove the door handle and lock, there’s a ten millimeter bolt here. Remove that. Take the bolt out, and pull this off. It slides out of the steel panel. There's a hook here and a hook here. Flip it over.
So the door opening handle, it's this green one—it's going into the handle there. Pull it out of the plastic and just pop this straight out. And then when it comes out, you'll just push the cable up and out and then for the lock one, it's the same thing. Just kind of push it up and out. Unhook it.
To remove the vapor barrier—it's stuck to the door panel with butyl tape—it's forever sticky. You want to take a razor blade and sometimes you just kind of have to gently pull it and cut it a little bit to get it to separate. Should be able to reuse the vapor barrier. And it will restick to this butyl tape. Work your way all the way around. Cutting it. Just going to feed this harness out of the opening in here. Very careful. You can lay it sticky side up and reuse it.
To remove the speaker, we're going to unplug it. Pushing in the lock. Pulling up the connector. There's three ten millimeter bolts holding it in. Use a ten millimeter socket ratchet to remove them. Pull it right out. Put that aside. Plug the master window switch in. Turn the ignition on. Just going to lower the driver's window. Going to want to lower it so we can see. This bolt here and this bolt here. Turn the ignition off and I'll unplug this.
There is two ten millimeter bolts that are pinching the window glass into the regulator. Start with this one here and I'll just loosen it. It might not come all the way out. Well, it will come all the way out. And this one looks like somebody replaced it. It should look like this one, but it doesn't. Not a big deal. Still this one is ten millimeter. And we'll take it out. I'm going to have to drop this inside the door panel. Now we can lift the glass up and out of the door panel. Just carefully pull it out of the door panel. It does have a bit of a curve to it. Switch hands. Guide it out of here,
and we'll put that in a safe place.
Unplug the window motor by pushing in on the lock. Pull the connector out. There are six 10mm bolts that are holding the regulator to the door panel. Going to remove those. Remove this one last. The reason why we did this one last, because you can actually just loosen it. You don't have to remove it all the way. And now the regulator hangs in place, so you can lift it up and out of the opening.
We have to guide this out of the door panel. Just going to collapse it, and maneuver it out. Use a T25 Torx bit on the end of my extension and ratchet to remove the three T25 Torx that are holding the window motor to the regulator. I'll just separate it.
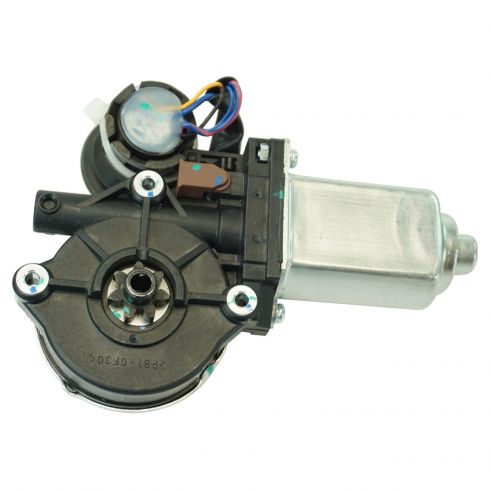
This is the original window motor from our vehicle and a brand new one from 1A Auto. It’s the same style of window motor. This should work great and fit great for you. Before we can install the motor to the regulator, we need to run it without it being connected and that will idle the motor to its neutral position.
I'm going to plug the master switch in. I'm going to plus the motor in. I'm going to turn the ignition on. Now it needs to run in the up direction for about four seconds, and no more than a minimum of six rotations and no more than 10 rotations.
You can try to mark it and count it but I'm just going to count to four, and when you do this you don't want to pull the switch all the way up into the auto position, you just want to pull it up into that first detent. We'll let this run for four seconds. Now we can unplug it. We'll unplug the master switch and we'll install this onto the regulator and then back into the door.
Going to install the motor to the regulator. This is the bottom of the regulator, so this will be the top of the door and the bottom of the door. You want to install the motor to the regulator with this lift arm pointing towards the bottom. That way these bolts are exposed when you put in the door and you can bolt out the glass.
Now would be a good time to take some multipurpose grease or white lithium grease. We'll just put some on the gears. This will sit. This gear has a part that is kind of like a bushing, but it's going to ride in the circular opening in the regulator. And then, of course, it's going to match up with the three holes so we can reinstall the Torx screws. We're going to sit it in place. Got to lift this up to fit them together just like that. Hold it together. Flip it over. Take a Torx bit and our Torx screws. Fit this one. Go in together. This is ready to go back in the vehicle.
Going to reinstall the window regulator and motor. I've got it kind of collapsed in through the door opening. Fish it in here. Going to bring the regulator up and hang it on the bolt that I left in there. That's why it's good to leave that bolt in there. You can just hang it in place.
I'm going to pull the regulator down and extend it where was. Just be aware, when you're installing this regulator, this bar, it mounts behind the panel here. You want this opening to point towards the inside of the car. You can flip this a total 360 degrees and install it backwards. If you install it backwards, the regulator is going to go up, get bound up, and then come right back down. It's not even going to go up a few inches, so make sure that this gets spun around in the right direction.
See there's a stop on there. It'd be hitting the stop. So you can actually spin it all the way around, and we'll put it up in place. I'll get this bolt caught. Push this one in place. Got to tighten all the bolts holding the regulator to the door. When you feel them get tight, stop.
To reinstall the glass, just going to slide it in at an angle. And I'm going to hold it with one hand. Reach underneath and support it. It needs to go into the channels on both sides. And going to kind of readjust it just like that. So it's going to ride in these channels and I'm going to gently lower it down and sit on here. Adjust that out to meet it. Just going to hold this in place with one hand, and I'll install this bolt. It's like somebody who had this window out before dropped the original bolt down inside the door panel and didn't spend a lot of time looking for it. So I'm just taking out this weird one that doesn't match. I'm going to put the correct original that was sitting at the bottom of the door panel here. Just going to tighten these up. It will get tight. I don't want to crack the plastic.
Reinstall the speaker. There's a hook here and the electrical connector goes in the top. Slide it up into place. Align it. Get one of these caught. Get the other ones caught. Tighten them up. Plug the electrical connector in.
Reinstall the vapor barrier. You can tell by the orientation of the holes which way it goes so that these two holes match up with these two here and then these two openings match up with these two here. So I know that will go up and also the slit there is to go around the cables. Going to feed the wire through for the courtesy light. Start in this corner and this stuff is just always sticky. Put that back in place and just push it down. Going to want to stick to everything. Lift up the cables from underneath. Kind of line it up with the holes. And just go along the outer edge and push it right back in. Don't be worried about getting it perfect. That's good enough there.
Reconnect the door handle. The inside door handle with the lock one. So the white one went in the outer one. It just hooked in. And then push right down in. And then the green one that hooks down in place there. And it looks like this is actually broken a little bit. It'd have kind of a tab over it that would lock it. Then we're just going to push it down in place. Just like that. There's two tabs here that are going to go into the door panel this way. Push it down. There are two openings in the handle. This one is for when the door panel is on and the screw will go through that and the cap will go over it. This one is the one you access with the door panel off and the ten millimeter self-tapper will go in here.
If one of these clips get stuck, you can just take a trim panel tool, pull it in here, pop it out and put it back in your door panel and reuse it. This went in down here—kind of push them in place. Plug in the courtesy light and there we go. The top of the door panel is kind of curved—it's going to hook over the metal frame, so I'm going to start by going up in here. It doesn't matter if the window is up or down. Hang it over it, and then we'll get it in place. Make sure that your master window switch harness is accessible, and now we can push it into place on the clips. It will snap into place. Just go around the door, and push them in place. Put a push clip back in.
Reinstall the screw that was under the door pull handle. Reinstall this door handle pull, the arrow points toward the inside, push it in, just like that. Reinstall this cover. It has a hook that's going to hook into here in the black plastic, so we're going to lift that up and slide it this way. Get it hooked first, and then push this in and we reinstall the screw.
Reinstall this black A-pillar cap. It just slides in place and then snaps in. Put the harness back in. It will click when it locks in place. There's a tab here that will slide underneath, and then this metal tab is going to push into this opening here.
Thanks for watching. Visit us at 1AAuto.com for quality auto parts, fast and free shipping, and the best customer service in the industry.