Hi, I’m Mike from 1A Auto. We’ve been selling auto parts for over 30 years!
Use a large pry bar or a flat bladed screwdriver to remove the wheel cover. Just kind of slide it between the wheel and the plastic. Pop it off. These lug nuts are a 21mm socket. We're going to use that and a breaker bar to loosen them while the vehicle's on the ground. Going to raise and support the vehicle. We're using a two post lift, but you can use a jack and jack stands.
The lug nuts are loose. Going to take my socket and finish removing them. Just going to hold onto the wheel. When I take the last lug nut off, it's going to be loose. I don't want to drop it. Dropped a lug nut. That's okay, just don't want the wheel to fall. Before you begin, make sure that your wheel is straight ahead. The intermediate steering shaft is located here, between the steering rack and the steering column. It bolts to the steering rack right here. If you're going to reuse this intermediate steering shaft instead of replace it, you'll want to make a matchmark between the steering rack and the intermediate steering shaft, so when it goes back together, you'll line those lines back up.
In our case, we're going to replace this entire steering shaft. Going to spray this lower bolt with rust penetrant. You can use a 12mm socket and a quarter inch drive breaker bar to loosen this bolt. It's 12mm. There we go. Now I've got it loosened up, so let's switch to a ratchet. I'm going to remove the bolt, but I will leave the steering shaft on the steering rack right now. I'm just going to put some more rust penetrant on there, so when it comes time to break it free it should slide off. Again, make sure that your steering wheel stays straight ahead. We're going to move underneath the dashboard. You don't have to remove this plastic trim above your knees. Slide in under here.
There is a bolt going through the collar right here on the top. I'm going to remove it, and use a 12mm box wrench, because there's a little clearance between the steering column and this bolt. Switch to a ratcheting box wrench. Try to fit it in there. It's still too big. Switch to the open end because now I've broken it free. Get it loose, and I can pull it out with my fingers. There's the bolt. I can slide this down and off the splines just like that. My steering wheel's going to be really loose. Again, make sure it stays nice and straight ahead.
Next we need to remove this clamp so that the steering shaft will slide out of the rubber boot where it is in the firewall. All right, let's see if I can pop this clamp off. Just lift it up a little bit, free it, and I can leave it right in place. Pull the rubber boot, it's like an inner boot with an outer boot. Here we go. You have to separate them and there the entire shaft will pull straight up and out. It might be still be stuck on the steering rack.
Okay, we have to go down underneath and pop it off on the steering rack. Now that the intermediate steering shaft is loose up top, I'm going to reach in and try to wiggle it off the spline that's on the top of the steering rack. Going to use a punch and a hammer, try to break it free. Now, with it released from the steering rack, we'll go back in this interior and just slide it right out.
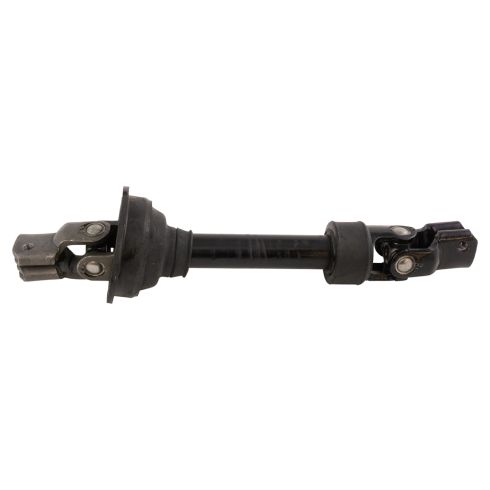
Here's our old intermediate steering shaft, and a brand new one from 1AAuto.com. Similar in design, similar set up with the small splines that are in here, and the pinch bolts. Got a little dust boot that goes through your firewall. They both telescope. It's very stiff. That one telescopes. This one telescopes as well. This just fit in the car, it'll work great for you. Put the new shaft into the firewall opening. I'm going to grab it from there for now. That's right. At roughly the same place, same as the one we took out. Steering wheel is still nice and straight. Put it right over, it sits.
Install the bolt. Got it started by hand, I'm going to try to use a ratchet on this if it fits. Going to switch to the box wrench and just that way I can give it a final tighten. I'm just going to bring this down until it feels nice and tight. You don't have to kill it. Yeah, right there feels good. This little boot just slides right into the boot coming through the firewall, sort of like a grommet, and reinstall the clamp. Pop this back over to the little groove. With needle nose pliers, push these together until it locks.
Okay. With it locked into place, I'm going to go back under the car with the steering rack. Before I put the steering shaft back on the steering rack, I want to clean off all this rusty garbage that's sitting on here. Just going to take a rag, and I'll wipe off as much as I can. Take some brake parts cleaner and spray it. Wipe it down. Now I've got this cleaned off, so I'm going to put a little bit of white grease on here to just help the steering shaft slide back onto the steering rack. Now, you want to make sure this is fully seated because when the bolt goes through this, it actually sits in this little groove in here on the steering rack, and it helps prevent it from pulling off.
Since this is collapsible, I can push it up, and then our wheels are still straight ahead. I'm going to pull it down. I don't want to turn it, I just want to get it over the spline. Just slide it straight down, just like that. I can feel that the steering rack, the shaft has come up all the way through the collar. I'm going to insert the bolt. The bolt's threaded in, so I'm going to take a 12mm socket and ratchet, and finish tightening it down. Just make sure it's nice and tight. Right there feels good. The steering shaft is replaced.
As always, it's recommended that even though we kept the wheels nice and straight, you should have the alignment checked by a shop. We can reinstall our wheel. Important to note, these lug nuts have a taper. Taper meets the wheel, matches the inside of the wheel. Don't install them with the flat side like this—that is incorrect. Install them with the taper to the wheel. It helps to locate the wheel on the lug nut stud. Now I'm just using the socket and ratchet to bring these down snug before I put the car on the ground. I'll torque the lug nuts to 76 foot-pounds. I'm going in a cross pattern. Reinstall the hubcap. Going to line up the opening for the valve stem with the valve stem on the wheel. Just push it in place.
Thanks for watching. Visit us at 1AAuto.com for quality auto parts, fast and free shipping, and the best customer service in the industry.