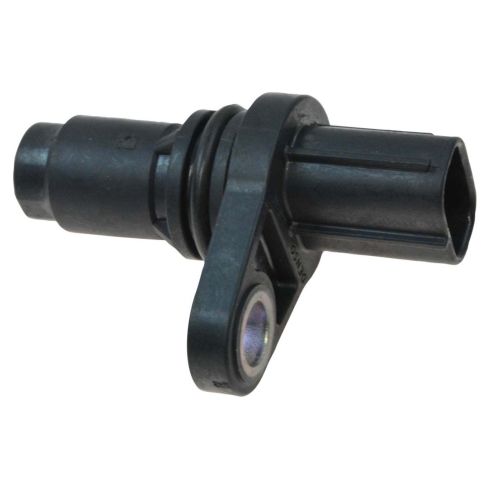
1ACPS00069-Toyota Lexus Pontiac Scion Camshaft Position Sensor TRQ ESA94799

Replaces
2006 Toyota 4Runner V6 4.0L Camshaft Position Sensor TRQ ESA94799

Frequently bought together
Product Reviews
Loading reviews
4.75/ 5.0
16
16 reviews
A good deal
July 26, 2017
The products worked good, the price was good. Shipping time and customer service was also very good. I will be for future business. Thanks alot.
Camshaft sensor
June 25, 2018
Looked every where for this part at a low price, couldn't find it. That's until I found 1A Auto, easy to order and great prices. I will be getting all my Toyota parts from here. Happy Customer
Woman's World
November 9, 2018
It's Hard Out Here for women when we're trying to get things done for a car. Friend told me about A1 Auto and I've been in love ever since. I'm able to know what part I need. I'm able to contact A1 Auto and get the exact part shipped straight to my door. Very good service.
Exactly what I ordered!
December 6, 2018
I would recommend this company to others. The part I bought was exactly what I was looking for. You never know when to trust a part that is shipped but this one you can! Didn't take very long to come and it fit perfectly. The price was unbeatable as well. My local auto parts store wanted $120! I wound up paying less then 30! That's a wina
Fast delivery, great price
March 1, 2019
Part came quickly, as described
Replace camshafts
June 11, 2019
I have a light engine on because of my camshaft so I ordered this one took it the mechanic replace it clear the code unfortunately the engine come back read the same code thats the same camshafts need to be replace. He told me this is a cheap after make !
Fit perfectly
March 27, 2020
Fit perfectly
Cam positioning sensor
September 18, 2020
Good quality part.
Thank you!
April 9, 2021
Great service and the part!
Outstanding
July 29, 2021
Very satisfied individual in fact I had spent almost $1000 with this company and always have been very satisfied with the price and the quality of the part
Part works
August 12, 2021
Installed easily
Direct fit
July 24, 2022
Direct fit. Super fast install. I did driver and passenger side.
Perfect fit
February 17, 2023
Perfect fit. Looks and feels identical to original pay it replaced.
Great sensor
July 25, 2023
All fit perfect and warning light came off without even having to reset, perfect match, oem item, thanks
November 16, 2023
Worked fine
I recommend it
April 6, 2024
Perfect fit
Customer Q&A
Can I install this part without having to program it into the vehicles computer?
January 23, 2018
10
Yes
April 11, 2019
Daniela C
10
Yes but make sure you disconnect the battery before you begin. After the job is done and you drive the vehicle for about 30 miles or so the computer should recognize the new part and reset itself
June 16, 2019
T H
10
Yes just disconnect the battery first
April 9, 2020
Robert N
how many camshaft sensors are found on a 2012 toyota venza v6?
February 18, 2018
10
My Avalon has 2. One in the front one in the rear.
February 18, 2018
Layne M
Is the camshaft sensor the same as the camshaft position sensor?
June 15, 2019
10
Yes
June 15, 2019
J A
10
Yes it is and there is only one per shaft. The ones I bought here at A1 were better priced and worked fine.
Hope this helps
June 16, 2019
T H
10
Yes, that is correct!
June 16, 2019
Andra M
Where is the camshaft sensor in a 2008 Toyota Avalon and is it only one?
December 17, 2019
10
Thanks for your inquiry. Written and video installation instructions are found on the product page under the "How-To & Tools" tab.
https://youtu.be/oNtaRSANU_0 is the link to this specific repair.
We're constantly adding new installation video instructions. If we do not have one for your vehicle on the product listing page, please check again at a later time or check our Video Library to see similar repairs here: https://www.1aauto.com/videos
December 17, 2019
Curtis L
Didnt see if this part fits the 4runner 4.7L v8 engine as opposed to the v6. Does anyone know if it makes a difference? It looks a little different than mine. Thx
May 4, 2020
10
Hey Eric,
This part is listed to fit both engine sizes.
Thank you,
Corey
May 4, 2020
Corey M
Do a 2011 Toyota Camry le camshaft sensor needs a magnet on the end of it ?
January 15, 2022
10
This part will fit your vehicle. It will be a direct plug and play when replacing your original. No magnet will be needed.
January 19, 2022
Jessica D
How many Camshaft position sensors the 2006 Toyota Avalon have?
May 14, 2022
10
Most vehicles have up to 4 Camshaft or Crankshaft position sensors. You could try looking in your owner's manual for more informaiton.
May 14, 2022
Ricale A
Are you sure this will fit my 2008 tundra 5.7L?
August 16, 2023
10
Yes, this part will fit your 2008 Toyota Tundra V8 5.7L.
August 16, 2023
Jean O
Toyota is a registered trademark of Toyota Motor Corporation. 1A Auto is not affiliated with or sponsored by Toyota or Toyota Motor Corporation.
See all trademarks.


