Hi, I’m Mike from 1A Auto. We’ve been selling auto parts for over 30 years!
Raise and support the vehicle. Remove this under shield that goes under the transmission and transmission. There is some 10 millimeter bolts here, and then two here. We'll remove those. Use a 10 millimeter socket a long extension and my ratchet. Just so I don't have to reach up here, but you can use any length ratchet. These two bolts were so rusted they broke. There's plenty of plastic clips holding this tray on. I'm not worried about it.
These bolts are also very rusty along here. One of them already broke, so what I'm going to do is remove all of the clips and then fold the plastic under tray down to get it out of the way. I'm going to leave these bolts in place. Not touch them. If your vehicles not rusty, they'll probably come out without a problem. This car is very rusty. They're going to break on us. I'm not going to bother with it. I'm just going to use a flat bladed screwdriver to release these plastic clips. Pop them out.
Once you get them started, you can use a trim clip tool. I've just gone along and found all the push clips holding this up. Somebody has already cut this to give them better access to the oil pan and the oil filter. So normally they'd probably be a door here you'd flip down. Ours doesn't have it. I'm not going to worry about it. There's one more clip here. I'm just going to take a bungee cord, just hook it to this, and you can hook it to the front grille. That'll just help hold it out of the way.
Got a drain pan in place. Going to loosen our drain plug. It's a 14 millimeter. Break it free. So this one is not looking so good. It should be a dark black color or caramel color. This is like a milky, chocolatey kind of mocha color. That's tell me there's probably coolant in this oil. It's likely this engine has a bad head gasket, which is unfortunate. That's a pretty good sign your head gasket is leaking, and you've got coolant contaminating and mixing with the oil, which is very bad. Its ruins the bearings and engine. We're going to change this oil for now, but this engine will need a head gasket.
It's draining pretty well. I'm going to reinstall the plug. The gasket stayed in place, so I'm just going to tighten this up. Threads in this plug aren't great. Somebody might have started to cross-thread it. Should spin in nice and easy. You want to over tighten it until you feel it stop. That's perfect.
Now I can remove the oil filter and put some fresh oil in it. Push an oil filter wrench. This one is 65-68 millimeter. Fits over the end of the plastic cap pretty well. Have our drain pan ready. Spin this free. Get this out of the way. This is stuck in place. You want to carefully hit this tab. Break it free. Use some adjustable pliers on here. The filter is a cartridge type. It's going to come out of the plastic cap, then get thrown away. We got our oil cap where the oil filter goes into. There's a rubber O-ring that needs to be replaced. We use a pick to pull it out. Throw that away for now.
Push on the O-ring. This is pretty oily so it'll slide right over it. Slide it into the groove. Put oil around it. I'm just going to wipe this out. Get some of the old oil out of here. Take the new cartridge filter. It pushes in place. Then this will get reinstalled. We'll thread it in. Just going to tighten the cap by hand. Get it until it's seeded. There's still a gap here. I'm going to turn it til this black plastic is touching the aluminum. That should be tight enough. I don't want to over tighten it. That'll get it nice and tight by hand. That should be good. Wipe up some of the oil. You're all set.
I'm going to remove all the bolts around the edge of the oil pan. There's a couple that are actually nuts with studs and they may come out with the nuts. They look pretty rusty. I'll do my best to spray some rust penetrant on here. And then use a 10 millimeter socket, ratchet, tension and loosen them all up. They look pretty rusty but they are 10 millimeter. Here's one. I'm going to use a small pry bar and a hammer. Tap under here, get this started. Get our drain pan in place. I've got this bent away a little bit. I want to try to pry it off, break that seal. Tap it in some more. And to get it started, I'm going to start to come down. There it goes.
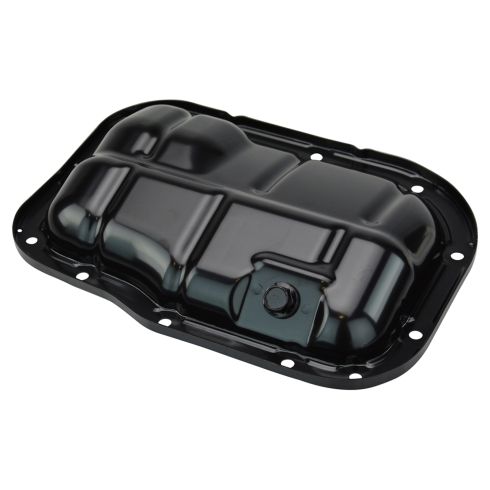
Here's our original oil pan we pulled off our vehicle. It's not in too bad a shape. But if you've got a rusted oil pan, you can get a brand new one from 1aauto.com. It's identical in design. Fitting it, the only thing you'll have to add is RTV silicon as a gasket. It does come with a new drain plug. When we install it this will fit great and work great for you. Before the new pan can be installed, we'll take a razor blade and get rid of all the gray RTV. You should just scrape along it. Once you get the big stuff out, you can take some break parts cleaner, spray it onto a rag and just clean it. And you'll just repeat that all the way around the edge. And then you'll be ready to install the new pan with fresh RTV silicon to seal it.
Use gray RTV silicon to make the gasket. Put a nice amount right along the edge. Go around the whole pan. Once you get this on there, make sure you're ready to install it because it will start to dry. It doesn't set up super fast, but it does start to set it up, and you want to have it ready to go and be installed on your engine. We just want to make sure the surface as a clean and dry as possible so any oil that dripped down after you cleaned it just wipe it off real quick with a rag. So one of our studs stayed in place. Get this all off. Push it up into place so the drain plug was at the back. Hold that stud, and push it up.
Now we'll get one of the bolts caught on the opposite side. Right now it's really only being held on with the adhesiveness of the RTV so I want to get some bolts in here. I'm just going to get that just loosely in place. Just tighten these gently at a cross pattern. Just get them snugged up. Once you feel them get tight, you can stop. Just go opposite. Going to let the RTV silicon dry and then refill the engine with the oil. We'll let it dry for about 30 minutes to an hour depending on temperature and then it should have a nice solid seal. You can even go up afterwards once it starts to dry, you can touch it and you'll tell.
Going to take this bungee cord off, flip the plastic under tray back up. I'll catch these back ones first. Just reinstall all the clips you removed to get the tray off. Open the oil cap. That should tell you the weight of the oil. 0W-20. The funnel doesn't fit that well, you can pop this cover off very easily. Just pops off the three rubber plugs that it sits on. The cover is broken, but it goes like that. Since I can get to that easier, put the funnel in. Pour in four quarts, and then I'll check it. Make sure it's enough oil.
To check the level, pull the dipstick. Wipe it off. Hopefully this is enough time so that the oil run down into the oil pan. It's going to be dark to see, because it's very clean and clear but the edge of it, so the low mark would be that point there. The high mark would be here, and it's right about there so it needs I'd guess about half a quart more. Double check the oil level again. So it's really hard to see because the oil is so nice and clean, but it's right at the top mark so the oil level is perfect. Put the dipstick back in. Take the funnel out. Actually reinstall the cap before you put the engine cover on. Engine cover simply pushes into place just like that. You're all set. You can close the hood.
Thanks for watching. Visit us at 1AAuto.com for quality auto parts, fast and free shipping, and the best customer service in the industry.