One of the first things we need to do before we get started on this job is remove the negative battery terminal. Use your 10-millimeter wrench right in there. Loosen this nut until the terminal comes loose. You don't have to fully remove it. Give it a nice wiggle, lift it up off of there, and set it aside so there's no way it can contact the battery terminal. The next thing we're going to do is grab this plastic cover. We'll lift it straight up on the front and then draw it up. Next, we're gonna go ahead and grab onto these hoses. Just pull them out of their secured point. And then if you were to look right down here, you're gonna see where the bracket is bolted on. Let's get that off of there. Now that that bracket's out of the way, you can see that the wiring right along here goes right down to those fuel injectors. We're going to remove all those pigtails. If you take a nice small pocket screwdriver, you go right here, this is the lock where the white area is. Just lift up on that, press in on this gray area, and then lift up. Do the same down the line. Now, just go ahead and grab onto this wiring harness here. This right there is the lock. Go ahead and slide that out. Lift up on this area here and then separate the two pieces. Set those aside.
We're just going to remove this so you can see what's going on. You don't necessarily need to do it for the job. Let's grab this little secure point here, lift that up. Now, we can grab this whole wiring harness, put it up and out of the way. Let's lift this up off its anchor point. Set that aside as well. Next, we're going to do the coil wires. That's right along here. Just lift up on that tab, slide it out. Do the same down the line. Now, we're just gonna take off these spark plug boots from the coils. Usually, if you give them a nice little twist, they'll break free, and then you can pull them down. Next, we're gonna use a 10-millimeter and we're going to remove the bolts or the studs that are holding this whole bracket on that's holding the coils. And there's one back there. It's going to be a lot easier to get to with a wrench. That out of there. So, now, if you were to look at the valve cover, you're going to see right down along the center four bolts that hold it down. We're going to remove all four. So, next, it's going to be time to take off the bolts that hold the valve cover down. If you look right along the center, you'll see all four. Go ahead and remove them. Okay. See if we can wiggle it around.
Okay. Be careful for your plastic line on here. If you need to remove it, you can grab this plastic right here, depress, and you can draw it right off. Lift this up and out of here. And right here, you can see the valve cover gasket. Nice. Now that the valve cover's off, just take a peek inside the channel where the gasket's supposed to ride. Make sure that there's no debris inside there or anything that can cause an issue with the seal. It's always a good idea to go ahead and clean this down if you feel as though it's dirty inside or it has any gunk buildup. Also, if you were to look along the engine where the gasket/valve cover is gonna ride, you want to make sure that that's nice and clean as well. Any of this stuff right here is buildup and it could potentially cause a leak. Now, when you go ahead and clean this down, you don't want to use any type of parts cleaner or whatnot and try to spray it because it could get inside there, and, of course, that's going to cause issues. With that said, just take a nice clean rag and wipe up and away. We're just trying to brush this stuff up and away from inside where the valves are.
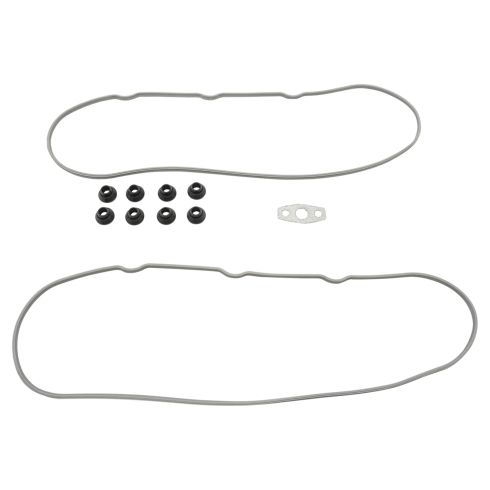
If you have anything that doesn't want to come up off the engine, you could use a nice, smooth razor blade. That'll do just fine. Okay. That's nice and clean. It's nice and smooth. We're going to have a great contact point. Let's get that gasket ready. All right. So, we've got our gasket. I just want to show you on the gasket itself, if you were to look closely, you're gonna actually see that it has two different sides to it. You're going to have the side that looks like it has a little knurled end. That's going to be the side that's going to press into the valve cover. And then the nice smooth area is going to be the side that goes up against the engine. You also want to pay attention to these ridged areas or the indented areas. That's going to ride right along here. I'm just going to go ahead and start it up on there. Line everything up. This looks like it's going to go on just fine. I have it facing in the right direction. I'm just going to press it in. After you press it in, if it feels like it pops back out, more than likely you just have it in backwards or upside down. But it's a good idea to just press it right in there. Just going to go right along. Make sure it's pressed in one last time.
The next thing we're gonna have to do is try to get these studs out of the valve cover because there's gaskets and we're gonna replace them. To do that, I'll just come over here somewhere where I can hang it over and I'll be able to have the bolt hanging through. I'm gonna take a nice socket here. Just something that kind of fits over it. See if I can punch it through. There we are. Do the same to all. Let's go ahead and continue cleaning this up. Next, what we're going to do is get the rubber pieces off of here because we're going to be replacing them with some nice new ones. Just pay attention to the direction that they go in. Let's get right in here with our little pocket screwdriver, stretch it over the top there, and pop it right off. Clean this down, of course. At this point, if you want to use a little bit of lubricant, you can put it on there and then you would just take this and you can slide it right on. Just like that. Do the same to all. Next, we're just going to take a little bit of this silicone grease, and then we're going to help push this gasket right in there. As you push, just take a look from the bottom and you should be able to see if it's going through completely or not. Make sure it's definitely 100% through and then continue on down the line. Now that we have all the gaskets on here, just take a quick look and make sure that there's nothing on the engine, no dirt or anything happened to fall in. Let's go ahead and get this valve cover down and under here. Careful for any wires, of course. You don't want to put any tugs on anything or, of course, catch your gasket and tear it. Get that outta there. Okay. Carefully set this right down along top. Now, I'm just going to push in the bolts. I'm going to start them all in by hand before I tighten anything down.
So, now it's going to be time to go ahead and snug up these bolts. We're just going to bring them down so they're barely bottomed out and then we'll torque them to manufacturer specifications. When we do this, we want to start from the center and work our way out. Okay. Not making these very tight because I am gonna torque them. Now, it's going to be time to torque all these to 106 inch-pounds. Let's start from the center. That's one. Do the same to all the rest. If you took this off of there, let's go ahead and put it back on. Let's get the coil pack back up on here. Just line it up with where it needs to go. Put your little studs there. Go ahead and start them all in before you tighten any of them down. Okay. Now that we have them all started in, it's time to start snugging them up. I like to start with the one in the farthest rear because it's the hardest to get to and why not get it done first? I gotta make sure it's tight. Nice. Do the same to them all.
Nice. Now, it's going to be time to get these spark plug wires back up onto the coils. I like to add a little bit of dielectric grease, it's a good idea. Go ahead and slide it right up onto that coil. Make sure it clicks in, give it a nice, easy tug, and it does not fall off, and then move along to all the rest. Let's go ahead and plug in the ignition coils. Out of the way. Now, let's get the wiring harness situated. Just gonna go back down around. It comes on the inner portion of where the filler neck is, not on the outside. Goes right up and along there. You have your little anchor point here. It's going to go on that rearward stud. Slide it right on there. And you're going to notice everything kind of just falls into place at this point. So, just kind of get it situated. We'll start with the front fuel injector. Go ahead and plug that in right down here. Push down, listen for a click, give it a wiggle, and press down on that lock. Make sure it's completely locked in and it can not come up. Do the same down the line. That's good. Lock it in. Give it a tug. Perfect. Let's move along to this. Plug the two pieces in, listen for the click, give it a tug, and then make sure you lock it in. Perfect.
Now that we have that nice and locked in, if you look on the backside, you're going to see a little clip. We're just going to take this, turn it over, and we're going to put it right down into this hole right there and it should anchor it in. Perfect. Now, it's going to be time to get this hose bracket on there. You have your area where the stud's going to go through and you have this nub right there. This is actually going to go in this direction. Put it in just like that, get the nut on there, snug it up.
Okay. Grab those hoses. Slide them right in. They are nice and secured.
Now, it's going to be time to get this cover back on here. Just pay special attention to the back. You're going to have an area where some hooky-dos are going to clip in. And then if you were to look right here, you've got a couple little pitons that are going. Slide it back, put it into the hooky-dos, line up your pitons, couple light bonks, give it a wiggle, make sure it's secured. Now, it's going to be time to get the negative battery terminal back on here. Slide it right up and on there. Make sure it's down as far as it can go. Make sure it's as straight as possible, and then tighten it up. Give it a nice wiggle. Make sure that it's completely secured. Close the hood. Take it for a road test.
Okay. If you took off the air intake system, just go ahead and put that back on. And then when it comes time to do the driver side, the process is going to be basically the same, except a little bit easier.