Replaces

This part doesn’t fit a . Select from parts that fit.
Frequently bought together
Item Condition:
New
1 Year Warranty
This item is backed by our 1-year warranty. In the event this item should fail during intended use, we will replace the part free of charge. This warranty covers the cost of the part only.
FREE Shipping is standard on Orders shipped to the lower 48 States (Contiguous United States). Standard shipping charges apply to Hawaii, Alaska and US Territories. Shipping is not available to Canada.
Expedited is available on checkout to the United States, excluding Alaska, Hawaii and US Territories as well as P.O. Boxes and APO/FPO/DPO addresses. Final shipping costs are available at checkout.


Created on:
Tools used
Brought to you by 1AAuto.com, your source for quality replacement parts and the best service on the Internet.
Hi, I'm Mike from 1A Auto. I hope this how-to video helps you out, and next time you need parts for your vehicle, think of 1AAuto.com. Thanks.
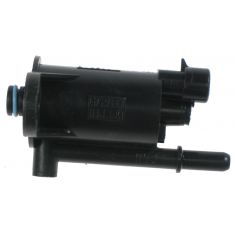
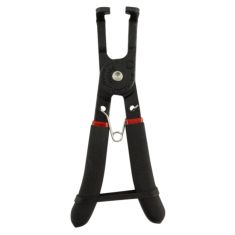
In this video, we're going to show you how to replace the vapor canister purge solenoid valve on this 2003 GMC Envoy XL. It's the same part and similar process on these XLs from 2002 to 2004. The items you'll need for this is a new vapor canister purge solenoid valve from 1AAuto.com, an 8 millimeter socket and ratchet, and a flat-blade screwdriver.
The vapor canister valve is right here. You want to just lift up on this tab and disconnect this harness and then just push in on the clip down here and then pull this hose up and out. Once that's removed, you can pull it right up and out.
On the left, is the old vapor canister purge solenoid valve. On the right, is the new one from 1A Auto. You can see they're identical, and they'll fit exactly the same. Take the gasket off your old vapor canister. Just wipe it off a bit and put it into place on your new canister. Push the bolt through and then just feed it down into place and tighten up that 10 millimeter bolt. Then reconnect your harness and push the hose back down into place until it re-clips. Then you're all set.
We hope this video helps you out. Brought to you by www.1AAuto.com, your source for quality replacement parts and the best service on the Internet. Please feel free to call us toll-free, 888-844-3393. We're the company that's here for you on the Internet and in person.
Tools used
Now is gonna be time to get started on our EVAP purge solenoid. That's gonna be located right here under the cover. Use your 8-millimeter socket and remove this bolt. Get this right out of the way. The next thing we need to do is use a nice, small pocket screwdriver, and we're gonna press right along this white piece right here. You'll notice that it presses in towards the black, and then it should relieve this so you can pull it right up and off. Set that aside. Come right under here, there's a little flippy do. You can either grab it with your finger or your small screwdriver, pull it away, and then you should be able to lift that up as well. Next, we're gonna remove our 10-millimeter bolt, and lift this right up and out here. Let's go ahead and get this off of here, put this aside, and I'll put right on our new one. Slide that right over the O ring, and then right over this.
Then we can take this unit. We're gonna carefully slide it down and in here. So that slid right in there, nice and easy. We'll take our bolt, start that in there, and we'll snug it right up. Now, remember that you're just screwing in the plastic here, so when you tighten this up, you wanna have a nice small ratchet, you don't want anything that's gonna apply too much pressure. I'm just gonna put this on till it bottoms out. Okay. Give it a nice wiggle, make sure that it's secure. Once you've done all that, go ahead and start reconnecting it. Got our electrical, and, of course, this. It should slide right on. Perfect. Now, it's time to get the cover on. Just pay attention to those two hookie dos back there and then the two slots on the cover. Line it up so it fits right in, lay this down, then your bolt should line right up. Snug it up. All right, start it up, take it for a road test.
Tools used
I'm gonna take this cover off using an 8-mm socket and slide it off. And the purge valve is located right here. Disconnect the connector. Just slide underneath the lock. Disconnect that. Disconnect the hose. You can use a little pocket screwdriver. Just push on this little lock right here and then that'll release the hose. Just slide it up and, using an 8-mm socket, take this bolt out. Pull that out. And grab the purge valve and just slide it right up. There's an O-ring right there. And take this rubber piece off the old one. Take the new one, just slide it right over like that, and slide it in position. Put the bolt back in and tighten it down. And just snug it up. That's good. Reconnect the hose. Lock it in place, make sure it's good, and connect the connector. There you go. Take the cover and line the cover up in the back. And get the bolt started. And tighten it up, snug.
Tools used