Brought to you by 1AAuto.com, your source for quality replacement parts and the best service on the Internet.
Hi, I'm Mike from 1A Auto. I hope this how-to video helps you out, and next time you need parts for your vehicle, think of 1AAuto.com. Thanks.
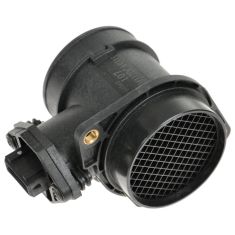
In this video, we're going to show you how to replace an airflow meter on this 1997 VW Jetta at 1A Auto. We sell a nice replacement airflow meter, at great cost savings over the dealership. If your engine is running rough, or you get a check engine light, and it indicates that you have a bad mass airflow sensor, or air intake sensor, this is the repair you will need to do. It's a pretty simple operation. You'll only need a flat blade screw driver and a 10mm wrench, or a 10mm socket with a ratchet.
Open up the hood, reach right in, pull this handle, pop the hood and then you reach underneath here and you'll feel a hook that you push aside. Lift up the support rod right here. You have the passenger side of the air box. There are two clamps you'll want to loosen up. Just use a flat blade screwdriver. Really, this one you don't have to undo, but this one makes it a lot easier. Loosen up this clamp, twist, and then pull this tube off, or you can push it down like that. There are two wire tabs here. Press those and release that. There are two vacuum lines. Carefully pull them out of the clips in the side of the air filter box. Then you'll have to use a screwdriver probably and pry the rubber tubes off of the air box. Those can go right there. Then around the perimeter of the air box, there's a wire that's just held on with some clips. You just take the clips and push them down and off. There's four of them: two on the front and two on the side. Now there are just two clips: one here that you pull up on the bottom of to release it, and then there's one right back in here. Pull up on the bottom and release it. Pull that off and then your air box lid comes right up and off.
To get the old one off, a 10mm socket, ratchet and extension just helps me. You could use a 10mm wrench as well. Just remove two bolts. Then this simply just pulls right out. There is a rubber o-ring in here. Make sure that's in good shape.
Here's a new flow sensor from 1A Auto. Take it out, you can actually just pull one cover off for now. The airflow arrow points out of the box to the engine. Put it in, and put the two bolts back in place. Tighten them up. Take that off.
To reinstall, make sure you put your wire down out of the way. Make sure that your vacuum lines are out of the way. There are 2 tabs on the air box lid, those are put in there straight. Those go right into place, and put the lid down on. Reset these clasps. Watch the connection, put that back on. For my intake hose, the airflow sensor has a little slot on it, and there's a little tab on the hose. Make sure it's going together correctly and lined up right. Bring these vacuum lines back into place, clip them into the tab there, and push them firmly onto their connections here. For this line that goes around, clip it back on in all four spots. Then, take the air pump hose, and put it back on. Then we'll tighten up those two clips
We hope this video helps you out. Brought to you by www.1AAuto.com, your source for quality replacement parts and the best service on the Internet. Please feel free to call us toll-free, 888-844-3393. We're the company that's here for you on the Internet and in person.