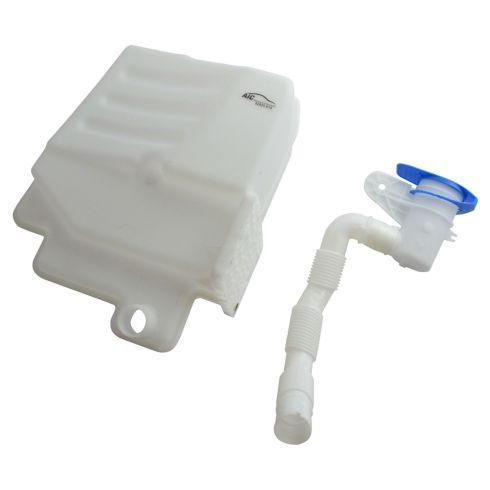
This item is backed by our limited lifetime warranty. In the event this item should fail due to manufacturing defects during intended use, we will replace the part free of charge. This warranty covers the cost of the part only.
FREE Shipping is standard on Orders shipped to the lower 48 States (Contiguous United States). Standard shipping charges apply to Hawaii, Alaska and US Territories. Shipping is not available to Canada.
Expedited is available on checkout to the United States, excluding Alaska, Hawaii and US Territories as well as P.O. Boxes and APO/FPO/DPO addresses. Final shipping costs are available at checkout.
How to Replace Windshield Washer Reservoir Bottle 2005-10 Volkswagen Jetta
Created on:
Tools used
Flat Blade Screwdriver
Phillips Head Screwdriver
T30 Driver
T25 Torx Driver
1. Removing the Grille
Remove the two clips on top of the grille with a Phillips screwdriver
Remove the two Phillips screws below the grille
Push in the tabs on the top of the grille
Pull up on either side of the grille
Remove the grille
2. Loosening the Bumper Cover
Remove the T25 screw from the fender
Remove the four T25 screws in the wheel well
Repeat the process on the other side
Remove the two T30 Torx screws on the top of the bumper
Remove the series of T25 screws along the bottom of the bumper
3. Removing the Side Marker Light
Pry out the side marker light with a flat blade screwdriver
Pull out the side marker light
Twist the bulb socket out of the light
Pull the bulb off of the socket
Repeat the process on the other side
4. Removing the Bumper Cover
Pull off either end of the bumper cover
Disconnect the side marker harness from the clip on either side
5. Removing the Washer Bottle
Remove the washer pump from the washer bottle
Disconnect the wiring harness
Remove the 10mm bolt from the top of the reservoir
Remove the 10mm bolt on the bottom of the bottle
Remove the two 10mm bolts from behind the bottle
Push the washer bottle down and out
Pull and twist off the hose from the bottle
6. Installing the New Washer Bottle
Push the hose onto the new bottle
Insert the washer bottle and neck into place
Tighten the 10mm nuts behind the bottle
Tighten the 10mm bolt to the bottle
Tighten the 10mm bolt to the upper reservoir
Connect the wiring harness
Push the washer pump onto the washer bottle
7. Tightening the Bumper Cover
Insert the bumper cover into place
Tighten the two T30 screws to the top of the bumper
Tighten the five T25 screws in the wheel well
Clip the side marker light harness to the bumper on either side
8. Installing the Side Marker Light
Push the bulb socket into the light
Push the side marker light into place, starting at the front
9. Reinstalling the Bumper Cover
Tighten the series of T25 screws along the bottom of the bumper
10. Reinstalling the Grille
Line up the tabs on the grille with the slots on the vehicle
Push the grille into place
Tighten the two Phillips screws below the grille
Tighten the two clips on top of the grille with a Phillips screw
Brought to you by 1AAuto.com, your source for quality replacement parts and the best service on the Internet.
Hi, I'm Mike from 1A Auto. I hope this how-to video helps you out, and next time you need parts for your vehicle, think of 1AAuto.com. Thanks.
In this video, we're going to show you how to replace the washer bottle on this 2005 Volkswagen Jetta. The items you'll need for this is a 10mm socket and ratchet, Philips screwdriver, flat blade screwdriver, and a T25 and T30 Torx driver.
Start off by removing these two T25 Torx bolts. Then remove two Philips screws down at the bottom of the grille, there's one on either side. We'll just fast-forward as Mike removes these. Now push in these tabs and then pry the grille up. There's one tab on either side. Before doing the other tab, you want to make sure that the grille is pulled up on this side so it won't just snap back in. There's that side, and your grille will pull free.
Now remove this T25 screw right here, and then these four T25 screws below it in the wheel well. We'll fast-forward as Mike removes those. Then you want to repeat this process on the other side. Now remove these two T30 Torx screws. Now, along the bottom of your bumper, you'll see this series of T25 screws. Just go ahead and remove all of those. Now push in your side marker lights and pry out the back and then it will pull free. Then you can just pull the bulb out. After you've done that on both sides, just start pulling out on the bumper cover and then reach back and disconnect the harness clip from either side. Then your bumper cover is free.
Now just pull the washer pump out and then disconnect the harness by pushing on the tabs and pulling it free. Then pull this hose out. You may need to use a flat blade screwdriver and just pry it out up here. Now remove this 10mm bolt, this 10mm bolt, and these two 10mm nuts. We'll fast-forward as Mike does that. Now just push the washer bottle down and out, and it will pull free. If your new washer bottle doesn't have the hose, just pull and twist until it pulls free.
Then take your new washer bottle and push the hose back into place. Feed your washer bottle and the neck back up into place. Just get everything lined up. Once you've got it all lined up, replace those two 10mm nuts and the two 10mm bolts. Now re-clip the hose to the washer bottle, and push the washer pump back into place, and reconnect that harness.
Now we'll fast-forward as Mike pushes the bumper cover back into place, and then replaces those two T30 screws at the front and tightens them up. Then replace the five T25 screws in the wheel well on either side. Now reach down behind your side marker light, and just pull the harness up and feed it through. Then re-clip it onto that lip on the bumper cover, and then repeat this process on the other side. Now reconnect the wire to the side marker light, and then push the front in first and then the back. Then replace this series of T25 screws on the bottom of the bumper.
Take your new grille and line up these two tabs into these two slots. Just push the grille back into place and then snap it back in at the top. We'll fast-forward as Mike replaces those two T25 screws and then the two Phillips screws on the bottom of the grille. You want to make sure that you push the grille and bumper together so that the screw will go all the way through.
We hope this video helps you out. Brought to you by www.1AAuto.com, your source for quality replacement parts and the best service on the Internet. Please feel free to call us toll-free, 888-844-3393. We're the company that's here for you on the Internet and in person.
603-647
In Stock
Product Reviews
Loading reviews
2.00/ 5.01
1review
5 Stars
4 Stars
3 Stars
2 Stars
1 Star
0
0
0
1
0
Misrepresented
Kristi
March 22, 2018
The site claimed that this part would be a guaranteed fit for my vehicle and it wasn't. So I had to improvise to make this work for my project which is overall inconvenient
Customer Q&A
No questions have been asked about this item.
Customer service
877-844-3393
Monday - Friday 8:00am - 9:30pm ET Saturday - Sunday 8:00am - 4:30pm ET
Audi is a registered trademark of Audi AG. 1A Auto is not affiliated with or sponsored by Audi or Audi AG.See all trademarks.
Enter Vehicle Year Make Model
Specify your vehicle's year, make and model to guarantee fit.
Year
Make
Model
Options
Drivetrain
This part doesn’t fit a . Select from parts that fit.