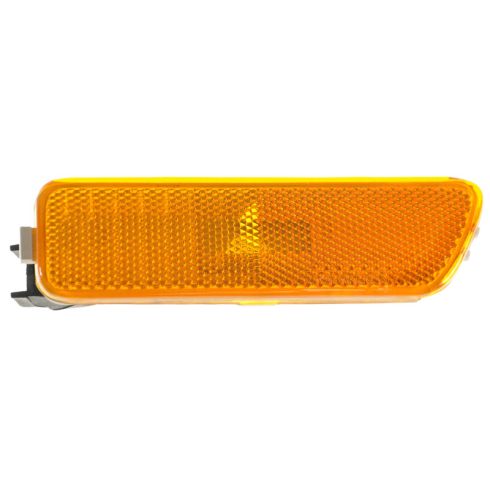
Complete Repair in One Purchase - Stop searching for parts individually and complete your repair with a customized kit or set from DIY Solutions.
High-Quality Parts from Trusted Brands - DIY Solutions' kits and sets are selected from the best automotive brands and include hard-to-find and even obsolete parts you may need for your vehicle.
Guaranteed Fit - DIY Solutions ensures its selected parts are quality-tested to guarantee fit and function.
Assemblies may include halogen or incandescent test bulbs that should be replaced before installation.
Features and Benefits
Direct Fit - No vehicle or wiring modification necessary
DOT, SAE, and FMVSS Compliant - Meets on-road use regulations
Matching set for a restored look
Item Condition:New
Attention California Customers:
WARNING: This product can expose you to chemicals including Lead and Lead Compounds, which are known to the State of California to cause cancer, and birth defects or other reproductive harm. For more information, go to www.P65Warnings.ca.gov.
Lifetime Warranty
This item is backed by our limited lifetime warranty. In the event that this item should fail due to manufacturing defects during intended use, we will replace the part free of charge. This warranty covers the cost of the part only.
How to Replace Side Marker Light 1999-2005 Volkswagen Jetta or Golf
Created on:
Tools used
Electrical Tape
Flat Blade Screwdriver
1. Removing the Side Marker Light
Wrap a flat blade screwdriver with electrical tape to avoid scratching the paint
Push on the front of the side marker light
Pry out the back of the light with a flat blade screwdriver
Pull out the side marker light
Pull the bulb and socket out of the light
2. Installing the New Side Marker Light
To service the bulb, pull it out of the socket and push the new one into place
Push the bulb and socket into the new side marker light
Push the light into its cavity starting at the front
Hold the front of the light in place as you push the back in
Brought to you by 1AAuto.com, your source for quality replacement parts and the best service on the Internet.
Hi, I'm Don from 1A Auto. I hope this how-to video helps you out, and next time you need parts for your vehicle, think of 1AAuto.com. Thanks.
In this video, we're going to show you how to replace a side marker light on this 2004 Volkswagen Jetta, and we show you on the driver's side but the passenger's side is the same procedure. The items you'll need are a new side marker light from 1AAuto.com and a flat blade screwdriver.
Using a flat blade screwdriver we've wrapped in electrical tape so it won't scratch the paint, we just pry out the back while pushing in the front of the side marker light. Then you just pull your socket right out. On the left is the old side marker light. On the right is the new one from 1A Auto. You can see they're identical and they're going to fit exactly the same. If you're just looking to service the bulb, you just pull the bulb out and then push the new one in. Then you just push your socket into your new side marker light, push the front end in first and just hold it down. Then push the back in. Now using your flat blade screwdriver, pry it back out just a little bit on the front, and you're all set.
We hope this video helps you out. Brought to you by www.1AAuto.com, your source for quality replacement parts and the best service on the Internet. Please feel free to call us toll-free, 888-844-3393. We're the company that's here for you on the Internet and in person.
LHT04920
In Stock
Product Reviews
Loading reviews
5.00/ 5.01
1review
5 Stars
4 Stars
3 Stars
2 Stars
1 Star
1
0
0
0
0
Michael
November 14, 2022
all good
Customer Q&A
No questions have been asked about this item.
Customer service
877-844-3393
Monday - Friday 8:00am - 9:30pm ET Saturday - Sunday 8:00am - 4:30pm ET
Enter Vehicle Year Make Model
Specify your vehicle's year, make and model to guarantee fit.
Year
Make
Model
Options
Drivetrain
This part doesn’t fit a . Select from parts that fit.