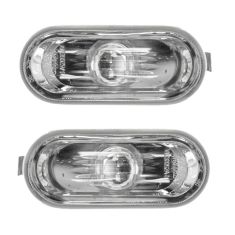
Assemblies may include halogen or incandescent test bulbs that should be replaced before installation.
Attention California Customers:
WARNING: This product can expose you to chemicals including Lead and Lead Compounds, which are known to the State of California to cause cancer, and birth defects or other reproductive harm. For more information, go to www.P65Warnings.ca.gov.
Lifetime Warranty
This item is backed by our limited lifetime warranty. In the event this item should fail due to manufacturing defects during intended use, we will replace the part free of charge. This warranty covers the cost of the part only.
FREE Shipping is standard on Orders shipped to the lower 48 States (Contiguous United States). Standard shipping charges apply to Hawaii, Alaska and US Territories. Shipping is not available to Canada.
Expedited is available on checkout to the United States, excluding Alaska, Hawaii and US Territories as well as P.O. Boxes and APO/FPO/DPO addresses. Final shipping costs are available at checkout.
How To Replace Fender Marker Light 2002-04 VW Passat
How to Replace Repeater Light 2001-09 Volkswagen Jetta Golf or Passat
Created on:
Tools used
No Tools Needed
1. Removing the Fender Marker Light
Grab hold of the fender marker and move it back and forth
Push the fender marker backwards and pry out
Disconnect the fender marker from the bulb
2. Servicing the Bulb
Pull the bulb off of the socket
Push the new bulb into the socket
3. Installing the Fender Marker Light
Push the socket into the light
Make sure the clip is pushed down in
Place the fender marker light into place
Place the front end first and then the clip side
Brought to you by 1AAuto.com, your source for quality replacement parts and the best service on the Internet.
Hi, I'm Mike from 1A Auto. I hope this how-to video helps you out, and next time you need parts for your vehicle, think of 1AAuto.com. Thanks.
On this, fender markers are pretty easy. You just grab hold of them and try to move it back and forth. You can see this one moves backwards. It might move backwards, it might move forwards, but if it moves backwards, push it backwards and then pry out.
Then this disconnects right here. You can access your bulb, they do need an orange bulb. The bulb just pulls out and pushes back in. If your original has been broken, 1A Auto, we make a nice replacement.
Plugs right in and make sure it's nice and secure. Always make sure on the new ones that this clip is pushed down in, and that's kind of out like that. Just put it right back in. Put that side in then the clip side right in.
We hope this video helps you out. Brought to you by www.1AAuto.com, your source for quality replacement parts and the best service on the Internet. Please feel free to call us toll-free, 888-844-3393. We're the company that's here for you on the Internet and in person.
Tools used
Electrical Tape
Flat Blade Screwdriver
1. Removing the Repeater Light
Wrap a flat blade screwdriver in electrical tape to avoid scratching the vehicle paint
Pry the repeater light out
Pull the bulb and socket out of the repeater light
2. Servicing the Repeater Light Bulb
Pull the bulb out of the socket
Push the new bulb into the socket
3. Installing the New Repeater Light
Push the bulb and socket into the new repeater light
Push the light in, starting at the front
Brought to you by 1AAuto.com, your source for quality replacement parts and the best service on the Internet.
Hi, I'm Don from 1A Auto. I hope this how-to video helps you out, and next time you need parts for your vehicle, think of 1AAuto.com. Thanks.
In this video, we're going to show you how to replace a repeater light on this 2004 Volkswagen Jetta, and we show you on the one on the passenger's side, but the driver's side is the same procedure. The items you'll need are a new repeater light from 1AAuto.com and a flat blade screwdriver.
Using a flat blade screwdriver we wrapped in electrical tape so it won't scratch the paint, we just pry up on the side of your repeater light, and then just pull your socket out. To replace the bulb, you just pull it out, and push your new one in.
On the left is the old repeater light. On the right is the new one from 1AAuto. You can see they're identical, and they'll fit exactly the same. Push the socket into your new repeater light. Then push the front end of the repeater light in first, and then the back end. You're all set.
We hope this video helps you out. Brought to you by www.1AAuto.com, your source for quality replacement parts and the best service on the Internet. Please feel free to call us toll-free, 888-844-3393. We're the company that's here for you on the Internet and in person.
1ALPP00407
In Stock
Product Reviews
Loading reviews
4.20/ 5.05
5 reviews
5 Stars
4 Stars
3 Stars
2 Stars
1 Star
4
0
0
0
1
These did not work on my 2005 VW Golf.
Robert
February 3, 2017
The outside shape and appearance was a perfect match to the OEM repeater lights that came with my Golf. The problem was that the metal clip that retained the light unit in the fender opening was to short. The OEM clip goes almost to the base flange to firmly retain the light. On these lights, the clip is about 3/16" away and will not hold the light tight. Bending the clip would not have worked as it would have still not have came close to the flange and it would not have the springy propery to work correctly. 1A auto refunded my money. Excellent company to deal with.
'01 Passat Repeater Light
Jakob
February 27, 2017
It's great, thanks! I appreciate the care when sending, and the fast shipping!
O
August 26, 2020
Excellent service,Ill keep buying from you guys
Alan
June 7, 2023
The part was an excellent fit, the video instructions were great it took about 10 minutes to complete. An auto place here said I should take it to a body shop. Definitely did not need to do that. Tanks for the help!