Replaces
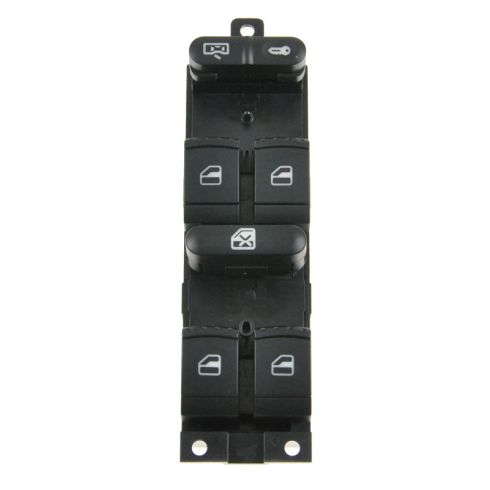
2006 VW Golf 4 Door Front Driver Side Power Window Switch DIY Solutions BSS00424


BSS00424
This part doesn’t fit a . Select from parts that fit.
Specify your vehicle's year, make and model to guarantee fit.
This part does not fit a .
Buy in the next and
Get it by: Tuesday, Dec 16 with expedited shipping
Recommended for your 2006 Volkswagen Golf
Frequently bought together
Specify your vehicle's year, make and model to guarantee fit.
This part does not fit a .
Complete Repair in One Purchase - Stop searching for parts individually and complete your repair with a customized kit or set from DIY Solutions.
High-Quality Parts from Trusted Brands - DIY Solutions' kits and sets are selected from the best automotive brands and include hard-to-find and even obsolete parts you may need for your vehicle.
Guaranteed Fit - DIY Solutions ensures its selected parts are quality-tested to guarantee fit and function.
Attention California Customers:
![]() WARNING: Cancer and Reproductive Harm - www.P65Warnings.ca.gov.
WARNING: Cancer and Reproductive Harm - www.P65Warnings.ca.gov.
Lifetime Warranty
This item is backed by our limited lifetime warranty. In the event that this item should fail due to manufacturing defects during intended use, we will replace the part free of charge. This warranty covers the cost of the part only.
FREE Shipping is standard on Orders shipped to the lower 48 States (Contiguous United States). Standard shipping charges apply to Hawaii, Alaska and US Territories. Shipping is not available to Canada.
Expedited is available on checkout to the United States, excluding Alaska, Hawaii and US Territories as well as P.O. Boxes and APO/FPO/DPO addresses. Final shipping costs are available at checkout.


Created on:
Tools used
- Pry out the panel inside the door pull with a flat blade screwdriver Pry the switch master window switch panel out with a flat blade screwdriver Pull off the switch panel Disconnect the window switch wiring harness
- Remove the three Phillips head Screws from the window switch Pull the switch out of the switch panel
- Push the new window switch into the switch panel Start the three Phillips screws into the window switch Insert the three Phillips screws into the window switch
- Connect the wiring harness to the new window switch Push the switch panel into place Push in the switch panel clips Push the door pull panel in
Brought to you by 1AAuto.com, your source for quality replacement parts and the best service on the Internet.
Hi, I'm Mike from 1A Auto. I hope this how-to video helps you out, and next time you need parts for your vehicle, think of 1AAuto.com. Thanks.
In this video,we're going to show you how to replace the master window switch. Now, this is the driver's side window switch. Sometimes this can go bad. Water can get on it and short it out. One indicator is that the windows will not work from their own positions but they do work from the master window switch. Obviously, you check to make sure that you don't have the window lock button activated. The only tools you will need are a flat-blade screwdriver, and a Phillip screwdriver. This is the same for a '98 to '01 Jetta, the '01- to '05s may be a little different as far as taking the switch panel out.
You want to start by using a screwdriver. There is a little inner panel on your door pull and you pry that out right in the middle then take it out carefully. Now, use your flat blade screwdriver and pry in the back. There are clips all round the edge of that panel, so you just pull it up. It takes a firm pull, but it comes right out. Then, on the bottom side there is a connector, just press a tab and pull the connector free.
Now, we turn it over. On the back there are three screws that hold the switch in. I'll remove those. Then, we'll speed it up here as I take those out. Then quite simply, once those are out, the switch just pulls right out of that panel and a new switch from 1A Auto fits, right out of the box.
It's going to go in reinstall with the same three screws and plug in just like the original. Put it back in. Start that first screw that's easy to get to first. I always start my screws first. Start the other ones by putting the screws on the screwdriver and turning them upside down, then tighten them up nice and firm.
Once you have them tight, plug your panel back in or your switch back in and put the panel in place. Make sure you press it down well into all those clips. Make sure they set, then put your inner panel back on.
We hope this video helps you out. Brought to you by www.1AAuto.com, your source for quality replacement parts and the best service on the Internet. Please feel free to call us toll-free, 888-844-3393. We're the company that's here for you on the Internet and in person.
Tools used
- Pry off the trim piece inside the door pull by hand Pull the switch panel up by hand Disconnect the window switch harness
- Remove the Phillips screws from the panel Remove the switch Insert the switch Insert and tighten the Phillips screws onto the panel
- Connect the window switch harness Push in the switch panel Clip the trim piece inside the door pull
Brought to you by 1AAuto.com, your source for quality replacement parts and the best service on the Internet.
Hi, I'm Mike from 1A Auto. I hope this how-to video helps you out, and next time you need parts for your vehicle, think of 1AAuto.com. Thanks.
In this video, we show you how to replace the master window switch on this 2003 Volkswagen Passat. It's a pretty easy replacement. These will get shorted out a lot if they get wet. The only tool you'll need is a Phillip's screwdriver.
On this door pull, right back here, there's a piece. You kind of squeeze it and pull it back and out. Now you just grab this and firmly try to work your fingernails under and pull it up. Then disconnect your window switch right here.
Now, pretty easily, there are three Phillips screws that hold the switch onto the bezel. I'll just fast-forward here as I remove those three screws. Then, switch your covers out.
The new switch from 1A Auto goes right in the same way. Take my three screws I'll start all three first. These two back ones, I just kind of put down into the hole first, get them in place, then use my screwdriver to get them straight and then in.
Reconnect the switch, put it in place, and snap it down. Then we'll put the locking bezel back in place.
We hope this video helps you out. Brought to you by www.1AAuto.com, your source for quality replacement parts and the best service on the Internet. Please feel free to call us toll-free, 888-844-3393. We're the company that's here for you on the Internet and in person.
Tools used
- Pry off the door pull cover with a flat blade screwdriver Remove the two Phillips Head Screws inside the door pull Remove the two T20 Torx bolts from the bottom of the door panel Pry off the door panel by hand Lift the door panel up off the windowsill Disconnect the wiring harnesses from the door panel Unclip the door latch cable with a flat blade screwdriver Pull off the door latch cable
- Press on the power window switch from the front of the door panel Pry the switch tabs with a flat blade screwdriver Pull the switch out of the door panel
- Push the new power window switch into the door panel from the back side
- Connect the wiring harnesses Clip the latch cable onto the door handle Slide on the latch cable clip Lift the door panel onto the window sill Push in the door panel clips Insert the two Phillips screws into the door pull Insert the two T20 Torx bolts into the bottom of the door panel Push on the door pull cover by hand
Brought to you by 1AAuto.com, your source for quality replacement parts and the best service on the Internet.
Hi, I'm Don from 1A Auto. I hope this how-to video helps you out, and next time you need parts for your vehicle, think of 1AAuto.com. Thanks.
In this video, we're going to show you how to replace a power window switch on this 2004 Volkswagen Jetta. We show you on the rear passenger side door but it's the same part and similar process for the front passenger door and the rear driver's side door. The items that you'll need for this are a new power window switch from 1AAuto.com, a Phillips screwdriver, a flat blade screwdriver, and a T20 Torx driver.
Carefully pry off your pull handle cover with a flat blade screwdriver. Then you want to remove this Phillips screw and this Phillips screw right here. And we'll just fast forward as Don removes those. Then you want to remove this T20 screw and this T20 screw. We'll fast forward as Don removes those. Now, pry out on the door panel to release the clips. Then, lift it up and out of the window sill and pull it back. Then you want to disconnect these two harnesses right here by just pushing on the tabs and pulling them free. Then, you want to pry back on this clip that's on your door handle cable. Once it's out of the bracket, just unhook the door handle cable and you door panel is free.
Flip your door panel over and apply pressure to the switch while prying out the tabs on the side and it will pop out.
Now on the left is the old power switch. On the right is the new one from 1A Auto. You can see that they're very similar and they'll fit exactly the same. Take your new power switch and just push it into place.
Now to reattach your door panel, you just want to connect these two harnesses. And then re-hook your door handle cable into place and slide that clip forward. Put your lock rod back through your door panel and then put the door panel back into the window sill. And once it's fully into place in the window sill, just hit around the edges to reactivate those clips. Now we'll fast forward as Don replaces those two Phillips screws in the door handle and the two T20 screws along the bottom of the door panel. Now just push your door handle cover back into place and you're all set.
We hope this video helps you out. Brought to you by www.1AAuto.com, your source for quality replacement parts and the best service on the Internet. Please feel free to call us toll-free, 888-844-3393. We're the company that's here for you on the Internet and in person.
Tools used
- If you are replacing the rear window switch, see the 2001 Passat rear door panel video for more detailed instructions Pry off the door pull trim with a flat blade screwdriver Remove two Phillips head screws from inside the door panel Remove the two T25 Torx screws from the bottom of the door panel Pry the door panel off using a door panel clip tool or a putty knife Pull the door panel up and off Pull the door latch cable out of the door handle Disconnect the door lock wiring harness Disconnect the window switch wiring harness Disconnect the courtesy light wiring harness
- Pry out the window switch with a flat blade screwdriver from the back side of the door panel
- Push the new window switch into the door panel
- Reattach any trim or insulation pieces that fell off the door panel Connect the courtesy light wiring harness Connect the door lock wiring harness Connect the window switch wiring harness Clip the latch cable to the door handle Push the latch cable into its grooves Lift the door panel into place Push in the door panel clips Insert the two Phillips screws into the door pull Insert the two T25 screws into the bottom of the door panel Push on the door pull trim piece
Brought to you by 1AAuto.com, your source for quality replacement parts and the best service on the Internet.
Hi, I'm Mike from 1A Auto. I hope this how-to video helps you out, and next time you need parts for your vehicle, think of 1AAuto.com. Thanks.
In this video, we're going to show you how to replace the power window switch. This switch is the same for the passenger front as well as both rear doors. We're going to show you the passenger's front door. The rear doors are the same. You just need to check out our video for a rear door panel removal and installation. Tools are the same as for door panel removal: flat blade screwdriver, Phillips screwdriver, T25 Torx driver, and a door panel clip tool or a putty knife.
Start by going right up underneath here and prying it out. That pushes out on this panel, here. Pull that off. Now inside there, there are two Phillips screws. Then down at the bottom of the panel, there are two T25 screws: one there near the light and one a little further back. Speed it up here as I take those screws out. The top screws, they'll generally stay in there then fall out as you pull the panel off. The other alternative is if you have a magnet you can pull them out with a magnet. Now you'll want to use a door panel clip tool. What you do, is put this in here and slide it up until you feel yourself come to a clip. Then insert it around the clip, and pull it until it releases the clip. Do that again. Repeat for all the clips. If you don't have a tool like that, you can use a household putty knife. Do the same thing. You just come up to the clip, right next to it and pull. That came out from the speaker. It's just the insulator for the speaker. Once you've got the clips undone, then you just lift that up. Make sure you collect those screws as they come out of that panel. Lift it up and out. Pull this out. You should have to pull out on the little tab and pull your cable backwards, and then out. Then take the hook out of that handle there. There's a couple of harnesses here. They just have little tabs. Squeeze the tabs. Pull down, and then do the same thing for your light. The light has just a couple clips that hold it on. It pulls off. Again, make sure you collect your screws as they fall out. The door panel's off.
To get the power window switch out, take a small screwdriver and carefully pry out on the side here. The switch comes out.
The new one reinstalls the same way. Push it and it'll fit back into place.
Before we put the door panel back on . we saw this fall off as I was taking it out. This goes back in place. Lock it on. First, we put the light back in. Bring it up. Plug our window and lock switches back in. To put this back together, bring it back. Put the hook in. Then you need to bring this back. Get the wire in the grooves. Then slide this forward. Put the panel towards the door. Now make sure your lock button, here, comes up through. Push your panel on and down. Then lock the clips back in place. Reinstall your two Phillips screws. Just speed it up here as we tighten those two Phillips screws. Tighten them in there nice and snug. Then put the two T25 screws in the bottom as well. Put this back into place.
We hope this video helps you out. Brought to you by www.1AAuto.com, your source for quality replacement parts and the best service on the Internet. Please feel free to call us toll-free, 888-844-3393. We're the company that's here for you on the Internet and in person.
Tools used
- Pry off the panel inside the door pull with a flat blade screwdriver Pull the switch panel up and off Disconnect the window switch wiring harness from the switch pack
- Remove the three Phillips screws that connect the switch pack to the switch panel Push the new switch pack into the switch panel Insert the three Phillips screws into the switch pack
- Connect the window switch wiring harness to the switch pack Push the switch panel into place Push the door pull panel into place
Brought to you by 1AAuto.com, your source for quality replacement parts and the best service on the Internet.
Hi, I'm Don from 1A Auto. I hope this how-to video helps you out, and next time you need parts for your vehicle, think of 1AAuto.com. Thanks.
In this video we're going to show you how to replace the driver's side switch pack on the 2004 Volkswagen Jetta. It's the same part and process on these Jettas from 1999 to 2005. The items you'll need are a new switch pack from 1AAuto.com, a flat blade screwdriver and a Phillips screwdriver. Start off by prying off this back panel right here on the back of your pull handle. Once that's pulled off, you can just lift up on your switch panel and then push the tab on your harness and pull it free.
Now on the back of your switch panel you'll see three Phillips' screws holding your switch back in. We'll fast forward as Don removes these. Now your switch pack lifts up and out. On the left is the old switch pack. On the right is the new one from 1A Auto. You can see they're identical and they're going to fit exactly the same. Push your new switch pack into place and then replace those three Phillips' screws. We'll fast forward as Don replaces those and tightens them up.
Now reconnect your harness and then push your switch panel directly down into place. Then lock it into place by pushing this panel in. You want to line it up and push it firmly in. Then you're all set.
We hope this video helps you out. Brought to you by www.1AAuto.com, your source for quality replacement parts and the best service on the Internet. Please feel free to call us toll-free, 888-844-3393. We're the company that's here for you on the Internet and in person.
BSS00424
877-844-3393
Monday - Friday 8:00am - 9:30pm ET
Saturday - Sunday 8:00am - 4:30pm ET
Specify your vehicle's year, make and model to guarantee fit.
This part does not fit a .


