Brought to you by 1AAuto.com, your source for quality replacement parts and the best service on the Internet.
Hi, I'm Mike from 1A Auto. I hope this how-to video helps you out, and next time you need parts for your vehicle, think of 1AAuto.com. Thanks.
In this video, we're going to be working with our 2008 Dodge Ram 1500 Hemi. We're going to show you how to remove the transmission pan. If you like this information, please click subscribe. We have a ton more information on this vehicle, as well as many other makes and models.
If you want this part for your vehicle, you can find it in the description at 1AAuto.com.
Here are the items you'll need for this repair include a 8mm socket, ratchet, socket extension, T25 Torx bit, drain pan, razor blade or scraper, rags or paper towels, brake cleaner, gasket maker, gloves, safety glasses, transmission fluid, transmission fluid funnel, torque wrench, jack and jack stands
Before performing any type of transmission service, maintenance, or repair, you'll have to check the condition of your automatic transmission fluid. What we are looking for here is a nice, clean, red and clear fluid. If the fluid has any kind of muskiness, brown, or black discoloration, or if you actually put it on your fingers and feel a gritty type of feeling or smell burnt fluid, that's an indication that the clutch material is failing in your transmission. Removing this fluid can cause you to remove what friction remains inside of that fluid. This can cause the transmission to slip and fail completely. Mildly dark or discolored fluid with just a little bit of grit is acceptable. You are going to want to use your best judgment, and if you are not sure, don't touch the transmission or any of its fluids.
Raise and support your vehicle, and place the drain bucket under the front half of the transmission pan. We are going to be removing the eight millimeter bolts from this side, forward, around the front, and to about the same spot on the opposite side. We'll remove those entirely, and then slowly loosen the rear most bolts to make the front of the pan hang down and drain the fluid. We are going to use an eight-millimeter socket ratchet and extension.
Remove all the forward most bolts on the pan. Once your pan has started draining, loosen the rear screws some more to allow it to hang further and drain more fluid. We'll repeat this process as necessary until the pan has finished draining.
Now that our pan is hanging pretty much all the way down, we'll finish removing the hardware. You are going to want to support the bottom of the pan with your other hand while you remove the last bolt; this way it doesn't fall out. Be prepared, because there is still some transmission fluid in there. This does still have a little bit of weight to it.
Now, we'll carefully lower the pan down. We are going to have to set it all the way down in order to clear the sump filter that's in here, and we'll lay it into our drain bucket, and finish pouring it out. You'll leave the drain bucket underneath the transmission, as it's still going to drip from all the wet surfaces inside the actual transmission. Now that the pan has been removed, we can access this T25 Torx bolt at the back of our transmission sump filter, which is located right here. We'll remove this bolt, and carefully pull down on the front to release the pick up tube from the transmission.
Our truck has a custom exhaust that makes it a little difficult to get at this bolt, so you may have to get creative with a shallow T25, or perhaps an Allen key style to make sure you can get in there to remove it without risking stripping out the bolt. Once that bolt's out, we'll grab both ends of our sump filter evenly, and wiggle the pick up tube out of the transmission. See why we keep the drain bucket under there when we are working inside the transmission.
Be sure that this feed tube has the beveled part seeded into the gasket with the O-ring inside of the transmission just between the valve body, and oil cooler filter.
Reinstall the screw into the back of the filter. Now, we can't get a Torx wrench in because of our aftermarket exhaust, but if you have access to yours, you'll want to Torx this to 40 inch-pounds.
Once you've removed your pan, you're going to want to check this magnet at the bottom of the pan. You can see that ours is pretty clean. What this is designed for—you can actually see just a little bit of it here—is that metallic that gets stuck to the magnet. That's to alert you to any metal components wearing down and creating metal shavings in the fluid. If you check your magnet, and it's got really heavy build up on it, you're going to want to start looking seriously at the condition of your transmission itself if you are having any concerns. Our looks pretty good, so we'll go ahead and wipe down the rest of the pan.
Use a razor blade to scrape off this gasket material so we have a nice clean pan to reseal and reinstall onto our vehicle. We are just going to take a clean paper towel. You can also use a clean rag. You just don't want to use anything oily that will contaminate the new fluids that going to go into our transmission. You don't have to go crazy here because it is just transmission fluid going back in, but we want to make sure we have the cleanest start we can. There's all the heavy build up out. Now we'll take a razor blade, and scrape off all this old gasket material. You can also use a scrapper or a brass wire wheel/brush is all good at taking this off without removing the paint. But with just basic household supplies, we can get away with doing this with just a razor blade.
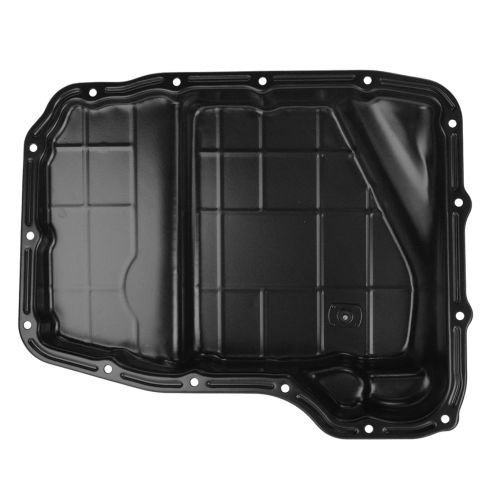
Make sure you get all that build up off because our new coat of gasket material will not stick to the old stuff. We are actually going to be installing a new pan from 1AAuto.com when we do our fluid change—not because there's anything wrong with this pan, but because our new pan has a drain plug in it, which will make this process easier in the future. This is an awesome feature to have, because the next time we do this fluid change—and you should be doing these fairly regularly depending on your manufacturer's specifications—it's going to be that much easier for us to remove the drain plug and allow the fluid to run out as opposed try and unbolt it.
You can allow it to hang down, which creates a mess, and a much larger flow than we are going to get out of that drain plug. It also, has a little magnet at the bottom so you can simply check that for your metal shavings like we told about earlier. However, if you don't need to upgrade your pan, or don't want to, you can use the same steps we are going to use to reseal, and reinstall this one on your old pan. If you are re-installing your old pan, after you finish scrapping off all your gasket material, and ours is pretty close, we'll reinstall our magnet, spray some break cleaner onto a paper towel, and wipe the surface of the pan free of any oil or debris to make sure that our gasket material stays on there.
We'll also wipe down the contact surface on our transmission the same way. Make sure that you don't leave any pieces of paper towel or other fibers inside of the transmission, as those can get contaminated into the fluid and sucked up into the pump. You may have the toothpaste tube style gasket sealer. Ours is actually in a pressurized can. It makes it a little easier to spread out and spread evenly. We'll lay the beat across go right across the bolt holes. This is actually a little bit thicker than we'd like so, we'll go a little bit faster to spread that out. The key here is not to have a ton of excess gasket, as anything that runs over the sides on the outside when we crush this down is going to go into the pan the same way. This means that we could have this material contaminating our fluids as well as getting sucked up into the pump or the filter and creating a blockage.
Once it's laid on, we'll just spread it out. I see we've gone a little too thick here. Once we spread, it out, we'll wipe the excess off with a clean paper towel. This stuff is time sensitive so make sure you check the cure time on your particular gasket maker to ensure that you have sufficient time to spread this out, clear the bolt holes, and get it installed onto the transmission. Once it's all spread out evenly, we'll take that clean paper towel, wipe down the inside edge, and the outside as well.
Double check that the gasket surface on your transmission is clear, and install the pan. Line up the pan, being careful not to touch anything inside of the pan or anything that's going to contaminate that gasket maker. We've started a bolt onto the end of our eight millimeter socket. We are going to use that to start all of our hardware. Be sure that you have all the hardware started and down hand tight before you start cranking it down with a ratchet or a torque wrench. Check if the particular gasket maker you are using has a cure time. Ours is about 15 minutes, so we've installed all our bolts finger tight. We'll allow that gasket to cure for 15 minutes, and then go around, and torque all of our transmission pan bolts.
Now that we've given our gasket sealer some time to cure, we are going to torque all of the bolts. You want to try to skip a couple of bolts as you go around or go from one side to the other, kind of in a cross pattern, like you would in a tire to make sure that you don't tighten down one side of the pan before the other. Torque the bolts to 105-inch pounds, which you could see I'm skipping every other bolt here to make sure that we go around evenly. It just happens to work out that we would have hit the same bolt we started on there. We'll go over one bolt, and make another pass around on every other bolt.
Your dipstick for the transmission is located on the passenger side over here. Remove the dipstick using a transmission funnel; what’s special about this is that it's got a long skinny end on it so it fits into the dipstick tube, which is actually how you fill the majority of automatic transmissions. We'll install that into the dipstick tube, and add ATF plus four transmission fluid. It says it should take about 6 1/2 quarts after a drain and fill, so we'll add four and see where we are at.
In order to check your transmission fluid properly, you'll have to start to get the vehicle, let it get up to operating temperature, with the engine running, and the transmission in park, clear your dip stick, reinstall, and check your fluid level.
Ensure that the fluid level is between the cold and hot marks, depending on the temperature. We've just gotten our vehicle running and up top reading temp. We are just above the cold mark. That's fine.
After running the vehicle for a while, driving around, and letting the transmission get up to temp, it should be up to the hot side. Your levels are all right. Reinstall the dipstick, and you are good to go.
Thanks for tuning in. We hope this video helped you out. Next time you need parts for your car, please visit 1AAuto.com. Also check out our other helpful how-to and diagnosis videos.